
Is your favorite t-shirt too small for you now? You can make it bigger! Here’s how to expand a shirt to a larger size.

Hey y’all, today I’m going to show you how to make a shirt bigger. I’ve written in the past about how to make a t-shirt smaller, but what if you want to go in the opposite direction? Maybe your size has changed but your favorite tshirt is still your favorite, just more snug than you’d prefer. Well, today’s tutorial will show you how to add width at the side seams to make your favorite shirt larger.
Here are some before and after images of this top. The original t-shirt is at left and my altered version is on the right. I liked the graphic on it (it says Queen of the Pool, and you know I love lounging by the pool), and I liked the way the shoulders/sleeves fit on me. But I wanted just a little more room in the hips. It’s subtle in pictures, but I can definitely feel the change when I’m wearing it.

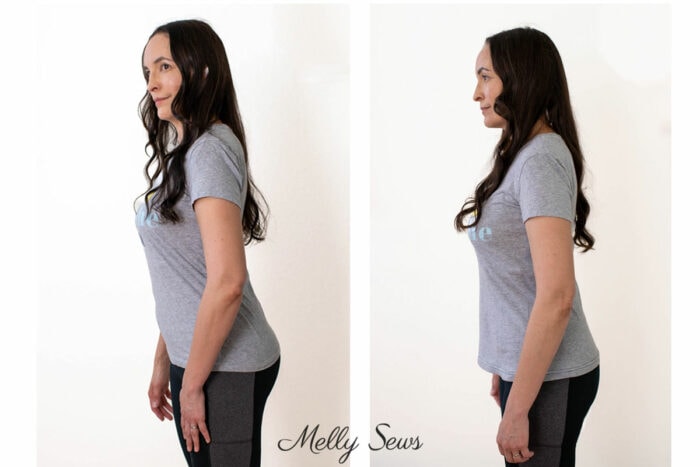
The side view of might be a more clear before and after of the width I added to the hem. Now instead of clinging to my belly, the fabric hangs a little away from my body. And while I am showing this technique on a t-shirt, you can use the same principles on shirts of any style. That’s important because some tutorials are basically just instructions on how to stretch out your cotton shirt, but that doesn’t help at all if you need to increase the size of a dress shirt or if you’re dealing with fibers that recover from stretching, like spandex.
Materials to Make a Shirt Bigger
So if you need to increase the size of your button down or any other top, here are the materials you need:
- Fabric. You can use either matching fabric or contrast fabric. Obviously if you use contrast fabric the alteration is going to be more apparent, but you can also make that a design detail. I’ve seen this done with lace, for example. In my sample for this post I used matching fabric. In fact, I shopped the t-shirt section at the thrift store to find the closest possible match. Gray weathered fabric comes in a surprising variety if you look closely at all the garments on the rack. You can also head to the fabric store to find fabric to use.
- Seam ripper in case you need to unpick the hem
- Sewing machine capable of doing a zig zag or other stretch stitch. You could possibly hand sew this, but it would be very difficult to make it look nice on the outside and I would only recommend that in an emergency or if you are wearing the shirt under a jacket or blazer.
- Basic sewing notions – scissors, needle, thread, etc.
I’ve made a video that you can watch below or on YouTube here to show the sewing techniques I used. Bonus – I also show how to fix the twisted side seams this thrift store find had. I’m counting this as a thrift flip because without this alteration the tee would have gone right back in the thrift donation pile.
Tutorial to Increase a T-shirt Size
Written DIY Instructions
If you prefer written instructions to video, here’s how to sew it.
Time needed: 1 hour
How to Make a Shirt Bigger
- Determine how much total width you need to add
Measure the too-small garment and decide how much bigger it needs to be. It can be helpful to compare it to another similar item of clothing. For example, if it’s an old button-down shirt that is too small, compare it to a new dress shirt that does fit. It can be helpful to lay the tops on a flat surface to compare them with the wrong size one on top so you can see how much wider the correct size is. Also pay attention to whether you need to add a wedge shape (for more room in the hips and belly only) or a side panel that increases width all the way up (for more room all the way up to the chest or bust).
- Divide the total additional width needed by 2
In my example shirt I needed a total of 6 inches of width added once I had cut the twisted part out of my tee. So 6/2 = 3 and that’s how much finished width I needed to add to each side of my shirt.
- Cut the side seams open or unpick them with a seam ripper.
I strongly recommend using a seam ripper if your garment is made from woven (non stretch) fabric. That way you still have seam allowances to work with. This is not as essential on a stretch fabric like t-shirt material. If you need help with unpicking serger seams, see this post. Unless your sleeves are very short, as they were on my t-shirt, or very tight, you don’t need to unpick or cut past the underarm seam.
- Unpick the hem
For the best looking results, unpick the hem of your garment. You’ll re-hem after adding your fabric panels.
- Measure the length of the side seam
Measure how long you need your wedge or side panel to be
- Draw your pattern and cut your fabric
Draw a piece the length and width you need to add to the garment. In my sample, I started with a center line the length of my side seam, then made a 3 inch wide line centered at the bottom and tapered to nothing at the top. Add seam allowances all around. If you cut your side seams on a woven shirt you need to double the side seam width added to your new piece to account for no longer having seam allowances. Do the same if your t-shirt was really tight. Cut this out of your side panel fabric.
- Sew the side panels.
Insert fabric right sides together with one side seam. Match the raw edges and sew. Remember not to use a straight stitch on stretch fabric; here are some stretch stitch options instead. Repeat with the other side of your panel and the corresponding side seam, and then on the other side of the shirt.
- Re-hem your garment
Press a new hem around the bottom edge of your blouse, t-shirt, or button-down. Hem stitch, then enjoy your new shirt!
Judith Spencer
Thank you for the instructions to fix t-shirts.
Karen L
I really appreciate the time you took to put this video together! I watched it on my iPad last night — for some reason I can’t comment on videos when I watch them on the iPad — have to get my “tech” (more commonly known as my Son, Brian) to figure that out for me 🙂 I’m so thankful he is a computer whiz — I don’t think I would manage without his help! Anyway, I got some really good ideas from your video. I am one of those people who are carrying some extra “Covid” pounds — they don’t just fall off like they used to 🙁 Anyway, I have several favourite t-shirts that I am not prepared to part with and now I can make them fit to wear in public 🙂 Thanks again for your creative solutions!