
Which stitch is best for sewing jersey knits? Here you’ll learn how to sew stretch fabrics on a regular sewing machine.
Hey y’all, continuing with the month of sewing knits, today we’re going to talk about different sewing stitches for knits. While you may have heard of types of stitches like a basting stitch, running stitch, blanket stitch, etc. But what we’re focusing on today are stitches that stretch. The simplest example of a stretch stitch is a zig zag stitch.
Stretchy fabrics seem to scare people new to sewing, and I’ve seen new sewists avoid knit fabrics even though they love to wear them. So let me reassure you that even beginners can work with knit fabrics using the tips in this series. Keep reading and watching, and soon you’ll be sewing your own knit garments.
Sewing Stretch Fabric 101
For those that are beginners to sewing knits, two main tips for success are to use a stretch stitch and a stretch needle. The reason you need a special stitch to sew knit fabric is because knit fabric stretches. Which means you need a stitch that stretches.
If you use a straight stitch the fabric will stretch and the stitch won’t, which means popped stitches. That is an experience I’ve had personally. So I thought that if I stretched the fabric as I sewed, I could use a straight stitch without my stitches popping. While that works to keep your stitches from breaking, it can also make your fabric stay stretched out and wavy.
The next idea I often see floated is to use a thread that stretches, like an elastic thread. It’s a logical thought. While this can also work, it can be hard to control the amount of stretch the machine’s tension dials add to the thread, especially in the bobbin thread. Which can result in seams that get gathered without you meaning to. It’s the opposite problem from stretching the fabric as you sew.
So if stretchy thread or stretching your fabric as you sew aren’t great solutions, what should you do instead? The answer is to instead use a stitch with side to side or back and forth motion. Types of stitches with motion besides straight ahead leave room to stretch.
Now that we know to use a stretch stitch, what kind of stitch stretches? And do you need a special machine to make it? The answers to those questions are the subject of the video below, where I demonstrate several stitches. If the video won’t load, you can also watch it on YouTube here. And if you’re not a video person, I’ve got a discussion of the stitches below.
Stretch Percentage and Recovery
Before we get into a discussion of how to sew knit fabrics, we need to talk about stretch percentage. Stretch percentage means the amount a given knit fabric can stretch before it severely distorts. So for example, below I have a 10 inch strip of knit that I can stretch to 14 inches before it starts getting really distorted. Those 4 extra inches divided by 10 (the total starting length) means that this fabric has 40% stretch. Now that we know this, we’ll be better able to compare the stretchiness of stitch types.

Recovery simply means how well/whether the fabric snaps back to its original shape. As you can see above, this fabric (a 95% cotton 5% spandex knit jersey) also has good recovery. For more about different types of knit fabrics, see this post.
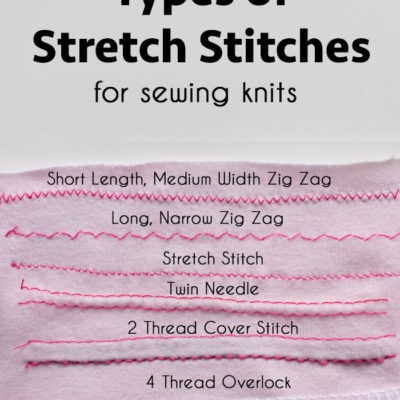
Basic Types of Stitches That Stretch
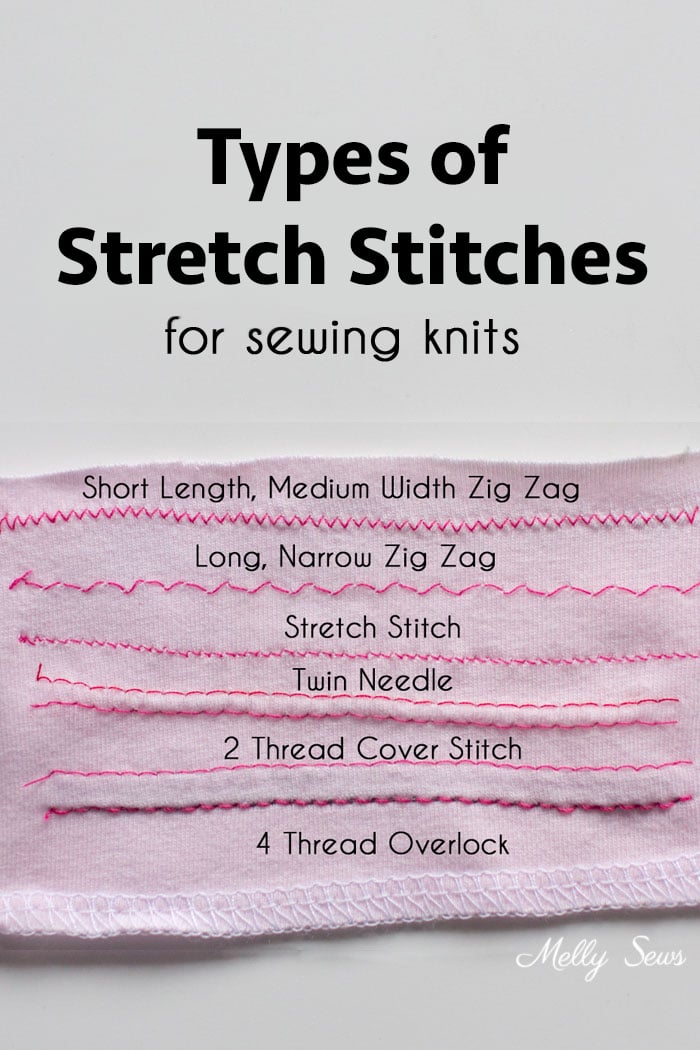
Now let’s take a look at some sewing machine stitches that stretch. The common stitches that a modern sewing machine might include are zigzag, stretch or lightning bolt stitch, triple stitch, and twin needle stitch. Machines with many stitch choices might even have a stretch buttonhole stitch and a stretch blind hem stitch. Your machine manual will be helpful in determining which of these stitches you can do with your sewing machine, as we won’t cover every possible stretch stitch in this post. With other types of machines, you can also do a cover stitch, a chain stitch, and an overcast or overlock stitch.
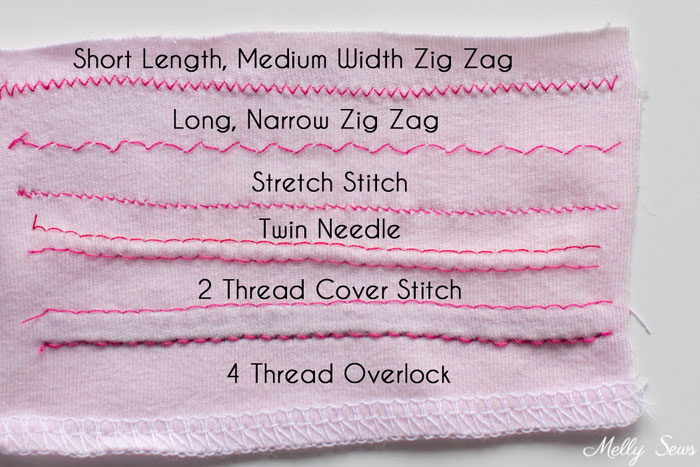
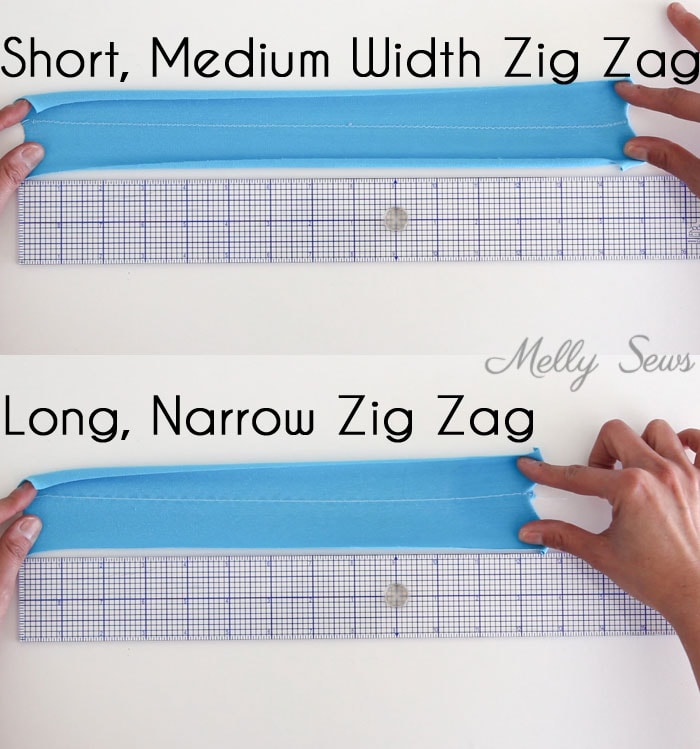
Note that you don’t need a special machine to sew knits. You can do it with your regular sewing machine as long as it can do a zig-zag stitch. The side to side motion of a zig zag means that it is a stitch that can stretch. In the video above, I compare the default zig-zag on my machine, which has a stitch length of 1.4 mm and a stitch width of 2.5mm, with a longer and more narrow zigzag stitch (3.5mm and 1.5mm). The first stitch is the stretchier of the two zigzag stitches, because the more back and forth the needle does, the more the thread has room to stretch. The pieces of fabric in all the images below at the same length. The difference between them is the amount of stretch the different types of stitches can do.
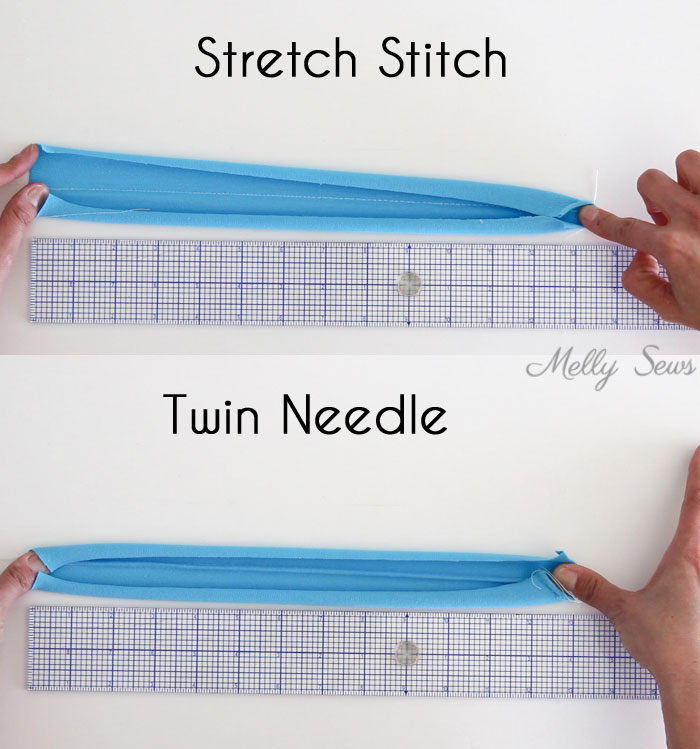
Some machines, mine included, also have a specific stretch stitch. It looks like a lightning bolt, and it works kind of like a zig-zag, except the needle goes back a little bit to overlap the previous stitch. This means that the stretch stitch can look more like a straight line. You might see this stitch called a lightning stitch.
If your machine does both a zig-zag and a stretch stitch, I advise you to play with both of them. The zig-zag is often faster to sew, but it can look more “home-ec project” than a stretch stitch, which looks closer to store bought finishes. On the other hand, the stretch stitch is harder to seam rip than a long, narrow zig-zag stitch.
Some machines also do a triple stitch. A triple stitch can look like thick topstitching and is similar to a backstitch in hand sewing. It places three stitches side by side next to each other before advancing forward. And in my experience this is the hardest type of stitch to use and the one most likely to make a hole in your fabric. Just because of the high number of stitches in a small area, it has the potential to pull your fabric into the throat plate. It’s also very hard to seam rip because of the high number of stitches. Proceed with caution if you decide to use a triple stitch.
Another stretch stitch you can do on a regular machine is a twin needle stitch. And instead of a long discussion of that, I actually have an entire post about twin needle stitching here.
The best way to figure out the best stretch stitch for your project is to use scrap fabric from your project and experiment with it.
Using an Overlocker or Cover Stitch Machine
While you can sew knits with a regular sewing machine, I’m not going to pretend that specialty machines aren’t useful. These machines make types of stitches that stretch just by the nature of how they form stitches. Which means that both a serger (also know as an overlocker) and cover stitch machines can be very handy for stretch sewing. In fact I serge seams on the vast majority of my knit sewing.
This section will briefly cover what both of these machines do, but if you’d like a more comprehensive look check out this post on sergers and this post on the cover stitch machine.
As a side note, you can get an overcasting presser foot to simulate on a regular sewing machine the overlock stitch that a serger does. It’s an OK option, but as it only uses 2 threads instead of the 3-4 that a serger uses, it’s not quite the same as the types of stitches a serger or cover stitch machine can make.
An overlock stitch has thread looped around the edge of the fabric. The machine also trims your seam allowances, so a serger is useful for woven fabrics as well to finish seams. Because of these loops, the stitch is very stretchy. However, because a serger cuts the edge of the fabric, it can only be used on seams, not for topstitching. So it’s not useful for hemming. (Unless you’re doing a flatlock stitch, which is another discussion and not always the sturdiest stitch).
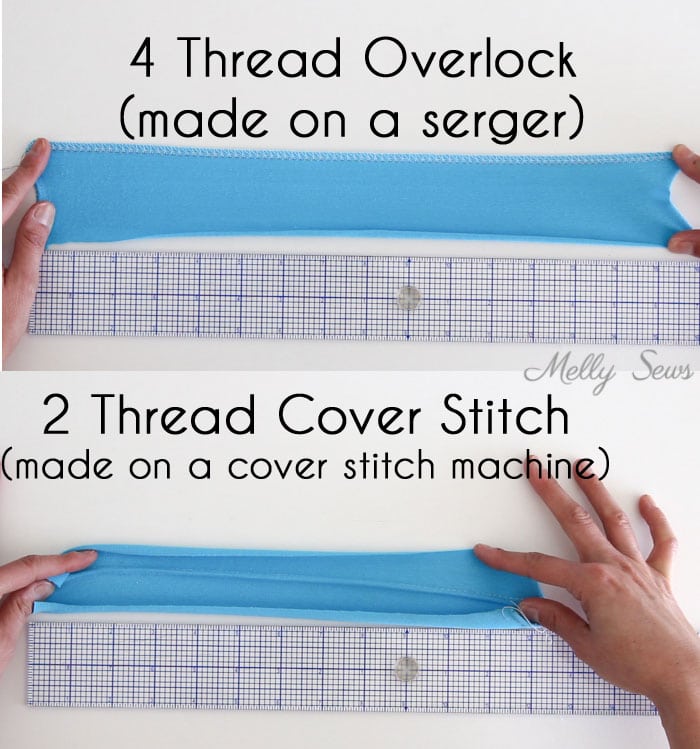
Hemming is where a cover stitch machine shines. Some sergers even convert to cover stitching. On the right side of the fabric, it does what looks like a straight stitch. But instead of a bobbin it has a looper for the wrong side of the fabric. Which again makes the stitch super stretchy. And it doesn’t cut the fabric, so it can be used for hemming and topstitching. A twin needle stitch can get close. However, it’s not as stretchy as a cover stitch, which is why most ready to wear knits are finished on a cover stitch machine.
Most cover stitch machines can even do a chain stitch. A chain stitch looks like a regular straight stitch on the right side, but has a series of loops on the back of the fabric. This kind of stitch, when properly secured, is both stretchy and strong. This is also the type of stitch that used to be used on the tops of dog food bags, where you could pull the string and rip out the whole stitch easily. Because it can be easily ripped out, a chain stitch can also be handy to baste.
So there you go – depending on your machine, you have lots of choices on the types of stitches to use when sewing knits!
Want to read more about sewing with knits? See these posts:


Anne
Great post! I usually use the narrow zig zag or twin needle on my sewing machine. I’ve got a Craft Gossip post scheduled for later today that features your stretch stitch tutorial: http://sewing.craftgossip.com/?p=91700 –Anne
Lyn Murphy
Thanks for sharing this tutorial on stretch stitches, Melly. I’m having an awful lot of problem sewing with knit fabrics at the moment and hunting for all the information i can gather to help with this. It’s great to understand the way different stitches work with regard to the amount of stretch they allow.
kathleen
Awesome! Now I know which stitch I need to be using. I have been using the wrong settings on my zigzag. I’m going to switch it up today and see if the stitch stretches. better.
Jenny
New to your blog and the first time I’ve watched your videos. Just wanted to say that you are doing a great job with your explanations. It’s very clear and easy to understand. Gives us newbies more confidence to keep trying different things. Thanks so much !