
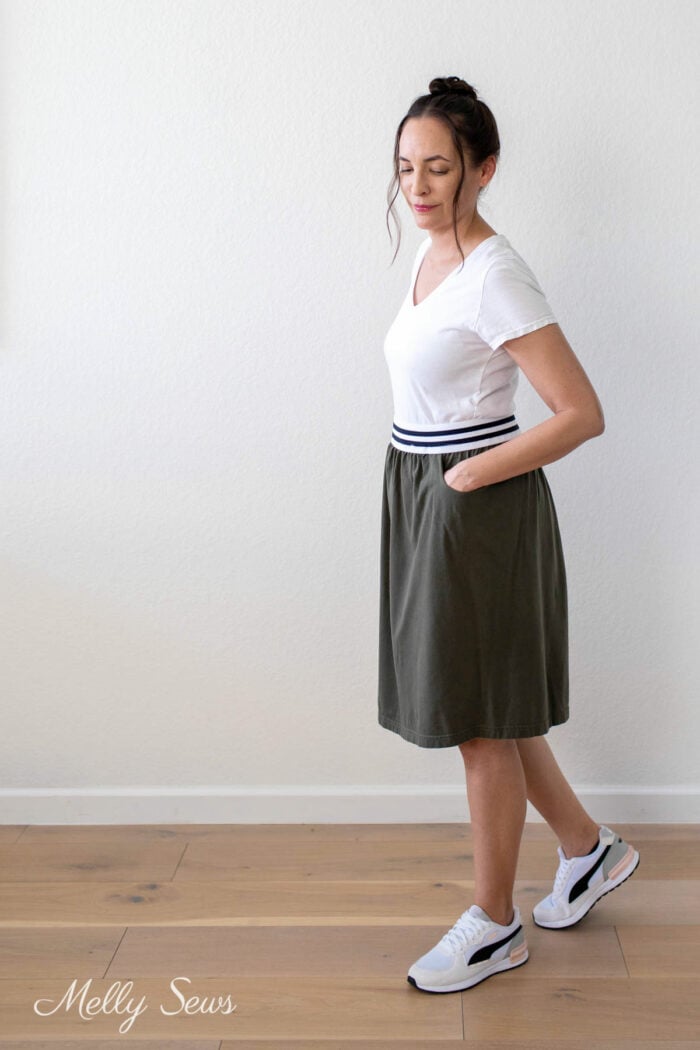
This DIY skirt tutorial shows you how to make an easy skirt from a t-shirt – and include pockets made from the sleeves.
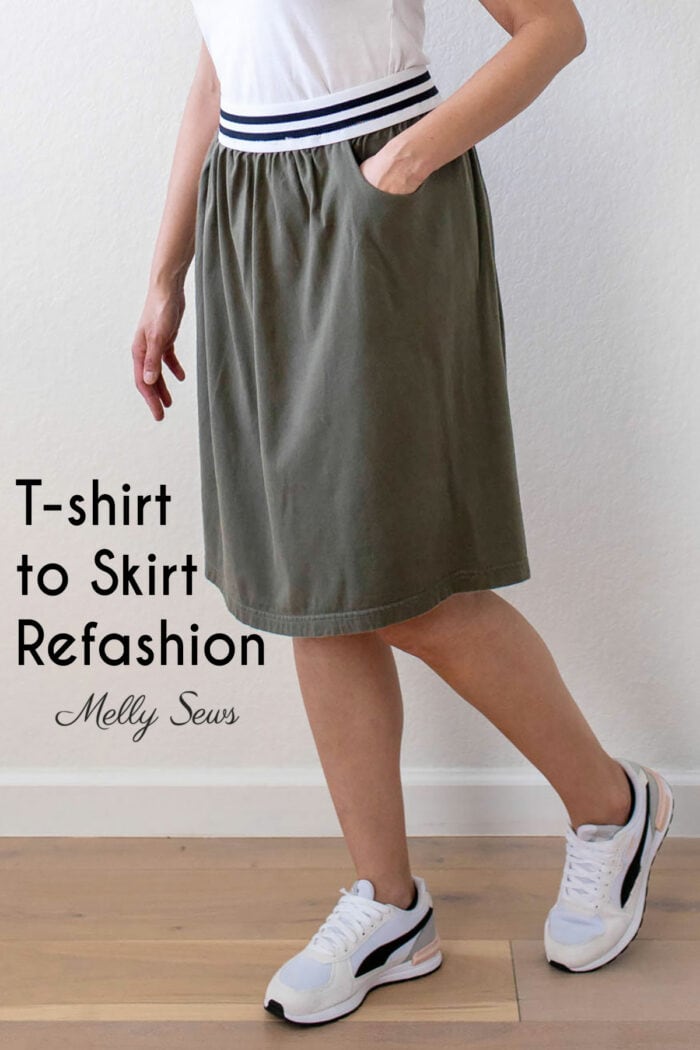
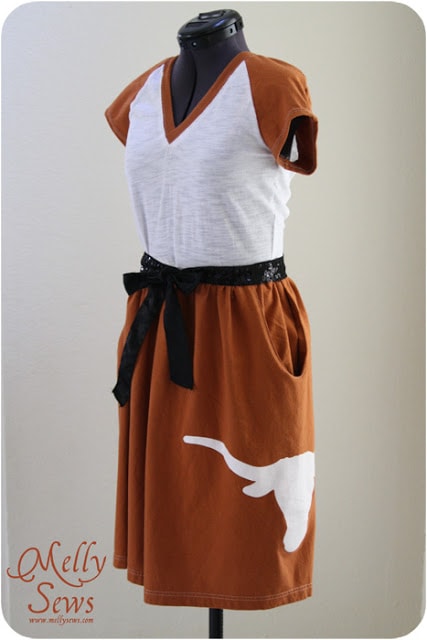
Hey y’all, today I’m going to show you how easy it is to make the t-shirt skirt I’m wearing in these pictures. I basically did the same thing in dress form for this Game Day Dress and sewed the skirt onto a t-shirt top.
It’s an easy way to get a comfy knit skirt – and it has pockets! It’s also a great project for refashioning beginners since t-shirts are cheap and easily available at thrift stores and the only supply for this besides a tee is a piece of elastic.
Using a tee to sew a skirt results in an easy to wear garment. I am all about casual outfits, especially when it’s hot outside (which is half the year in Texas) and sometimes I prefer a skirt over shorts to look just a little more put together, even if I’m still wearing sneakers.
Materials to Make a T-shirt Skirt
This post contains affiliate links. As an Amazon Associate I earn from qualifying purchases. All affiliate links are identified with (affiliate link) after the link or a commissions earned statement above the link(s).
To make your own t-shirt skirt, you’ll need the following supplies:
- A t-shirt (preferably without side seams).
- 2 inch wide elastic the same length as your waist measurement. I used striped elastic similar to this (affiliate link)
- Sewing machine and basic notions, pins, needle, thread, etc.
When choosing the t-shirt to make this, make sure the sleeves are at least as long as your hands. Also make sure that the length of the t-shirt from about the bottom 1/3 of the armscye down to the hem is long enough to make the desired skirt length. Also check that the width of the shirt is wider than the circumference of your hips to get this gathered look. Otherwise your skirt will have more of a tube shape, but hey, if that’s your preference, go for it. I personally prefer to use an oversized tee so that the width of the skirt is gathered by the waistband.
DIY T-shirt to Skirt Upcycle
I’ve got a video tutorial for how I sewed this skirt below, which you can also watch on YouTube here. Note that in the video I sewed the elastic on in a slightly different way than I did in the picture tutorial.
Written Tutorial to Sew a Skirt from a T-shirt
If you prefer written instructions for your skirt, you can find them below.
Time needed: 1 hour
How to Make a T-shirt Skirt
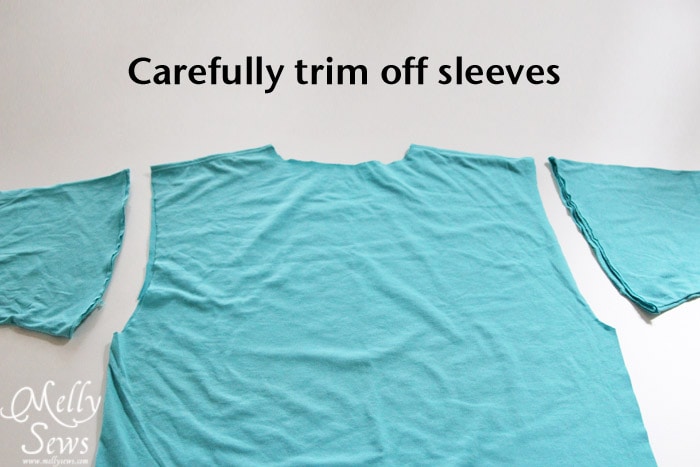
- Cut the t-shirt
Start by trimming off your sleeves. Set them aside, you’ll use the fabric from them to make your pockets.
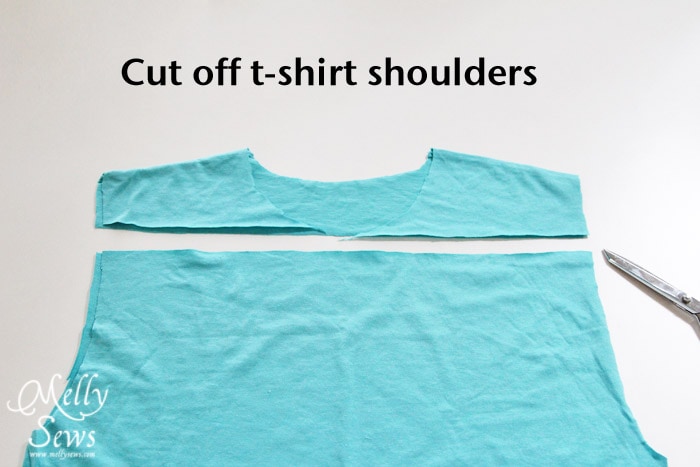
- Cut the shoulders off the shirt.
Use a ruler to cut a straight line across the shirt below the neck. This will be the top of your skirt, so check the depth of the sleeve openings – that’s how deep the outside part of your pocket will be. Set the shoulders aside, you’ll use this fabric for the pocket facings.
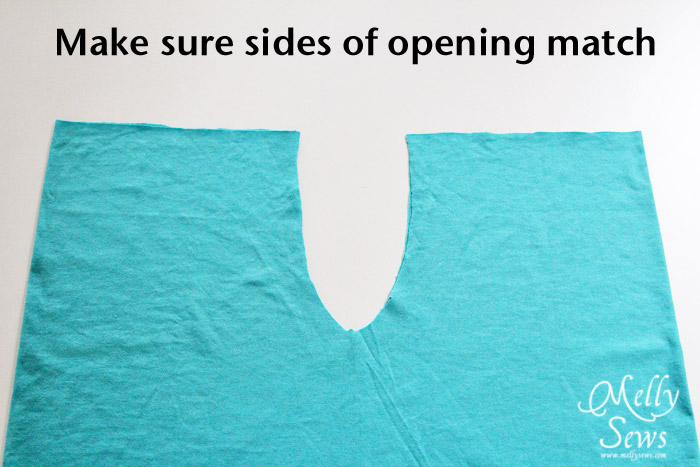
- Trim the armscyes
Fold the t-shirt in half, then in half again, so that you can match the armscyes. Trim openings carefully, and make sure the sides match each other.
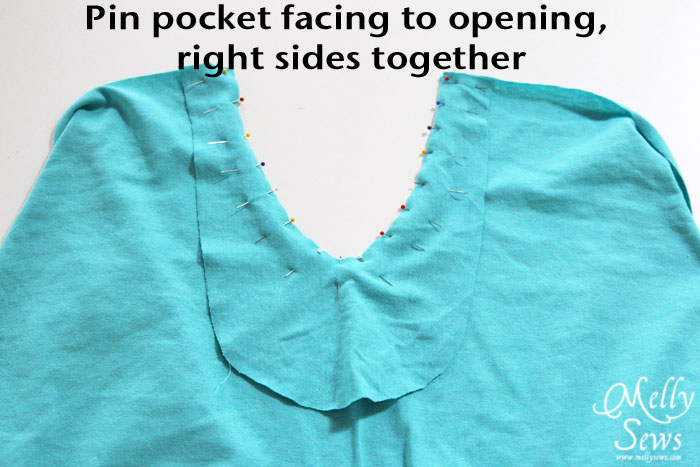
- Make your pocket facings and pockets
Use the shoulder portion of the shirt to cut facings that match the armscye cutouts and are as big as the extra fabric you have will allow. Round off bottom edges and cut out pockets from the sleeve pieces that don’t have the armscye cut out of them. Use your hand as a guide for the size and refer to the video above for help.
- Sew the facings to the skirt
Pin the facings to the armscye cutouts right sides together. Next, stitch around the curve using a stretch stitch. Flip the facings to the inside of the skirt, wrong sides together, and press along the curve. Topstitch if desired.
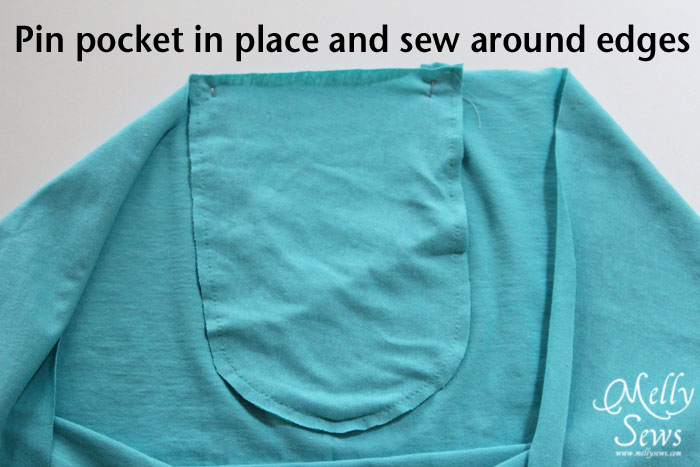
- Sew the pockets to the facings
Place the pockets against the facings, right sides together, and then stitch around the edges.
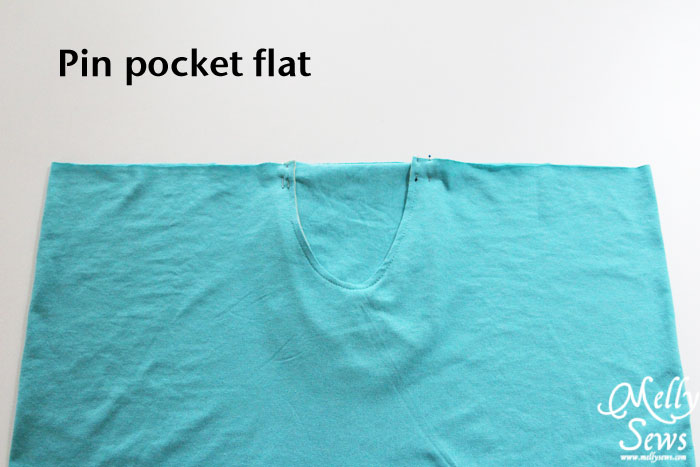
- Pin and baste the pockets at the top of the skirt
Do this just to help the skirt hold it’s shape while you attach the waistband.
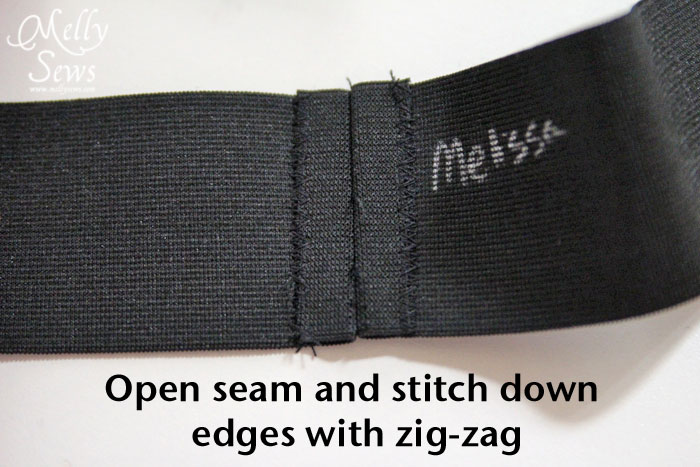
- Sew the elastic into a loop
First, if your elastic is not striped like mine, mark a line 3/8 inch from the edge on the wrong side. Then sew your elastic into a loop by overlapping the raw edge of the waistband and stitching over it with a wide zig zag stitch. If you are making more than one, you can label them like I did.
- Mark quarter points on the skirt and waistband
Mark the quarter points of the elastic and skirt top with a fabric marker or pins. Do this by holding your waistband with the seam on one end, and place a pin on the opposite end. Then fold the waistband so that the pin touches the seam, and place pins on the two edges. Mark your skirt the same way, starting by lining the pockets up on top of each other so that the center front and center back are at the edges. Then fold the skirt so the two pins touch, and you should be able to mark the center of each pocket easily.

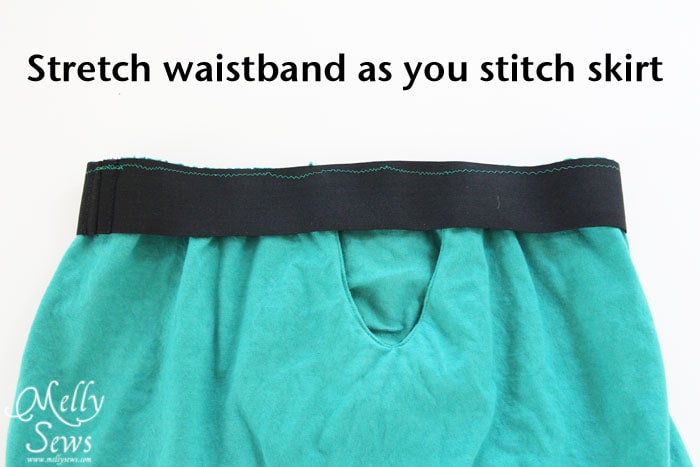
- Stitch the waistband to the skirt
Lay the elastic band over the skirt top and then line up and pin the quarter circumference marks. Then stitch close to the edge, stretching the elastic so it is the same length as your skirt. This will make gathers in the fabric when you release the elastic. In the picture I sew the two right sides together, but that leaves a bulky seam on the wrong side of the skirt. So in later versions of this skirt I sewed with the waistband wrong side agains the skirt right side. Line the raw edges of the fabric up with the 3/8 inch line on the wrong side of the elastic. See the video above for more tips on how I do this.
- Optional: hem the skirt
If your skirt happens to be longer than you would like, you can trim and hem the bottom of the skirt. This post about hemming knits has some good tips for that.
And now you’re ready to style your skirt! Add a cardigan if it’s mild outside, or maybe some tights and boots if it’s colder. In the spring I lean toward my denim jacket with the cuffs rolled up. On very hot summer days this kind of skirt is perfect with a tank top.

I personally like to tuck my top into the waistline of this skirt, but if you don’t want to show off the elastic waistband that’s totally optional.

Either way, this can be a fabulously easy and cheap way to get yourself some new layering pieces!
eat. sleep. MAKE.
Great idea! I have tons of my husbands tshirts just waiting to be turned into skirts! -Jen
Cindy
Brilliant! Thanks. I love skirts with pockets.
Lisa Mittelstaedt Lopacinski
Great idea, and easy!!! I’m a beginner sewer but love these kind of projects that don’t need much measuring. http://www.delicateconstruction.com/2013/01/delicately-constructed-friday-cricut.html
clod
wonderfull idea!! Great…
by Clod
Sally
Thank goodness for you and your generous knowledge!! I’m heading to southern California tomorrow and my thighs are not in any shape for shorts …… So a couple of tshirts, your tutorial and some sewing and I’m off in cute skirts!! Take that thigh master!
Lily
Very cute and looks simple, i want to try it soon and will send you guys pictures…
Lily in Texas 😀
scarlet
Good ornig to you,i ask something what kind of needle that i use for this skirt? Im a biggener to teach my self to sew. Please answer my question. Thanks.
Geraldine
I’ve had the same idea, just didn’t/couldn’t figure out – how – to create the proper pocket pouch. Thanks so much!
N
Hi! I’ve followed this tutorial and it came out great! The pockets look terrible lol but that’s probably my fault because I’m new to sewing and I’ve made all kinds of mistakes hahah but it still looks great on me 🙂
Thank you for sharing this idea <3
Hazel
I am excited to make this. I have cut off the sleeves and neck and am trying to cut the pocket and pocket facing, but my sleeves do not seem to have enough fabric for the pocket patten. Should I make it smaller or use another old tshirt for the facing? Thanks for your prompt advice. I am in the middle of it right now and hoping to finish tonight. Thanks!
Joy
This looks very doable & comfortable! Will have to get a good used t-shirt to try this out. Thanks for sharing your creativity 😊