For the month of January, I’m going to spend Thursdays showing you guys some quick tech tips to help you with your blog. Now, this is a little outside my comfort zone (Extend, remember?) since I’m a sewing expert but not a technology expert, but the things I’m going to show you work for me.
First of all, to edit my photos I use Adobe Photoshop Elements (I have version 8). So what I’m going to show you today will work in that program or in regular Photoshop if you happen to have it. (I actually do have the regular version of Photoshop, but I still use Elements to do the majority of my work – there are very few features I personally need to switch over to Photoshop for, and I’m just used to the Elements workspace).
I mostly use this technique to create my “button” images – the ones with text at the top of the post that I’m hoping you’ll pin. Like these: (by the way, those pictures are linked if you want to go to the projects)
So, here’s how you make that seamless background. Two of the ones above are done with Seamless Background Paper, but you can (and I have – like in the first picture) done this just using a solid wall.
Here’s the photo I started with, SOOC (straight out of camera)
As you can see, in the original picture there’s a lot of distracting stuff to the sides. Here’s my edited photo:
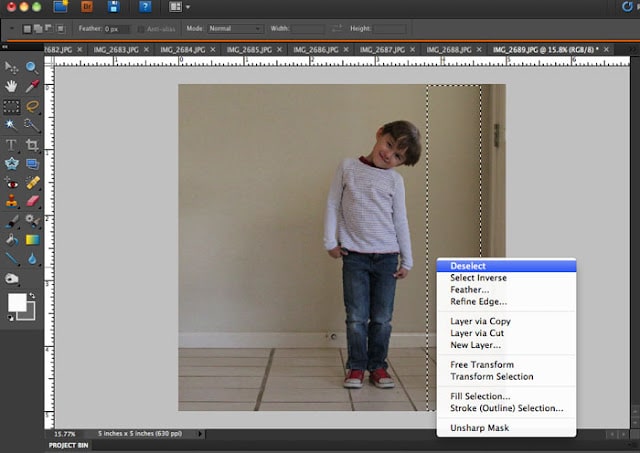
Tater in front of a blank wall that doesn’t exist in my house. I started by cropping the photo. But as you can see, this didn’t take out all of the background. So, use the rectangular marquee tool.
Click and hold down your mouse to select the area you’re going to extend. For best results, you want to select the largest area you can that is blank, and you want to select all the way from the top to the bottom of the picture.
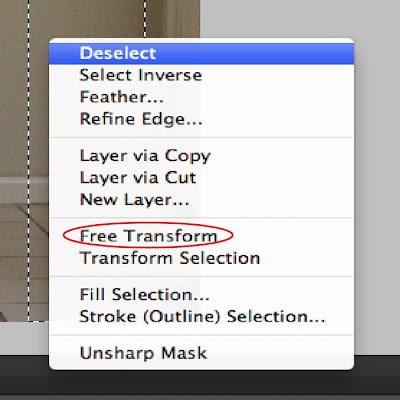
Next, right click your mouse to get the pop up menu and choose Free Transform.
This will give your selection handles. Now just click and drag the side handle to the edge of your image to extend the blank part of the wall and cover up the distracting stuff.
As you can see, I repeated this on each side of my image.
It did stretch the tile out some on the left of the photo, but once I added my watermark, I don’t think it’s that noticeable. Certainly less distracting than the hallway that was there.
After that, I went ahead and brightened and sharped. Another look at my finished result.
Well, hopefully that was helpful. If it was, please let me know in the comments. And if there’s anything else you’ve always wondered how to do as far as photo editing or blog formatting (in Blogger – I am pretty clueless on WordPress still), let me know. If I know how to do it, I’ll either show you on another Tech Tip Thursday, or point you toward the tutorials where I learned.


katie@stvital
That is very helpful. I have not played with Photoshop enough to know all of the things it can do for me.
Stef
Oh!! This is great! Thanks, Melissa!!
Amy (naptimecrafters)
I was just doing this exact same thing yesterday! Without photoshop it would be impossible to take any photos in my apartment 🙂 Photoshop is my best friend!
greatjencreations
Very helpful! I’ve wondered how to do that, knew there had to be a way, but hadn’t ever figured it out. “Free Transform” — who’d have guessed?! Thanks so much for the tip!
Jessica Chong
Wow. I’ve used photoshop a lot…taught myself…and never found this trick! It’s so simple and obvious and yet somehow I missed it. Thanks for sharing…I know this will be very useful to me and lots of others!
Jessica
zoeope
How to change backgrounds for photos has been a mystery to me for about a year now. (since I started my blog.)
I cannot thank you enough for this tech tip.
Can the background colour be completely changed to say white? Another question is can the floor background be changed to plain.
Thanks for this post.
Max of Max California ★
I do a similar thing, but it is WAY more complicated. This works so much easier!
Pam @Threading My Way
This seems a much better way than how I was doing it. Thanks for sharing. I hope you don’t mind, but I’m pinning this.
Ajaire
I use gimp since it’s free, but I just realized I can totally do this with it too. Very excited! Thank you 🙂
Amanda
Thank you so much! I just received my first “real” camera and am looking forward to learning how to do all sorts of things with it!
jodi
wow i’m always using the “clone” or “band-aid” thing to erase clutter in my background, this will be so much faster and efficient.
thank you, the tech tips are great!