
A walking foot is used on sewing machines to help evenly feed fabric. Learn how to set up and use a walking foot in this tutorial.
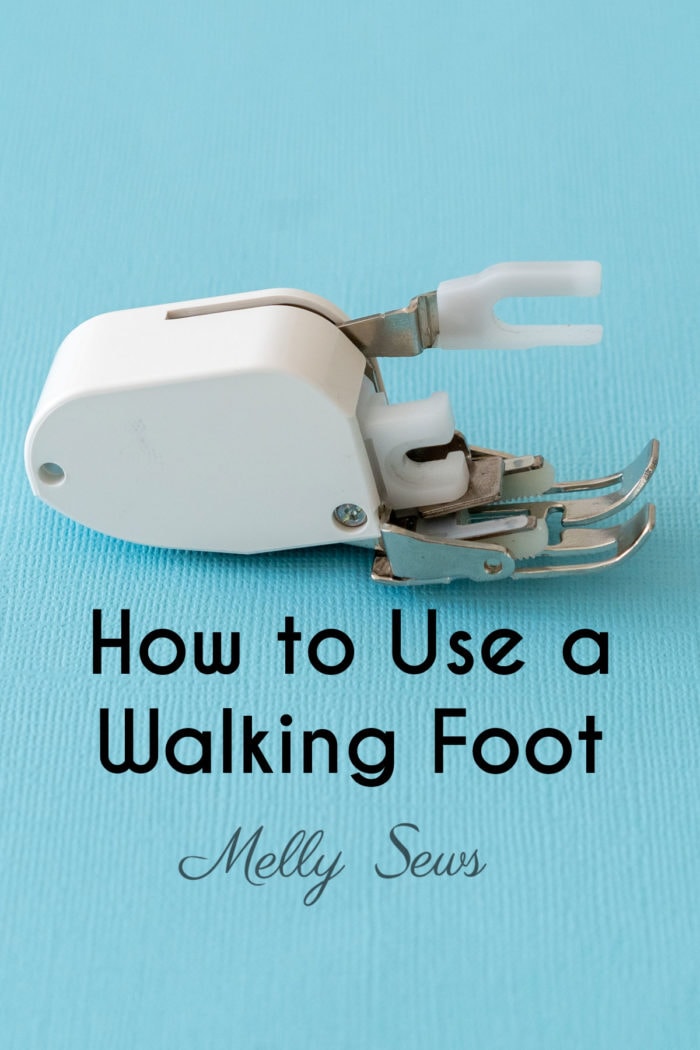
Hey y’all, today we’re going to talk about why, when and how to use a walking foot for sewing. This is a sewing question I’ve gotten many times. In this post I’ll be sharing a video that explains why you might want to use a walking foot, when specifically you might want to use one, and how to do it. Please note that this post is about a walking foot attachment, not the special use walking foot sewing machine you might find in industrial sewing shops, like those that do upholstery. By carefully following the instructions for use and sewing slowly, even beginners could benefit from this foot however.
A walking foot helps create even stitches on quilts, knit fabrics, leather, and when sewing through multiple layers of fabric. I’ve also heard it called an even feed foot for that reason. In the video below you can see how to set up a walking foot and watch it in motion. You can also watch on YouTube here if the link below doesn’t work.
What are Feed Dogs in Sewing?
To understand how a walking foot works and why you might want to use one, first we need to understand how a sewing machine feeds fabric with the normal presser foot. Feed dogs are the part of the sewing machine that pull the fabric toward the back of the machine as you sew. They look like little ridged or toothed bars under the presser foot and they move up, back, down and forward in conjunction with the motion of the needle. In fact, if you’ve ever heard of misalignment in a sewing machine or it being out of time, that’s referring to the needle and feed dogs not working together as intended. You can see a close up image of the feed dogs below.
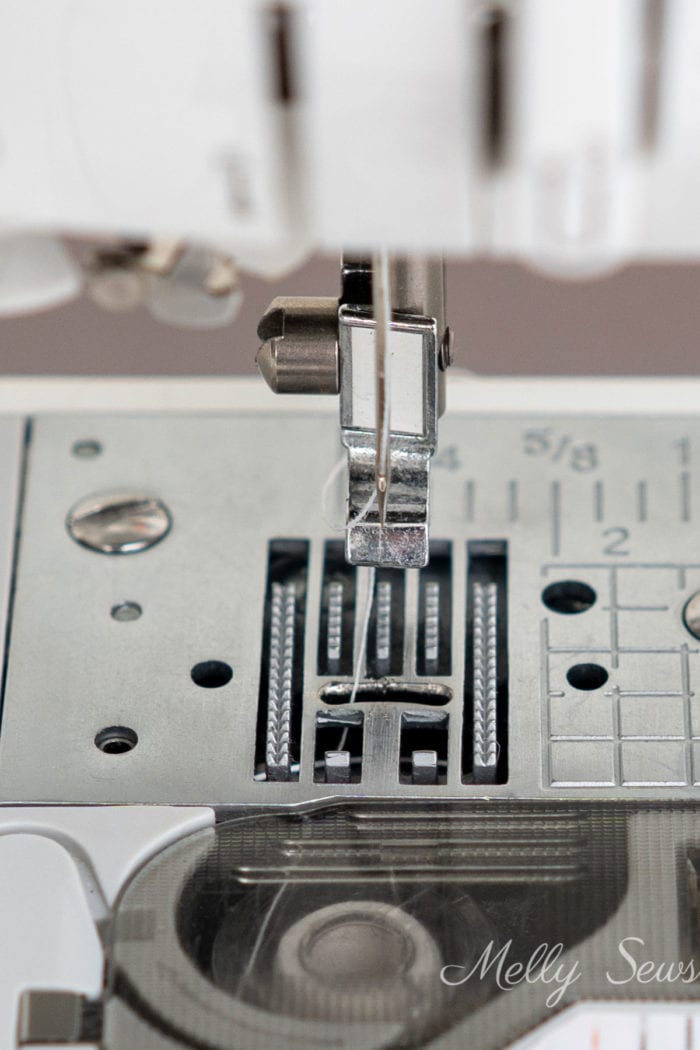
As you can see the feed dogs are only in contact with the bottom layer of fabric. The top layer slides against the regular foot. The majority of the time sewing, this works well. But sometimes the top layer of fabric drags a tiny bit on the regular presser foot. Over the course of a seam, this can mean that the fabric feeds unevenly so stitches aren’t even. This is most likely seen with multiple layers of fabric like in a quilt or sticky fabrics like leather. Or it can mean that the top of your fabric feeds at a different rate than the bottom fabric (this is most likely seen in sewing knits) causing puckers.
How Does A Walking Foot Work?
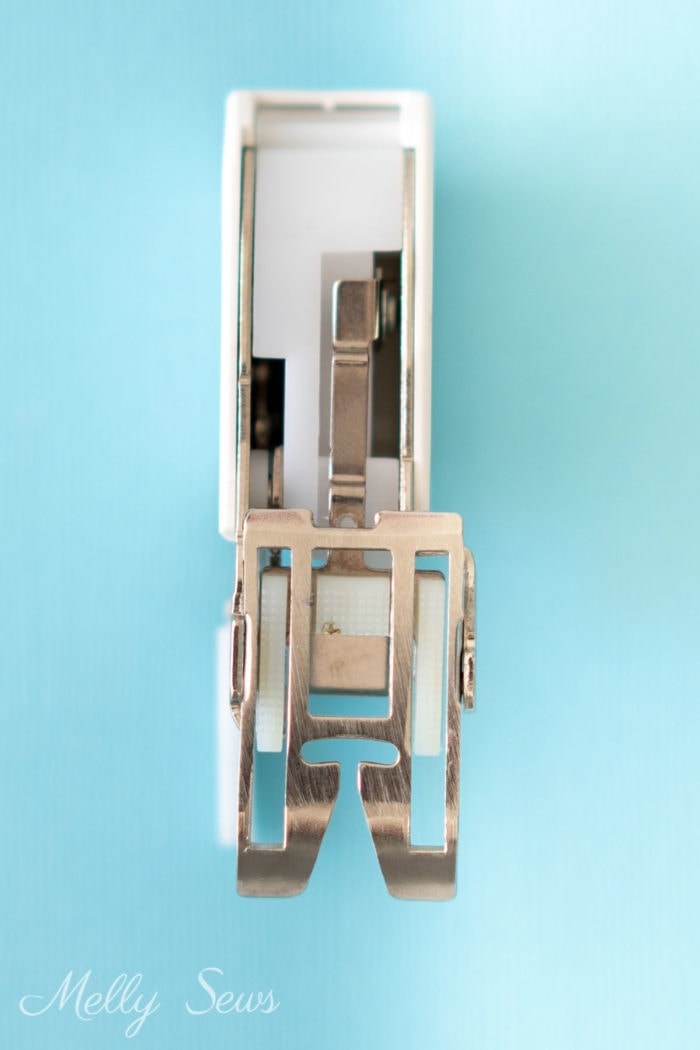
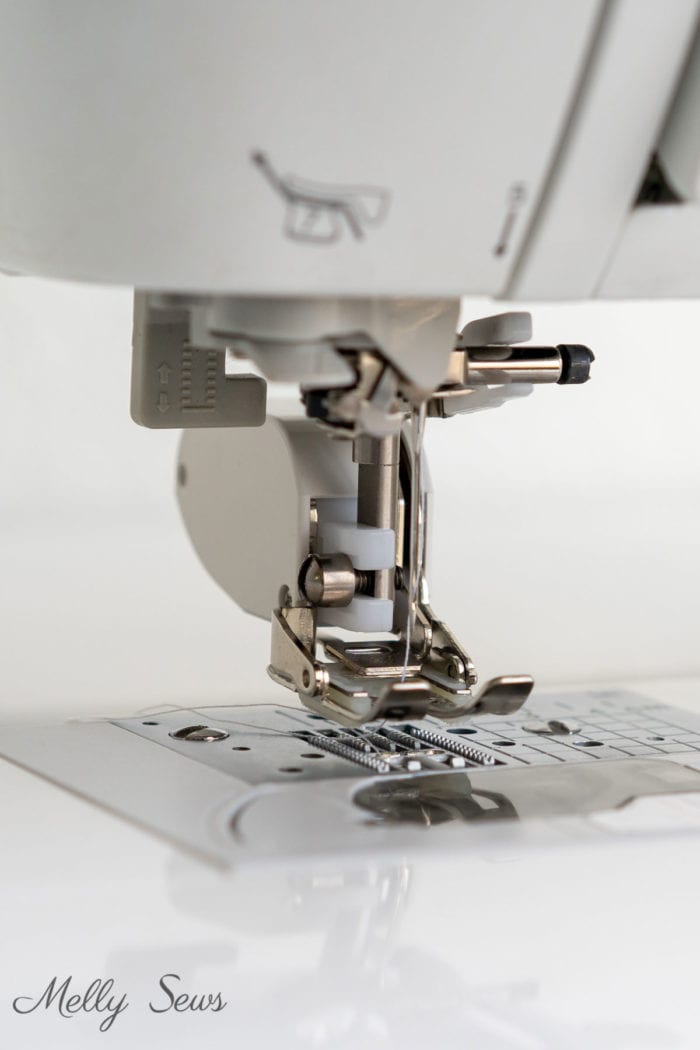
A walking foot has its own feed dogs on it. If you look at the picture of a walking foot below, you can see how there are openings in the presser foot. The white ridged parts come through those openings in time with the machine’s feed dogs to pull the top fabric. The feed dogs on the presser foot also have teeth that grip the fabric. The lobster claw piece on the side of the foot fits over the needle bar and rides up and down with it to keep the foot in time with the feed dogs and stitches.
When To Use A Walking Foot
Now that we understand how fabric feeds through the sewing machine, let’s talk about when to use a walking foot. I alluded to this above when I talked about fabrics that can be difficult to stitch evenly. Those include bulky fabric like canvas, stretchy fabrics, slippery fabrics, sticky fabrics (like leather or vinyl), and thin fabric in multiple layers (like a quilt sandwich). Since those types of materials cover the range from apparel to furniture upholstery, pretty much any type of sewing can use one at some point.
Sewing a knit fabric to a woven fabric can also be a difficult fabric combination even if each fabric on its own feeds well. If you are using those fabrics with a general purpose foot and getting uneven stitches, it’s time to switch. A walking foot is great when quilting or topstitching because your thread and stitching will be very visible, unlike the interior seams in garment sewing. If you feel like you’re having to pull the fabric through by hand, a walking foot will help.
Many quilters like to use a walking foot for straight-line quilting because it helps keep all the layers aligned. Making sure the layers are all quilted together without slipping is (to me) one of the biggest challenges in machine quilting.
A walking foot can also be helpful when you’re sewing striped fabric because evenly feeding the top and bottom fabrics keeps your stripes matched. The same would be true for plaids.
My foot says it can be used with a zig zag or straight stitch. The chart in the back of my sewing machine manual lists only a few stitches that are OK with this foot. I can sew with a twin needle, however. So make sure that you check your machine manual before doing anything other than a straight single needle stitch.
How To Set Up A Walking Foot
This post contains affiliate links. As an Amazon Associate I earn from qualifying purchases. All affiliate links are identified with (affiliate link) after the link or a commissions earned statement above the link(s).
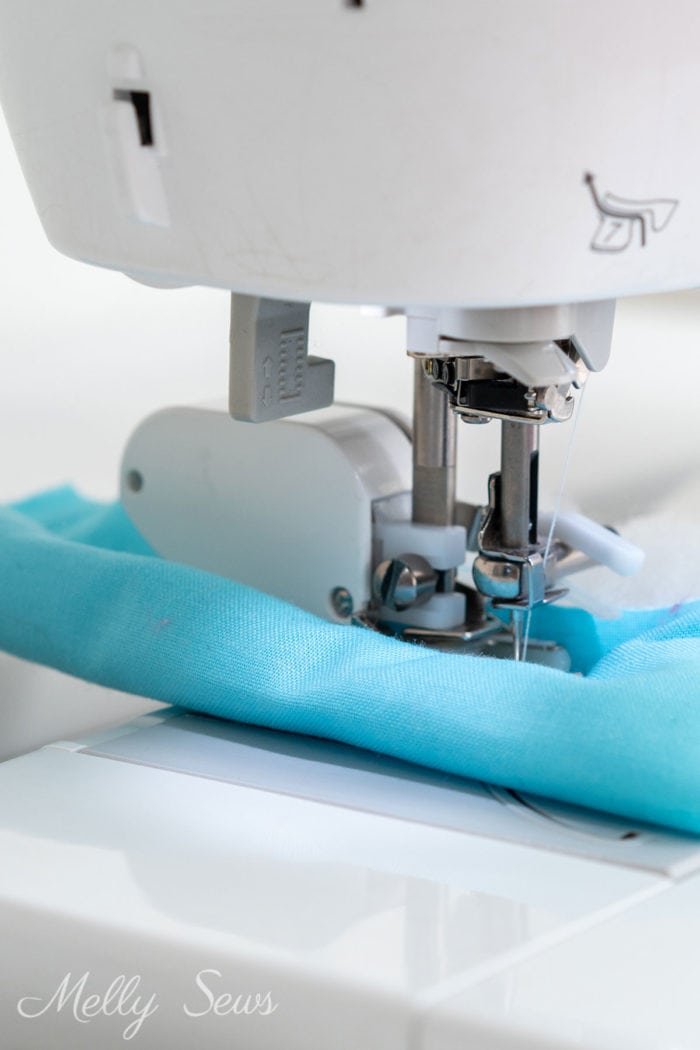
To set up the walking foot, you’ll want to consult your machine manual. Some walking feet have to be plugged into the machine, but here’s the process for a manual foot like mine (similar foot here,[affiliate link] mine came with my machine). First, I have to unscrew the snap on presser foot shank. I keep these tiny screwdrivers (affiliate link) in my machine storage box to help with this.
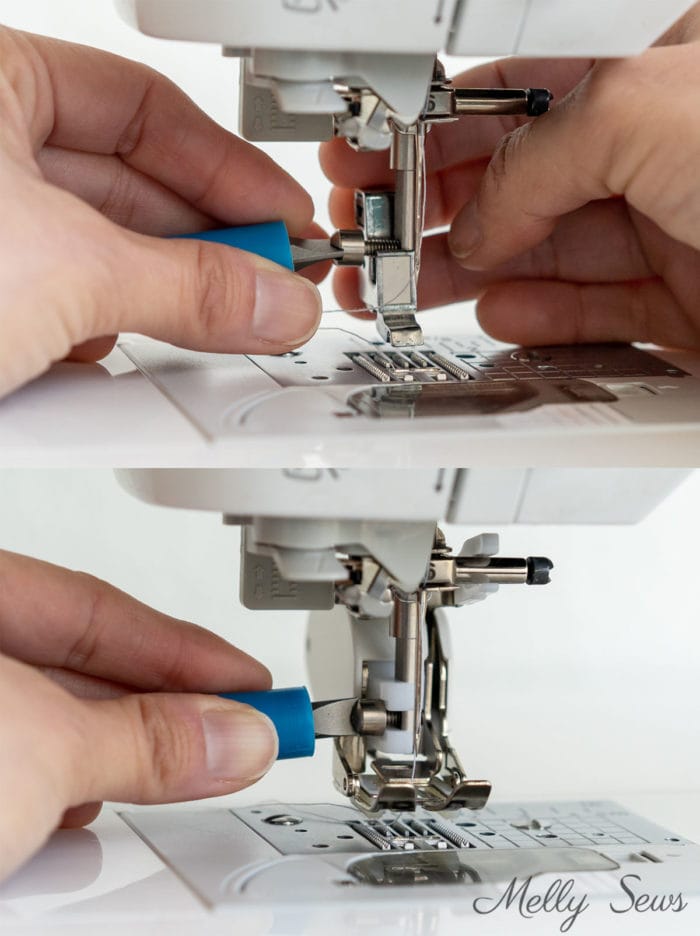
Once the shank is off, place the claw of the walking foot on the needle bar. Screw the shank of the foot onto the machine. Make sure to tighten both the needle clamp screw and the shank screw. One problem with this type of foot is that the lobster claw on the needle bar can loosen the screw and make the needle fall out.
How to Feed Your Fabric Evenly
Once you’ve got the foot on the machine, it should work in time with the feed dogs to feed your fabric. Because of the motion involved in this presser foot I recommend stitching at a slower pace at first. This will allow all the parts to work smoothly together and feed your fabric for beautiful, even stitches. You can try going faster on scraps of fabric that mimic your actual project. In other words, if you want to see how it will work when quilting, you’ll have to use scraps of all the quilt layers. Pins or clips holding your fabric together will also help make sure they feed evenly.
When Not to Use a Walking Foot
After reading through this post, you might be wondering why you wouldn’t just want to keep the walking foot on your machine all the time. Well, in my case the biggest con to my sewing machine’s walking foot is speed. I can’t sew as fast with this foot in place; it takes a minute to, well, walk. Another con is that a walking foot is best at sewing straight lines. The size of the presser foot makes it harder for me to turn a curve as precisely as I’d like or as I can do by changing the pressure in my hands as I feed the fabric. And my machine manual even says to sew at a speed between “slow and medium”.
So I can’t go pedal to the metal with this foot.
While some walking foot attachments come with more options to add things like a stitch in the ditch guide, mine does not. So any time I want the capability of any other special presser foot, I would have to switch. My manual also says not to reverse stitch with this foot. Additionally, I can’t do any wide decorative stitches with this foot. That’s because they’d require going back and forth or backwards and this foot can’t handle that. Again, these things might be specific to my machine and others like it, but they are still worth consideration.
So my philosophy is to keep my regular J-foot on my machine and only switch the the walking foot for items that aren’t feeding well that way.
Rebecca
Yes! Yes!! Yes!!! Finally an excellent guide for a walking foot! Of course, some of the vocabulary was unknown, but I got the gist of it. Great photos, great organization, and all-around awesome. What about using the walking foot for almost all sewing? I’ve been sewing like that for several months. I go slow when I need to and this foot helps me with that!!
Doreen
Thank you Melissa. I’ve had a walking foot for years and had forgotten how to fit it to the machine. I am in Queensland and I really enjoy your newsletters.
Teremoana Teina
This is just so awesome. I am truly grateful for the great and very clear excellent instructions of how to use the walking foot..
Dianne Underwood
Great article! I have used my walking foot for many projects once I began sewing with it – had heard of them but didn’t think they would be all that useful. How wrong I was. Such a difference seaming stretch fabrics especially, but great for any sewing project to keep your layers moving evenly. I would not recommend going in reverse with your walking foot as it can cause damage to the foot. Am on my second one as the foot part of the first one won’t stay on properly any longer.
Suzanne
This is so good to know. I have a walking foot that was working great, and I can’t seem to make it work like it used to. It’s probably because I did sew in reverse with it. It’s so automatic! I think I’ll need to get a new one and try again, and hopefully, not damage it.
Jean Burkinshaw
I attend a sewing group monthly, many sewers work on quilting mainly and often speak in glowing terms for the Walking Foot. As I have been sewing for over 60 yrs for myself and family plus charities, unfortunately never tried the walking foot until I read this site and have now tried it out on both Denim and silky fabrics and tell myself what was I missing, it us just great, I will never be without it . Thank you so much for valuable information.
Dagmar
Great tutorial. One thing that should be added, though, is that many walking feet come with different snap-on feet themselves, or you can buy them separately. Mine is the Husqvarna Viking ‘Interchangeable Dual Feet’. It came with two snap-on feet, the straight stitch foot and the zigzag foot, and available separately are an open toe foot, and, in my opinion most useful, a stich-in-the-ditch foot with guide and a ¼inch foot with guide.
Leanne
Thanks Melissa, great article. I bought a walking foot when I had to make 4 bridesmaid dress in velvet. It was my saviour, but I had never thought to use it on stretch material or to help with matching checks and stripes. I will definitely be dragging it from the back of the draw to use for these projects in future.
Shirley
This article was so helpful! I can now use my walking foot! Thanks so much.
Karen
Amazing. Finally I know why I found it difficult to sew multiple layers of denim. I will purchase a walking foot and hopefully I’ll find it easier to work with. Thank you…xx