

Have you ever wondered how to make a table full of linked images (like the ones you can see on my tutorials page)? It’s a handy little piece of HTML that I’ve learned, and it will work in both Blogger and WordPress. And it’s not hard to do, I promise! So keep reading, today I’m going to show you how to make an HTML image table in both Blogger and WordPress.
BIG DISCLAIMER ON THIS TUTORIAL: I am not a web expert, I won’t rewrite your code for you, and I take no responsibility if you waste a lot of time and/or totally mess up a page using these instructions. This method works for me, but I’m sure there are other (perhaps even better) ways to do this.
To make an HTML image table, you’ll need to know just a couple of things about HTML.
<> These enclose a tag, which you can think of as one command or bit of information you’re giving about how you want your page to look. At the end of each command, you use the same tag with </>
<table> and </table> designate your table on the page
<tbody> and </tbody> enclose the body of your table
<a href=> and </a> enclose your links
<tr> and </tr> enclose each table row
<td> and </td> enclose each piece of table data, in this case one picture and the link
Blogger Instructions (Scroll down for WordPress Instructions)
Step 1: Open a new page or post, whichever you’re using. Insert all the pictures you want in your table, in the order you want them, and resized to the size you want them. They’ll all be in a long line down the page at this step. Make sure to hit enter in between each picture so they’ll have space between them – this will make it easier to see what’s what when you go over to HTML.

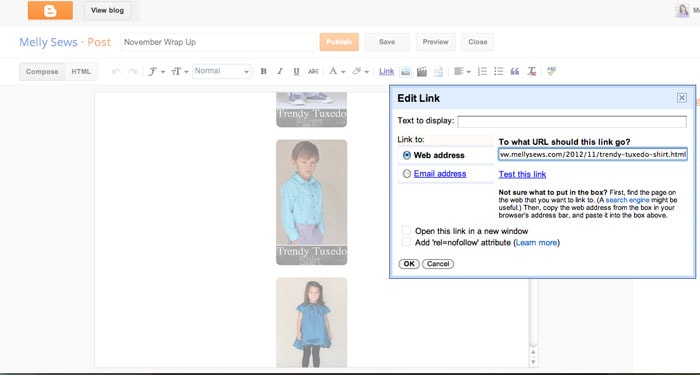
Step 2: Next, click on each picture to highlight, then click link. Leave “Text to Display” blank, and copy and paste the page you want this picture to link to in the “Web Address” box. Repeat this for each picture.
We’ll continue the Blogger Instructions after the WordPress Step 1 & 2 Instructions. Scroll down to Step 3.
Instructions for WordPress
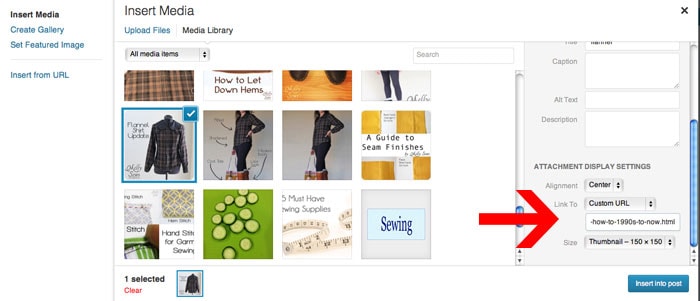
Step 1&2 (WordPress can do in one window what Blogger does in 2 steps): Open your new post/page. Click the Add Media button to upload your pictures. In the pop up window you’ll be able to change both the link and the size of the image. To change the link, select “Custom URL” from the drop-down and then paste your page link in the box below. Select your image size from the dropdown. Do this for all the pictures you want to use in the table. Then Command+Click (Mac) or Control+Click (PC) each picture in the order you want them to appear in the table. Click “Insert into post”
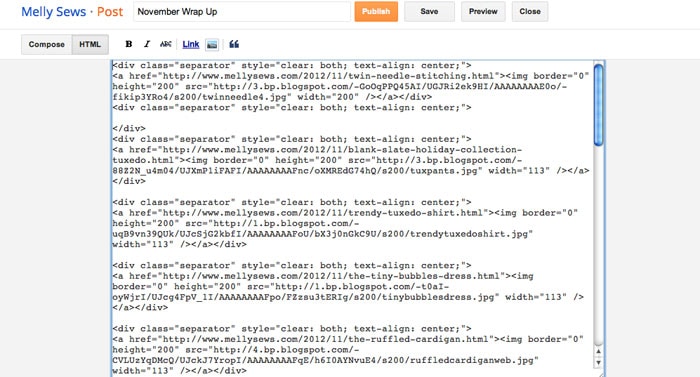
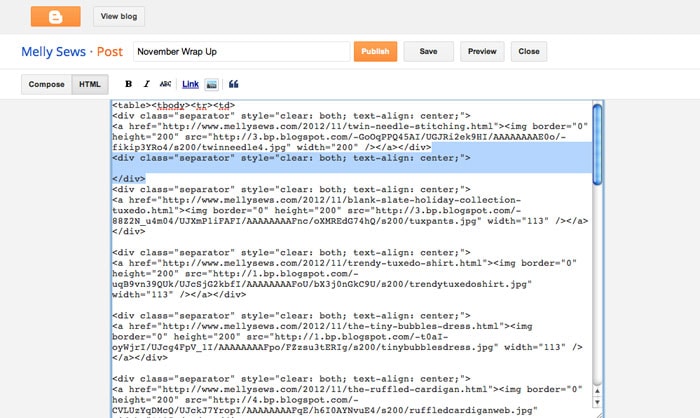
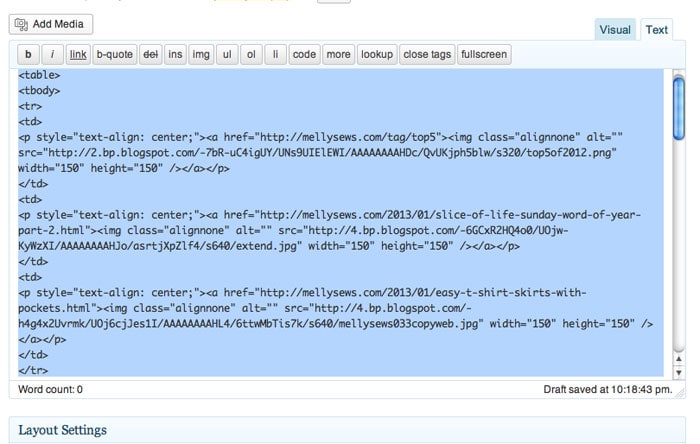
Step 3- Blogger: Now click on your HTML tab. You’ll see a bunch of stuff that looks like this. See the spaces below? Those are dividing my pictures. Depending on how you have your options for posts set up, you might also see tags that looks like this <br></br> where you added the spaces. That’s fine too.
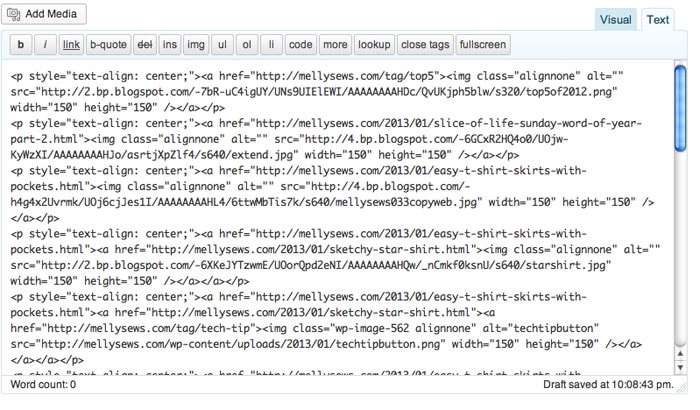
Step 3 – WordPress: Now click on your Text tab. You’ll see a bunch of stuff that looks like this. Look for the <p></p> tags – these indicate the pictures you’ve put in. For ease of editing for yourself, I would add an extra space between each one by hitting enter a couple of times after each </p>
STEP 4 – Blogger AND WordPress Scroll to the very top of your post, and type <table><tbody><tr><td> Then scroll all the way to the end and type </td></tr></tbody></table> You close your tags in reverse order of the way you typed them to begin with, or from inside to outside. This will start your table setup.
VERY IMPORTANT: Resist the urge to click back to Compose or Visual mode to see what you’ve done until you are finished editing the HTML. If you click over mid-process, you’ll just mess stuff up and create more work for yourself.
Next you are going to create your table rows.
Step 5- Blogger only: You’ll notice that each picture+link you created earlier starts with the tag <div> and ends with </div> You’re going to want 3-4 pictures per row. You already started the first row in the step above. Count down 3 or 4 pictures in your HTML, and after the 3rd (or 4th) </div> tag add </tr><tr> to close one row and begin another.
ANOTHER IMPORTANT POINT: You might see extra <div></div> tags with nothing in between them. Those are your spaces between pictures. You can delete these as you go (see mine below). If you don’t have these, this is where you will see the <br></br> tags. You can delete those too.
Step 5 – WordPress only: Remember, each picture+link you created earlier starts with the tag <p> and ends with </p> You’re going to want 3-4 pictures per row. You already started the first row in the step above. Count down 3 or 4 pictures in your HTML, and after the 3rd (or 4th) </p> tag add </tr><tr> to close one row and begin another.
Step 6 – Blogger AND WordPress: Almost done. Now all you have to do is define your table data. Go back to the top, and after the first picture+link </div> or </p> tag, add </td> Before the next <div> or <p> tag, add <td>. In many places you’ll be able to add </td><td> all at once, but sometimes you’ll have your table row tags from step 5 in the way. When you hit the ends of the table rows, the HTML should look like this: </div></td></tr><tr><td><div> in Blogger and like this:</p></td></tr><tr><td><p> in WordPress
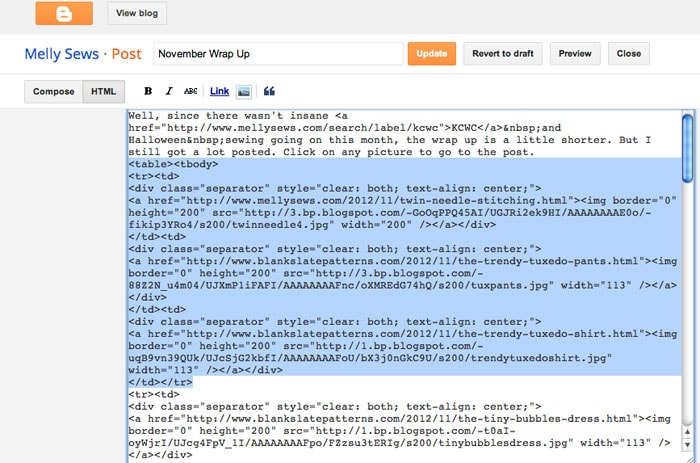
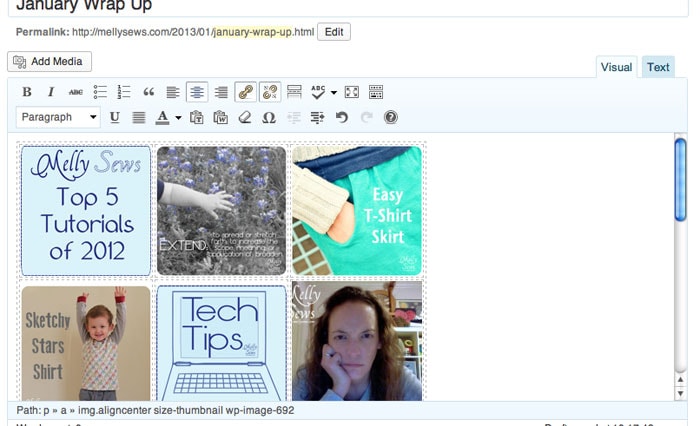
So, after each picture+link is enclosed within <td></td> tags, you are done! You can see what the first row of my table looks like in Blogger in the highlighted HTML below.
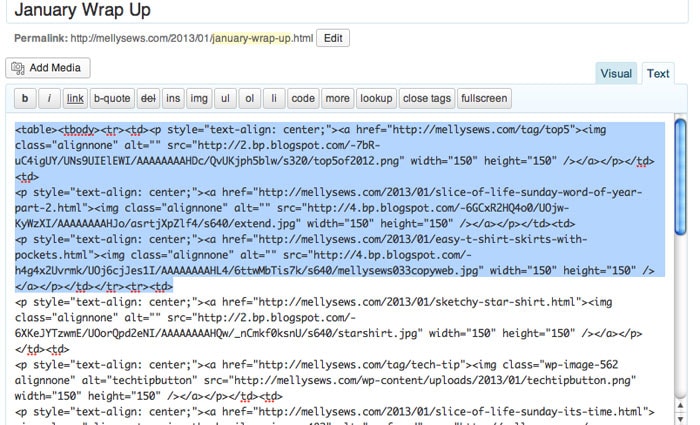
And in WordPress it looks like this:
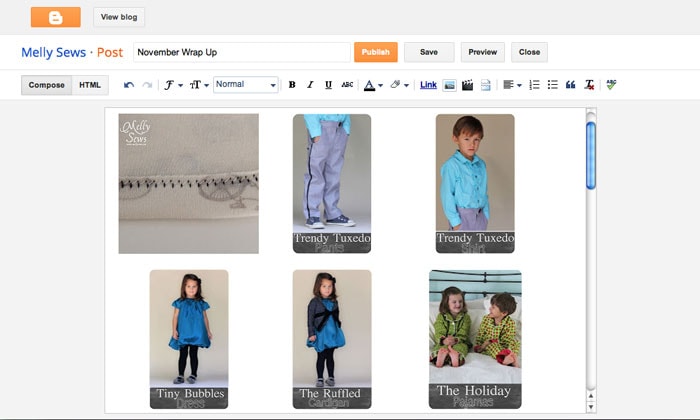
And now you can finally click the compose tab to go over and check your work in Blogger, which will look like this:
And in WordPress you can click the Visual tab to see your table, which will look like this:
Another note on WordPress – after you click over to Visual, if you click back to Text mode you’ll notice your HTML has been reformatted – it’s actually easier to read now, because it will look like this (the highlighted is my first table row again):
One Final Important Note: If you want to add captions to your photos in the table, do this AFTER you’ve created the whole table. You can click on any picture to add the caption. The reason you shouldn’t do it before is because captioning creates a table within a table, which can make your HTML much harder to read because there will be a lot more <table> <tbody> <tr> and <td> tags throughout.
Lucy
Thanks for the tutorial!
I’ll give it a try…..
🙂
francessuzanne
WONDERFUL tutorial! Thank you, I’ve often wondered how this is done!
Tori
I love your Tech Tips (and your other stuff too 🙂 )! Very helpful info!
Maria
wow! great tutorial. I love this new section in your blog. I’m learning a LOT!!! Thank you
kristin
it worked! i’ve always wanted to do this to my tutorial page and couldn’t figure it out. thanks girl! only difference was mine were center-aligned so i had to delete that at the beginning of each button and just type , an easy fix. THANK YOU!!!
hafza
Oh…I need sometime to read through the tutorial till the end to try it out. Thank you so much for sharing!
Kim
Hi Melissa, if anyone has questions about your awesome tech tips, I would be happy to help them. I used to be a web designer. I also created my own blog background using html code. I’m more famillar with blogger over WordPress, but generally, html code is the same anywhere. P.S. I’m the one that has commented a few times and asked if you were here in Austin (I’m in Round Rock and my husband went to McCallum eons ago). Thanks again for all you do.
jodi
thank you so much! all this HTML stuff is new to me. you just made that “text” page make way more sence. now i’ll be combing your blog looking for more of these little golden tidbits of info 🙂
Emily
Woah! So cool! Maybe one day I’ll be brave enough to switch to wordpress. 🙂
Emily
And/or blog enough in a month to do this. Wait- I can totally use this. Thank you, thank you!!!
[email protected]
Do you do this on the side? Freelance? I just know how this will end on my end and I would love a resource to have someone create a project gallery page (like centsationalgirl.com blog).
laura
Carie
This is brilliant – thank you so much, it makes sense and it works – yippee!
MD SOHAG
nice and awesome tips thanks for share.it is very use full for new blogger
Aashima
Thats awesome and easy. Thanks so much
Amanda
I just wanted you to know that this tutorial was exactly what I was looking for! Thank you so much. If you’re interested in how my page turned out, you can go here: http://www.theladyokieblog.com/p/blogging.html. Thanks again!
Kritika
Liked this simple tutorial. It is quite easy to understand. Thanks 🙂
Kulfibite
Its quote easy, never thought of this. Thanks very much.
Kashish Noor
Yes its easy. Thanks for creating such a simple tutorial.
Rana Naveed
I have been looking for the solution for the last few days and finally there is something to cheer now because you tips are good and i will definitely try them on my blogger blog. I will comment if it works for me and my blog Cartoon in HINDI
Independence Day Wallpapers
It was too easy, that i never knew. Thanks for this useful information
Nitin
Thanks! the trick is working.
Madhvi
It worked on my blog.
Quotes Pictures
Yess looks awesome and easy..
Heather
Thank you so much for posting this! I’ve seen loads of tutorials for this and this is the only one I’ve actually been able to follow! The way its set out makes it so easy to understand! xx
Happy Holi
Thanks for this trick. Its working good for me.
Suzanne
Absolutely fantastic. It worked great.
Suvichar
Ohh really easy. Thanku so much