
How to do the most common fit adjustments, including sloped shoulders, straight shoulders, forward shoulder, narrow shoulder and broad shoulder adjustments
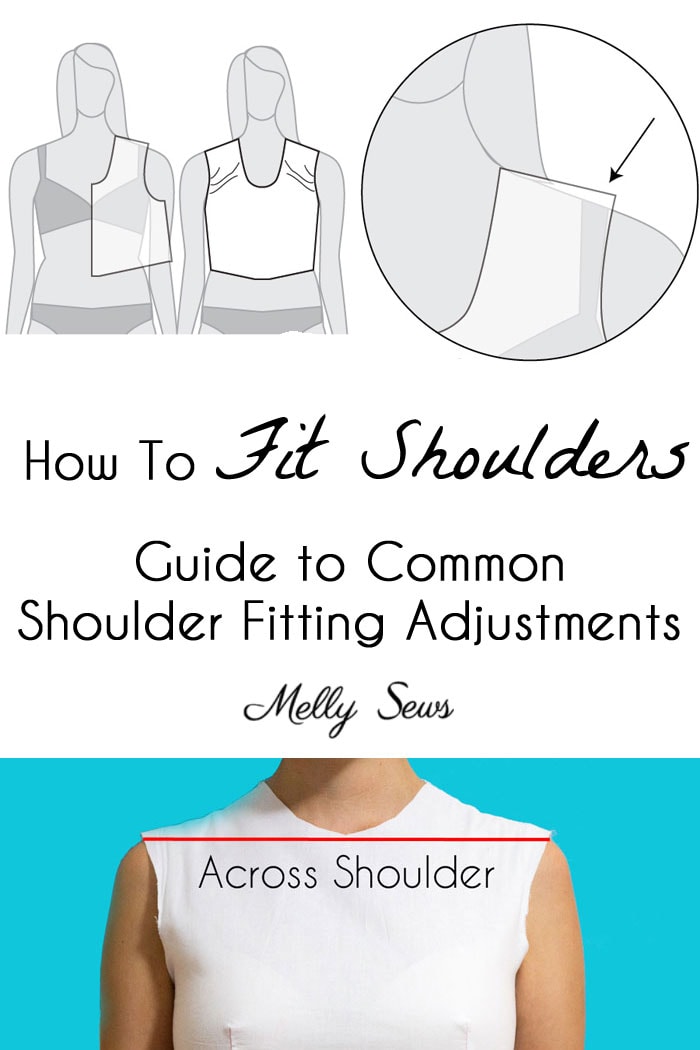
Shoulders are your body’s hanger for most garments with a bodice, the exceptions being strapless garments. And as such, it’s important to understand shoulder fitting adjustments when sewing your own clothing or adjusting other clothing to fit. So today’s post is going to cover the common shoulder adjustments, which cover slope, arm joint angle and width.
- Shoulder slope adjustments – straight shoulder adjustment or sloped shoulder adjustment
- Joint angle adjustments – Forward shoulder adjustments and Posterior arm joint adjustments
- Shoulder width adjustments – narrow shoulder adjustment or broad shoulder adjustment
I’ve made a video covering these common shoulder fitting adjustments, which you can watch below or on YouTube here. Scroll below the video for further discussion and illustration of each shoulder adjustment.
What Does a Properly Fitted Shoulder Look Like?
Before we get into adjusting the fit of the shoulder, let’s take a look at what a properly fitted shoulder looks like. In the image below you can see that the shoulder seam sits centered on the shoulder, and that both the neck and the armscye lie smoothly without excess fabric or wrinkles. The garment shoulder touches the dress form all along the top of the shoulder from the base of the neck to the shoulder point. The silhouette of the garment matches the silhouette of your body. This is how properly fitting shoulders should appear.
Shoulder Fitting – Slope Adjustments
Shoulder slope refers to the angle of slope on the sides of the neck from the neck to the shoulder point. If the slope of the shoulders on your body is not the same as what the pattern is drafted for, you might see fit issues in the neckline or the armhole/sleeve area.
How to do a Straight Shoulder Adjustment
With straight shoulders, fit issues will appear as excess fabric in the neckline. The outer point of the bodice hits the shoulder before it’s drafted to, which raises the neckline edge if it’s paper. But if it’s fabric, that extra fabric sags and pools around the neck. This can also be referred to as having square shoulders or needing a square shoulder adjustment.
To fix, measure how much you pinch out on the neckline to get it to lay flat. Then cut around the seamlines on the bodice as shown and push that sliver of bodice up the same as the amount you pinched out. Redraw the shoulder seam and true up the waistline. Repeat for the back bodice. Now the bodice will fit your unique shoulder slope.
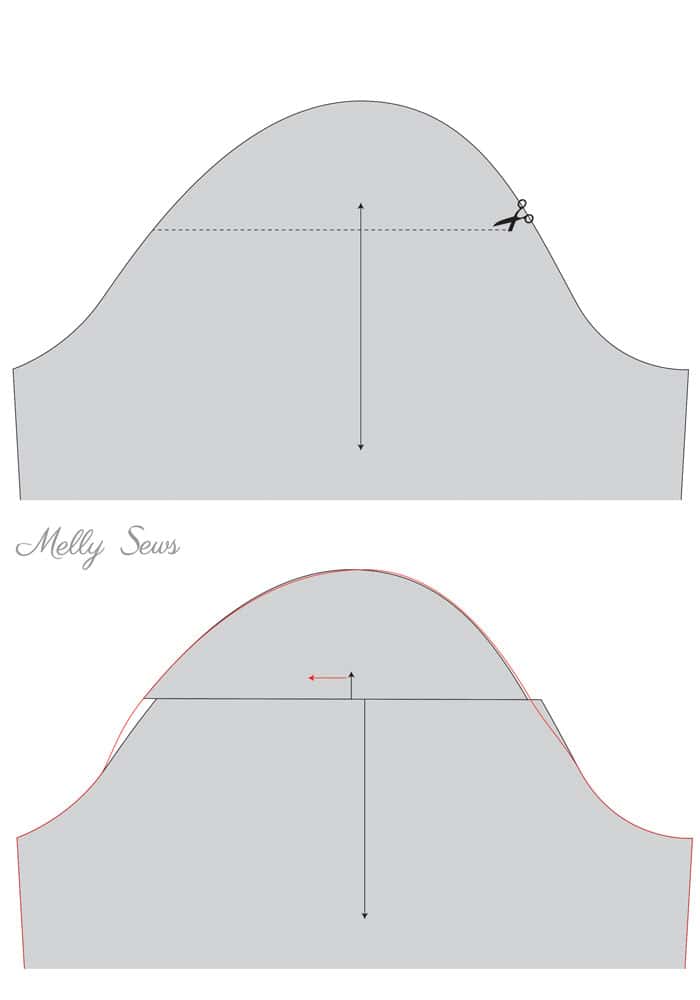
How to do a Sloped Shoulder Adjustment
With a sloped shoulder, the inner point of the bodice hits the shoulder at the right place, but then there’s extra fabric on the outer point, which tends to wrinkle in drag lines between the neckline and armscye. So you’d need to do a sloped shoulder fitting adjustment.
To do a sloping shoulder adjustment, measure how much you pinch out at the shoulder point to remove the wrinkles. Then cut around the seamlines on the bodice as shown. Next, push that sliver of bodice down the same as the amount you pinched out. Redraw the shoulder seam and true up the waistline. Repeat for the back bodice. Now the bodice will fit your unique shoulder slope.
What if you have uneven shoulders?
You can absolutely make separate pattern pieces for the right and left sides of your body if your shoulders are asymmetrical. You can also apply different adjustments to each side. Take time to think through right and wrong sides of the fabric and pattern when you are pinning and cutting. Make sure you get the correct adjustments on the correct side of your body.
Arm Joint Angle Adjustments
Joint angle adjustments for the shoulder are generally visible in the shoulder seam. When the seam isn’t centered on the shoulder, it is usually because a forward shoulder or posterior shoulder adjustment is needed.
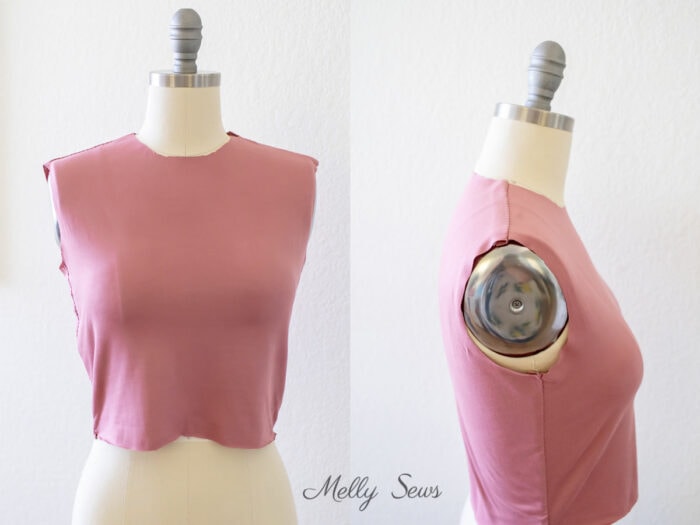
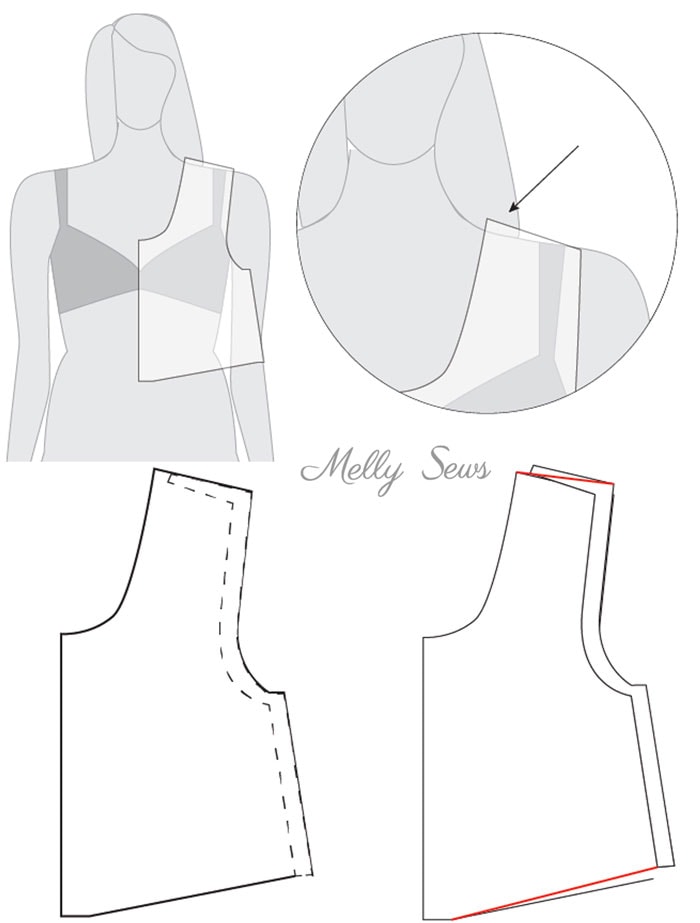
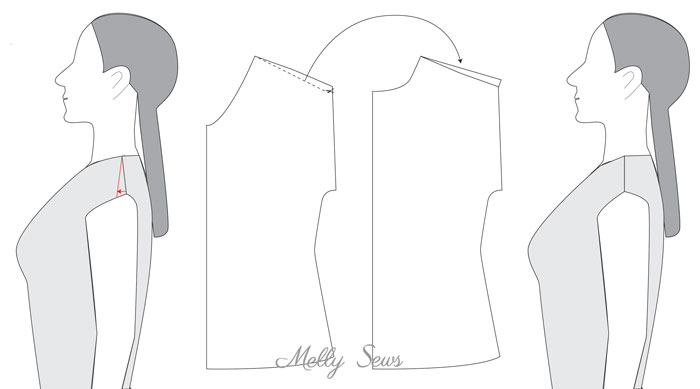
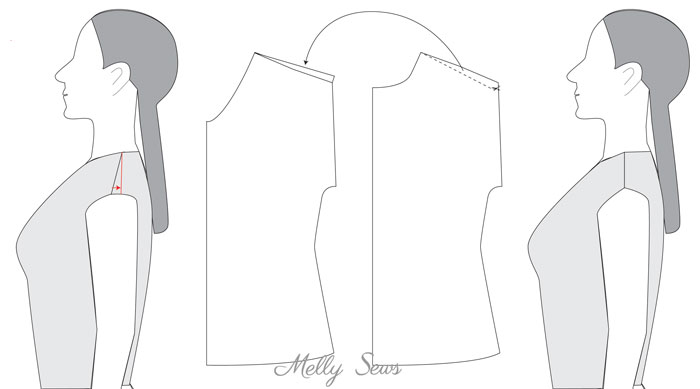
How to do a Forward Shoulder Adjustment
This is an EXTREMELY common adjustment people need. Forward shoulders can be bad posture or just your shoulder shape. However, my theory is that we as a population now have forward shoulders since we spend more time looking screens. You can see you need this adjustment when you look at your garment from the side. The shoulder seam won’t be in the center of your shoulder. Your garment may also feel like it’s pulling toward the back. You may also have an inadvertent high/low hemline, and only holding an unnaturally straight posture helps to fix this.
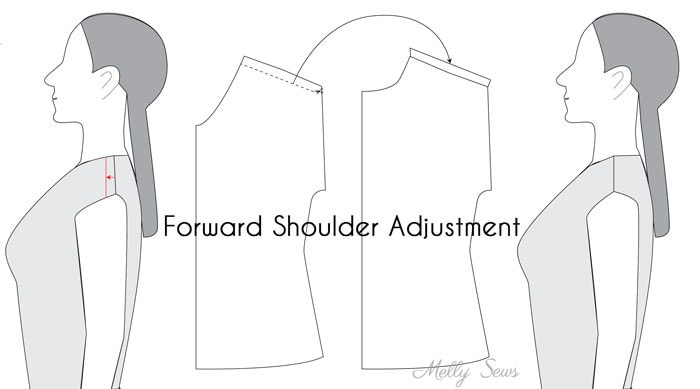
Luckily it’s an easy fix. Measure the amount you would need to move the seam to get it to the center of your shoulder. Then cut that amount off the front shoulder on the pattern piece, and add it to the back shoulder pattern piece. Note that you may need to cut across the whole shoulder, or you may need to cut at a diagonal (as shown below) because the seam hits the neckline at the right place.
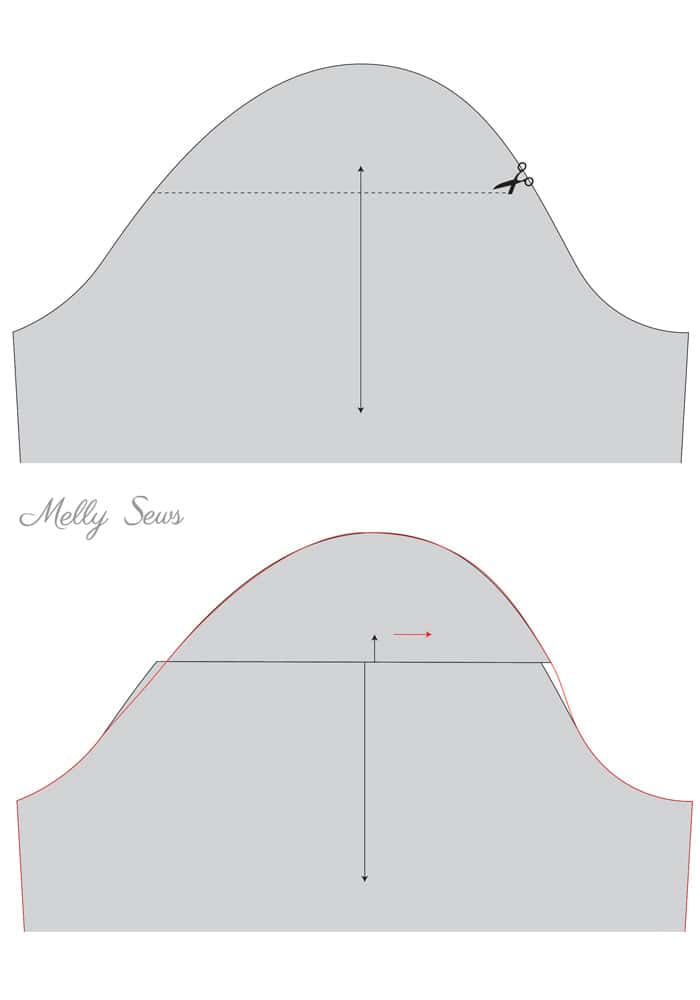
Depending on how fitted the garment sleeve is, you may also want to adjust your sleeve cap to allow for more room for the ball of your shoulder in the front of the garment. The simplest way to do this is to cut the sleeve head perpendicular to the grainline. Next, slide it forward the same amount as you did the shoulder seam. Then re-draw the front and back cap curves.
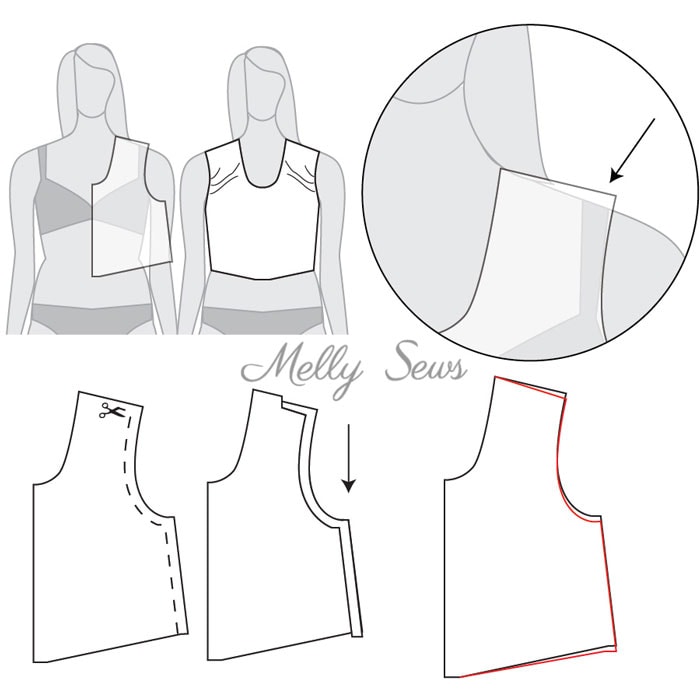
How to do a Posterior Arm Joint Adjustment
A posterior arm joint adjustment is far less common than a forward shoulder. However the way you do the adjustment is the same process, just in reverse. You’ll measure the amount you would need to add to the seam to get it to sit on the center of your shoulder. Then subtract that from the back shoulder and add it to the front shoulder.
Depending on how fitted the garment sleeve is, you may also want to adjust your sleeve cap to allow for more room your shoulder blades in the back of the garment. The simplest way to do this is to cut the sleeve head perpendicular to the grainline. Next, slide it backward the same amount as you did the shoulder seam. Then re-draw the front and back cap curves.
Shoulder Fitting: Shoulder Width Adjustments
Shoulder width adjustments, like shoulder slope adjustments, tend to show their need in the neckline and the armscye areas. Adjustments to the shoulder fitting are needed when your shoulders are narrower or wider than the pattern is drafted to accommodate.
How to do a Narrow Shoulder Adjustment
If you have narrow shoulders, you may find necklines slipping off your shoulders. Another clue is sagging necklines as you bring the shoulder points of the garment in to your actual shoulders. The good news is that this is a problem you can diagnose before even sewing a muslin. Do this by using your shoulder measurement. Measure across your body from shoulder point to shoulder point. Your shoulder point is that bone at the end of your shoulder, just behind the dimple your arm/muscle makes as you lift your arm up and out to the side. Compare this measurement (divided in half) to the measurement of your pattern from center front to shoulder point minus the seam allowance.

When comparing, keep in mind that different styles will hit at different points on your shoulder BY DESIGN. So a jacket seam may be slightly beyond your shoulder point. Meanwhile a sleeveless top will often end before your shoulder point.
To fix narrow shoulders, you have a couple options. If your narrower shoulder measures into a different size on a multi-sized pattern, you can cut that narrower shoulder and blend out to your bust size at the bottom of the armscye. However, this runs the risk of creating bust fitting issues by changing the shape of the armscye too much.
You might also try cutting a smaller size to fit your shoulders and adding a full bust adjustment to fit your bust.
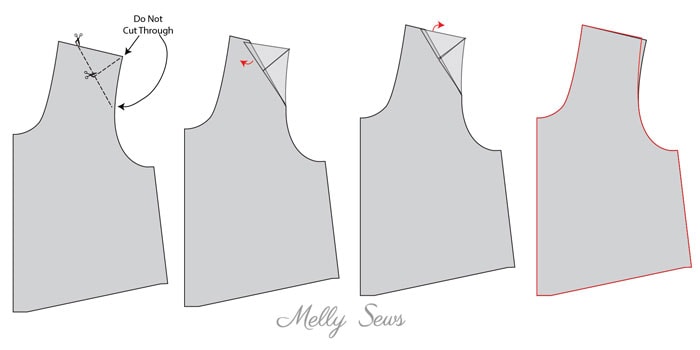
Another option (shown above) is to cut your pattern in hinges. This way you can slide the shoulder inward while maintaining the armscye length and general shape. To do this, cut diagonally across the corner of the shoulder toward the armscye, but don’t cut through the armscye. Then cut from the center of this wedge up toward but not through the shoulder point. Rotate both wedges together toward the neckline, overlapping by the amount that you need to narrow the shoulders by. Then rotate the top wedge upward to true the shoulder slope.
How to do a Broad Shoulder Adjustment
If you have broad shoulders, you may find sleeves feel tight or ride up on your shoulders. The good news is that this is a problem you can diagnose before even sewing a muslin by using your shoulder measurement. Measure across your body from shoulder point to shoulder point (your shoulder point is that bone at the end of your shoulder, just behind the dimple your arm/muscle makes as you lift your arm up and out to the side). Compare this measurement (divided in half) to the measurement of your pattern from center front to shoulder point minus the seam allowance.
When comparing, keep in mind that different styles will hit at different points on your shoulder BY DESIGN. So a jacket seam may be slightly beyond your shoulder point. Meanwhile a sleeveless top will often end before your shoulder point.
You also need to consider whether you need a broad shoulder adjustment or a broad back adjustment. If the front shoulder length fits but the shirt or bodice feels tight across your upper back, you actually need a broad back adjustment.
To adjust shoulder fitting for broad shoulders, you have a couple options. If your broader shoulder measures into a different size on a multi-sized pattern, you can cut that size at the shoulder and blend out to your bust size at the bottom of the armscye. However, this runs the risk of creating bust fitting issues by changing the shape of the armscye too much.
You might also try cutting a larger size to fit your shoulders and adding a small bust adjustment to fit your bust.
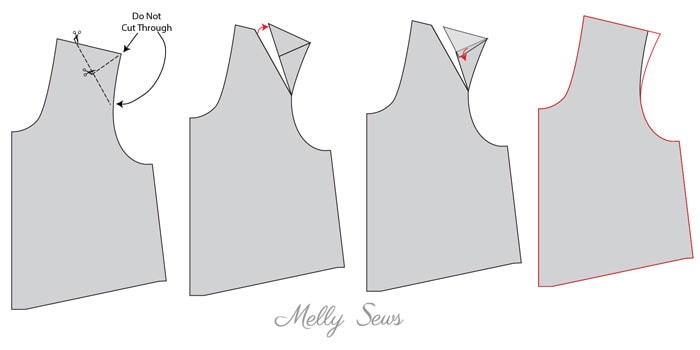
Another option (shown above) is to cut your pattern in hinges. This way, you can slide the shoulder outward while maintaining the armscye length and general shape. To do this, cut diagonally across the corner of the shoulder toward the armscye, but don’t cut through the armscye. Then cut from the center of this wedge up toward but not through the shoulder point. Rotate both wedges together away from the neckline, spreading by the amount that you need to widen the shoulder by. Then rotate the top wedge downward to true the shoulder slope.
Beth - Sew DIY
Your illustrations are so good! They make it so easy to understand. Great post!!
Jan
Thank you for explaining these adjustments so clearly and adding the illustrations! They take the mystery out of fitting a garment correctly..
Nancy
Thank you so much!
Spangler Melinda
Excellent instructions. Thanks for putting them in writing to refer back too!
Karel Riley
As usual, your instructions are helpful and clear, and demystify many fitting issues.
Leslie Christian
Thanks for the information and the clear drawings. You make this simple. Your
hypothesis re forward shoulders is correct.
Kathleen
Wonderful illustrations! I’m a very visual learner and thieve make it understandable. Thanks so much!
Jane
Thank you so much – so very generous of you.
Sandy
Very clear as usual. I appreciate all your efforts to help sewers improve their skills. You go girl!
Robyn Vaughan
Thank you. I learn so much from your tutorials.
Carol
Thank you! This will help the fit of my garments immensely and so easy to do!
Jenny
Thank you so much for sharing this post. I know its going to make a huge difference to the fit of my garments going forwards.
Jo
Thank you, oh thank you. Forward shoulders must explain why I spend my life tugging tops down at the front. Now I know how to fix that, or at least where to start.
Sara
Thank you so much! My broad, straight shoulders have always created fitting issues. I look forward to trying these adjustments with my next project.
Danita Courtney
Hi, Melissa.
This was something I didn’t even know I needed. I do what you recommend, “You might also try cutting a smaller size to fit your shoulders and adding a full bust adjustment to fit your bust.” to fit all my bodices.
I work with my measurements that draft to whatever size that is. It usually means a 4 size difference in my upper bust to my waist. But at my armscye a 1/2″ lower than the pattern suggests.
As I get older, I’ve noticed my body changing, (genetics, back beginning to slouch, and shoulders rolling forward.) It is getting harder to fit, But I am determined to do so. THANK YOU for all your help!
Most sincerely,
Danita
Larissa
Thank you for this! The clear explanation of problems and how to fix them is very helpful. I learned so much from this post, and it answered a nagging question I had about why my square shoulders cause gaping at the neckline. Finally, solved!!
Patty Massie
This is a great article!! Melly, can you tell me if one would do the Slopped Shoulder Adjustment before or after a Forward Shoulder Adjustment. I am having an awful time trying to get a decent
armhole pattern for myself. The slopped shoulder applies mostly to the right shoulder. Both shoulders need different Forward Shoulder Adjustments. I know you are busy but hopping you might see my question. Love what you do and thanks!
sandra
Such a wonderful tutorial. Thanks. I need two of these shoulder adjustments. I’m definitely going to try them with my next garment
Maria
Brilliant post! Thank you!
Laurie
Melly, you’re amazing! I just spent three weeks (and gobs of muslin) putting together a moulage for myself that I’m mostly happy with from a craftsy tutorial. I’m still unsure about my shoulder width though I think I’m really close. I’ve always been told that I have broad shoulders but I think I have narrow, straight, forward ones and because I’m an inverted triangle, my upper arms are just where I hold a lot excess weight so it *looks* like I’m broad-shouldered. Either way, the instructor didn’t spend much time at all discussing shoulder issues and I’ve learned far more in this simple article than several hours of frustration re-watching her non-explanation. lol Anyway, I’ve used many of your tutorials before but this one was GOLD! 🙂 Thank you!
Morgan J Brittingham
This is the exact resource I was looking for! Thanks very much.
Sophie T
This is fascinating! Thank you for this very detailed and clear explatation of this process! I would have never know how to fix such a fitting problem! And I’m sure it makes a huge difference on a fitted garment!
Jeri K
This was so helpful. You solved my puzzle, as I have only one sloping shoulder not two. Your illustrations make everything clear.
Louise
Brilliant. I always have this problem and botch a fix. Now I know how to tackle it properly. Thank you.