
How to resize a sewing pattern and make it larger or smaller

Hey y’all – today we’re going to talk about how to make a sewing pattern bigger or smaller, otherwise known as pattern grading. This should be a useful post if you’ve ever wondered how to size up a sewing pattern.
The number one question I get on my free patterns has to do with sizing. When I release a free pattern, it is always either something I drafted for myself or for whoever I made it for, like one of my kids. The patterns that I grade and test in multiple sizes take a lot more time, and that’s why those are in the shop. But regardless of what size I release for a free pattern, someone always wants a different size, so today I’m going to teach you how to do that for yourself.
What is Pattern Grading?
Pattern grading is the process is taking a sewing pattern of one size and then making it bigger or smaller from there instead of starting from scratch to draft the pattern in a different size.
The simplest explanation of pattern grading is that if you cut a pattern apart and then move all the pieces slightly away from each other, you’ll be able to enlarge the pattern by hand and you make a sewing pattern bigger. This is known as slash and spread grading, and it looks like the diagram below.
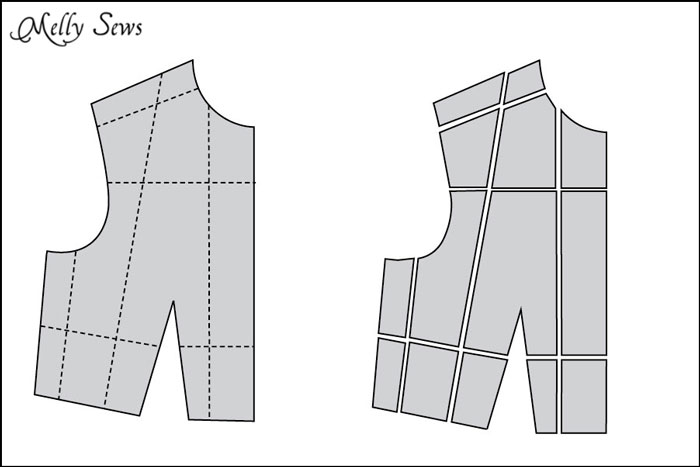
Similarly, if you overlap all those pieces slightly, you get a smaller pattern. Simple enough, right?
*Note: if you’re making a pattern smaller, when you read the examples below change the word “increase” to “decrease” and “spread” to “overlap”. The process is the same to make a pattern bigger or smaller otherwise.
Well, as you know, humans don’t increase in size at the same rates all across their torsos. Or hips or legs for that matter. For example, adults grow wider from size to size and not really taller. Whereas healthy kids grow taller faster than they grow wider. So you can’t just use a copy machine set at 110% to increase the size of a sewing pattern.
So how much do you add? Well, that is going to be based on measurements, so make sure you have current measurements handy. And then watch the video below on how to resize a pattern, or check out how to enlarge a pattern on YouTube here.
Supplies for Resizing Sewing Patterns
This post contains affiliate links. As an Amazon Associate I earn from qualifying purchases. All affiliate links are identified with (affiliate link) after the link or a commissions earned statement above the link(s).
- For more help grading patterns for yourself or for a small business, this book is well regarded (affiliate link) and is where I learned the fundamentals.
- I like this ruler (affiliate link) because it’s clear and I can see the pattern lines through it.
- For re-drawing curves, a French curve ruler (affiliate link) is helpful
- Pattern paper (affiliate link) is helpful to re-draw your patterns, although the back side of gift wrap purchased on sale is a cheap alternative.
How to Make Sewing Pattern Match Your Measurements
Start with your measurements, then compare that to the measurement that the pattern size chart or information says it will accommodate. So for example, most of my women’s patterns are for a 34″ bust. Let’s say your bust is 38″ – that means you’re going to have to increase 4″.
But wait! Don’t spread your bodice out 4″. Most bodice pieces only cover 1/4 of the body. So you’d only need to spread this bodice piece 1″ (4″ increase/4).
But wait! You still don’t want to spread that much. If you look at a size chart (like these, for example), you’ll notice that most sizes differ by about 1-2″ per size. Two inches is about the max you want to increase a pattern before redrawing, re-slashing, and spreading again. Otherwise the pattern starts to get really distorted.
So you’ll spread your bodice 1/2″ to go up one size (1/2″ x 4 = 2″) and then increase again 2″ total from the new pattern to get to your size. And that 1/2″ you’re spreading? You divide it between all three vertical cuts you made on the pattern. You might notice that 1/2 doesn’t divide neatly into three. It’s actually preferable to divide it by 4 (so you’d get 1/8) and then use that measurement as spacing for the two vertical slashes closest to the center front/center back, (so 1/8″ each) then take the remaining amount (1/8+1/8= 2/8 = 1/4) and put that increase into the last vertical slash, the one closest to the side seam.
It gives you a new respect for cutting your fabric exactly to the pattern and being precise with your seam allowances when you realize 1/8″ here and 1/8″ and 1/4″ there ends up being a whole new size pattern. This also shows why you can’t just put a pattern in the copier and increase 110% – because the pattern shouldn’t increase at the same rate for each part.
What about length increases?
And how much to increase in length? For children, this is going to be based on their measurements – like how much longer is your child’s torso than the pattern size?
But for adults, there’s a simpler answer since we don’t get a lot taller as we get wider. The rule of thumb is 3/8″ per size. That’s usually enough for the extra distance “out and over” that the larger sizes need to go to get to the same landmark, like the waist. As with all rules of thumb, tailor this to your personal size. If you’re short waisted, it may not make any sense to add length as you’re increasing circumference.
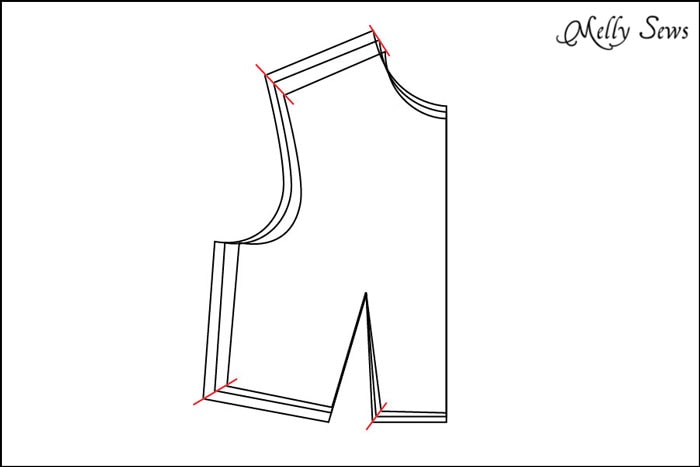
When you’ve graded a set of patterns, one way to check your work is to look at the corners. You should be able to draw a straight line on your bodices through the corners as shown below.
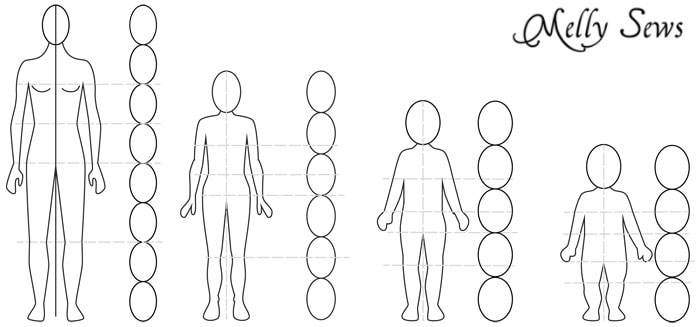
Note – checking the corners only works within a set of patterns – for example, toddler sizes 18m-3 or misses sizes 6-14. It won’t work when you go from toddler to children, for example. In fact, you really shouldn’t grade from toddler to children or vice versa. The reason is that grading is increasing or decreasing a pattern but keeping the same shape. If you need to go to another size group, that’s not the same shape, it’s a different shape altogether. This is more clearly illustrated by the image below.
Resizing Patterns FAQs
Can I make a child pattern adult size (or vice versa)?
As you can see above, proportional adults are usually about 8 head lengths tall. Babies are proportionally about 4 head lengths tall. They are DIFFERENT SHAPES. This is why you can’t just grade a 6m size pattern up to fit a 6 year old child – even if you go in steps as described above, you need a totally different shape, not just a larger size. The same applies in reverse. (Side note – this is also why my children’s patterns are for 18m-8. If I went beyond those measurements on either end, instead of creating two drafts I’d now be creating at least 3 as I do in my women’s patterns).
Similarly, a petite woman is a different shape than a misses regular, and that’s a different shape than women’s plus sizes. You need a new draft, not to grade up or down. Now, can you make a regular pattern work for you as a plus or petite size? Maybe. You’ll want to compare your measurements to the pattern and slash and spread or slash and overlap, but realize that you may have to do a lot of blending around the edges. And your pattern will not end up the same shape as the original pattern, so you can’t check your grading by checking the corners, and you WILL have to make a muslin to check fit.
Changing a pattern this way especially depends on where you carry your weight. The same volume of woman can come in a lot of different shaped containers. So measure, measure, measure, and use inexpensive fabric to muslin. And once you get a muslin that fits, SAVE IT. That baby is gold and a great starting point for pattern modifications next time you find a pattern you want to try that doesn’t come in your size.
How do I make a pants sewing pattern bigger or smaller? What about sleeves?
Pants and sleeves are shown below. As you grade these items, keep in mind that the top of pants will get spread more than the bottom (our hips and thighs grow wider faster than our ankles) and that the cap of a sleeve has to increase in proportion to the bodice it’s going to fit. (Not sure about some of this pattern vocabulary? Check this post). And like pants, you’d want to grade less at the wrist, because wrists don’t increase/decrease in circumference at the same rate as biceps.

This post raised a few questions so I decided to write a part 2 – see it here.
For more in depth grading, including how I use a computer to speed things up, I offer this course. This is aimed at those who want to sell their patterns, not just people who need to make a sewing pattern bigger or smaller for themselves, and includes a lot more specifics, examples, video and math worksheets and computer shortcuts for you to figure out your own grade rules and grade patterns you plan to sell.
cheryl
Wow!!! Lots of great information, well done! Love your blog 🙂 🙂
melissa evans
This is so helpful. Ive had your drafting class on my mind for sometime but im still far from ready to create my own pattern for publishing. Im glad it’ll be there when I am ready.
Alice
THANK YOU! You are truly amazing. Thank you for taking the time to explain this. I will find this helpful forever.
Kristie
Thank you for taking the time to explain this! I am excited to try it on a couple of “simple” free patterns, like your shorts and tank. Mostly the shorts one, as I have some baby birthing hips that just won’t go away! Thank you again!
Tanya
I love that our measurements are the same for your women’s patterns but I would still rather pay and buy your pattern for the beachy boatneck up to a size 12 for boys, we’re coming into a harsh Melbourne summer and I want my 9.5 year old to cover his arms, he won’t wear long sleeves but is happy with the beachy boatneck half sleeves. He still just fits the size 8 as long as he doesn’t have a growth spurt over the summer, pretty please?
Claire
Fantastic guidelines. Thanks
HW
So how do you adjust to get the right shape for a petites size? There are hardly any petites patterns around, and I’ve been trying to learn how to adjust and fit a normal size pattern to fit me. Even in commercial clothing Imhave a hard time finding things that fit.
Melissa Mora
You compare your measurements to the pattern, then cut and overlap at the marks as needed to adjust. The same as what you’d do to make it larger, except in reverse. I’ve edited the post to add more detail about what to do if you’re petite or plus sized.
Mary
Thanks Melissa. You’ve explained it in a way I “get it”. My mind’s racing over a couple of patterns right now. You must have been a well loved teacher!
Emily
Such a helpful post! Thanks!
Judy K.
Any hints or instructions available for enlarging an armscye? A favorite old pattern could be redeemed–a loose-fitting float or muu-muu with front and back yokes. I could perhaps redraft the old pattern using another pattern that fits, but I don’t quite have the gumption to sail into uncharted territory. Making the sleeve match is my biggest concern. Any help is appreciated.
Melissa Mora
Hi Judy. You weren’t the only one with this type of question, so I actually addressed it in part 2. http://mellysews.com/2014/09/grade-sewing-patterns-part-2.html
Verity
Wow, this is so useful, and so detailed. Thank you for posting this, I really admire how much you know and understand about pattern drafting!!
Anne
Thank you for sharing this information! Right now my daughter is too big for most of the little girl patterns, but doesn’t have the right proportions for the adult sized patterns. I posted a link to your tutorial on Craft Gossip here:
http://sewing.craftgossip.com/tutorial-resize-a-sewing-pattern-to-make-it-bigger-or-smaller/2014/09/14/
–Anne
Roseana Auten
Thank you for this easy-to-understand explanation of pattern grading — what it is, and what it’s not. I really hope more people pay attention to this. WAY too often on other blogs and social media you’ll read, “I cut a Small on top and graded to a Medium at the hip.” (Nope, you didn’t. You blended the sizes. You didn’t grade the pattern.) The authors of a rather popular book on fitting commercial patterns are to blame for this misnomer.
Mama Lusco
What great info! Thanks so much.
Sue Short
Thanks for the information on resizing a pattern. I am going to try and do this on the Fiesta Frock. My granddaughter is 3 but very tall for her age. She is wearing 5T clothes now (mom is 6’2″ and dad is 6’7″). I have been sewing since high school graduated in’64 and have never done this before. It will be a challenge for me – I am a visual leaner- but I am willing to try.
Yvonne
Thank you so much! I wish I had seen this days ago!
Christine Hull
This is the first time I have been able to find and understand about pattern grading. My grandchildren love the clothes I make them and certain dress patterns for my 6 year old granddaughter are much too small as she is a tall girl. Thank you for the information. It is much appreciated.
brahim
many thanks ,
Dawn Woodward
Thanks for the suggestions. I’m not sure how it’s going to work, but I’m going to try!:)
Deborah
This tutorial is great. Thank you for the time and trouble you went to to make this understandable to me. I have sewn for years (over 50 years) but only with bought patterns in the size shown on the packaging. Now I have lost 85 pounds and my patterns won’t fit me anymore, but all is not lost! I am on my way to buy some muslin so I can grade my favorite and see how it fits. On second thought, maybe I won’t learn on my favorite!!!
Pippi Hepburn
I used to use the move up and out or down and in method to grade and it takes forever. I will try this slash and spread or overlap to decrease. I’m sure it will work faster. Thanks!
http://www.pippihepburn.etsy.com
Lisa Giesbrecht
That make sense to me i gotta try it get to i always need a better pattern and i didnt no how its amazing how its done.
Maria
Thank you for a great post. It all sounds like technical drawing 🙂 I am going to put this information to work grading patterns for my “tall” baby, who grows out of things lengthwise first.
Stephanie
Thank you so much fornthis easy explanation. It is hard to find nice modest prom dresses for my daughter and the pattern she found doesn’t go quite as big as she needed. This makes life easier.
jamila
Hi.It was an excellent information l got from you.
Thank you so much.jamila
Jacqueline Chapman
This is wonderful! Thank you!
Judie
This information was really valuable! I really am a novice at this but occasionally try to make crazy things. Right now I’m attempting to make matching vests for my son and grandson (age 4) in glow in the dark Star Wars fabric. My son is 6’4” and is very long in the torso and there was no information about how to adjust for a 46 L on the pattern. I’m hoping a 1” adjustment at the waist cutting the pattern apart will work. My grandson is equally long waisted and HUGE somthis information was excellent. Thanks.
Ursa
Now it makes sense! Thank you so much for your time effort of writing this up – super helpful!!! Thank you!
Susan
Excellent information! Thank you for sharing your knowledge!
Donna Isbell
Thanks so much for this detailed instructions for sizing patterns for a custom fit. You did an excellent job, my Home Economics teacher never explained it like you were able to do. I learned how to adjust bust darts and widen and take in hip areas but even though she did a good job helping us sew a garment that fit us individually she left many questions unanswered. Through my years of sewing I’ve learn several steps of adjustments for certain patterns I’ve made, but I’m thankful for you detailed and very educational article. Many thanks to you.
Mellany
Thank you SO much for this video and tutorial! I have been sewing for 50 years and have been recently so discouraged because I couldn’t make anything fit anymore! With this lesson I should be able to grade my patterns to fit again.
I also have a preteen granddaughter who does not fit the standard pattern sizes. This should help me fit for her again too!
Thank you!
Angie
Newbie sewist here! (Well almost a year). This is so incredibly helpful and has made SO many things I questioned, make sense! I appreciate this post so greatly.
brendalynne1
THANK YOU
Barbara
This is great information. Your explanations are so clear and easy to understand. You’re a natural! Thank you.