
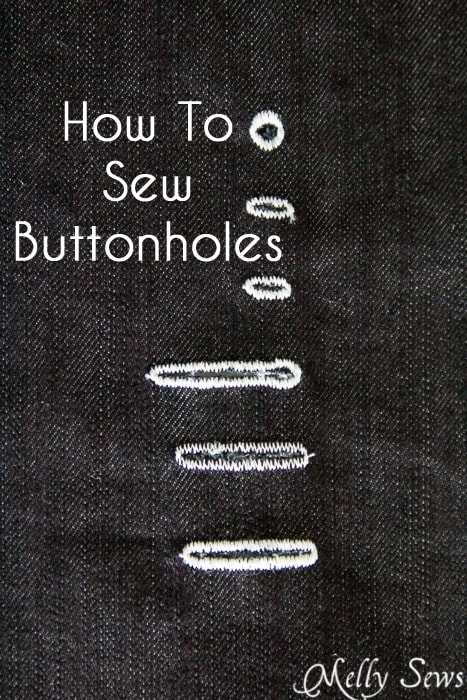
We’re almost done with our Berkshire Blazers today in the sewalong. All that’s left? How to sew buttonholes.
Did you miss any of the previous posts? Here they are:
- Day 1 Suit fabrics
- Day 2 Shawl Collars
- Day 3 Set in Sleeves
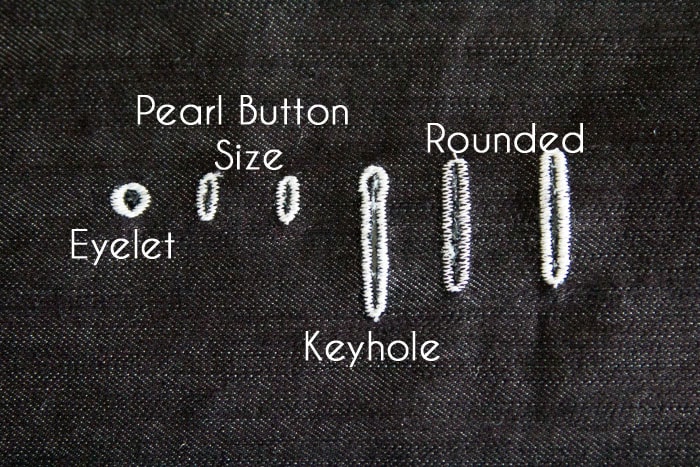
First let’s talk about types of buttonholes. I have some pictured below; the types you can do will depend on your machine. For my blazer I did a keyhole buttonhole. Mostly because that was the only option I had with the size button I wanted to use.
My two biggest tips for sewing nice buttonholes? Interfacing and sewing over the buttonhole more than once.
Interfacing can keep the fabric around the buttonhole from puckering – it is a must, even if you just cut a tiny piece to go under the buttonhole.
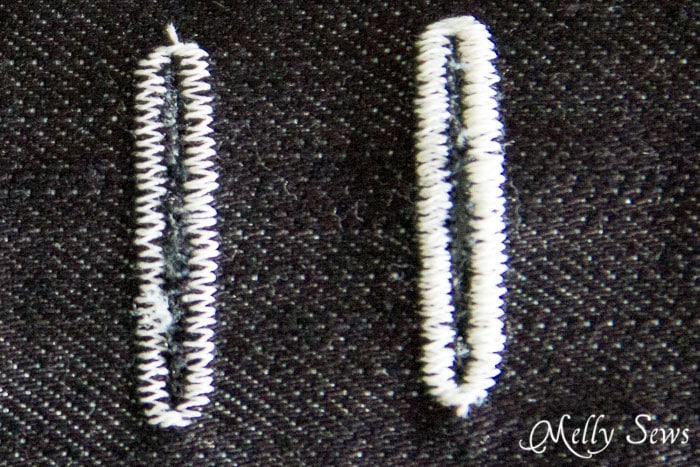
Next is to sew around the buttonhole more than once. See these two buttonholes? They were sewn on the exact same fabric, with the same thread and same settings on my attachment. But the one on the right looks much better because I sewed around twice.
I’ve mentioned my vintage machine before. So when I want to sew buttonholes, I’ve got this attachment to do it. Pros? It makes beautiful buttonholes. Cons? It’s a little tricky to set up and I can only do limited sizes. One more pro – if you have a low shank machine, I think you can used this attachment even if yours is not vintage or a Singer, as long as you have either a way to lower your feed dogs or a screw hole to use with the plate to cover the feed dogs. This type of buttonholer even works on straight stitch only machines, as you’ll see below. In case you ever see one for cheap at an estate sale, this is what they look like.
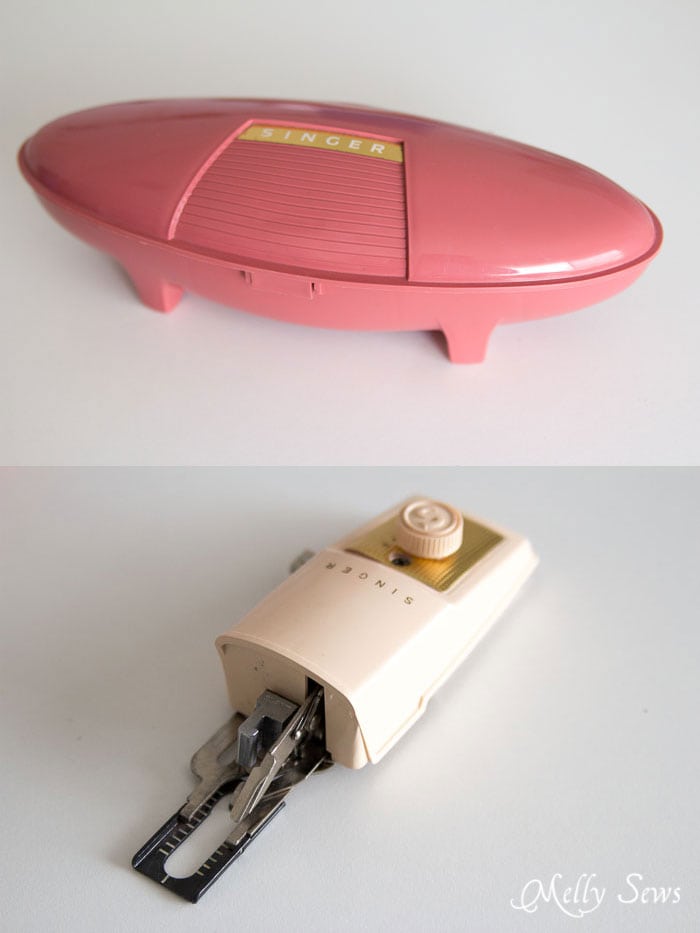
This is the newer model – the one I use most often. It has this space age carrying case.
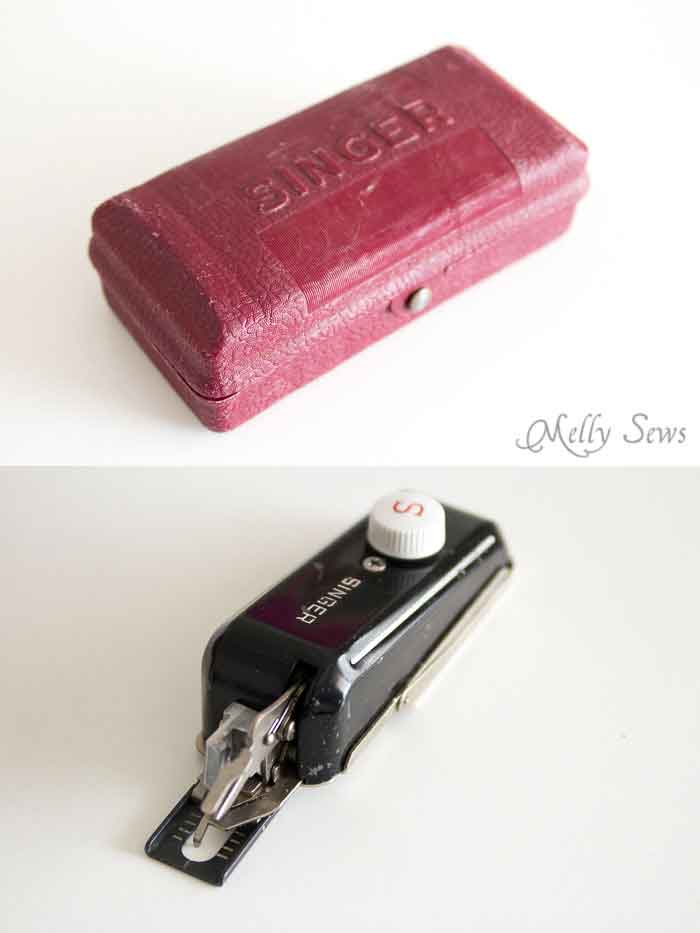
The older model works basically the same way, but it’s all metal, and comes in a case that looks like this.
No matter the model, they each should have a plate that covers the feed dogs on your machine. If you don’t have a place to screw this plate on, but you do have a way to lower or disengage your feed dogs, this should still work. The reason the feed dogs have to be out of the way is because the attachment takes care of moving the fabric for you.
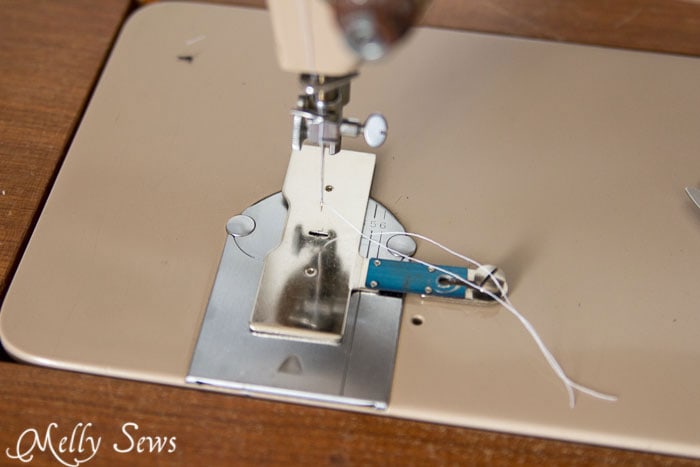
So then I choose which size button I want and the corresponding metal template, which gets inserted underneath the attachment.

And this is how it looks all installed.

To make a buttonhole I insert the fabric and press the pedal. That’s it.
Now, what if you’re on a modern machine? Then a foot similar to this one is a great option.
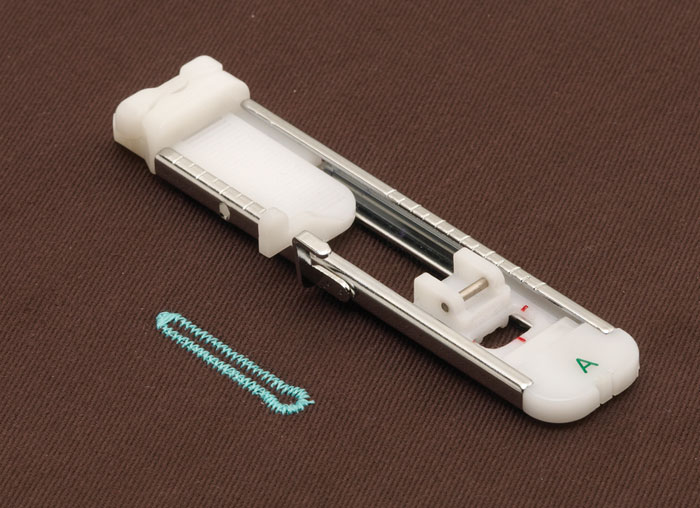
photo courtesy of Babylock
Each brand of modern sewing machine has a pretty similar equivalent foot. To use it you clamp one of the actual buttons you’re going to use in the back part of the foot, and then use your automatic buttonhole selector on your machine and it will stitch out the buttonhole. And remember to sew around twice – which was not done in the picture above.
If you have a very basic machine, you might have steps to create an manual buttonhole. These basically stitch a small zig-zag forward on one side, stop and do a wide zig-zag in place, then stitch another zig-zag backward, and stop and stitch a wide zig-zag in place to complete. This is the one feature I require an upgrade for. I cannot make pretty manual buttonholes. The square ends just don’t look great to me, and they scream homemade. Plus it’s super easy to mess up and hard to fix. I will do them in an extreme pinch, but to me it’s worth a different machine or at least a $10 foot like the one pictured above to get a better buttonhole.
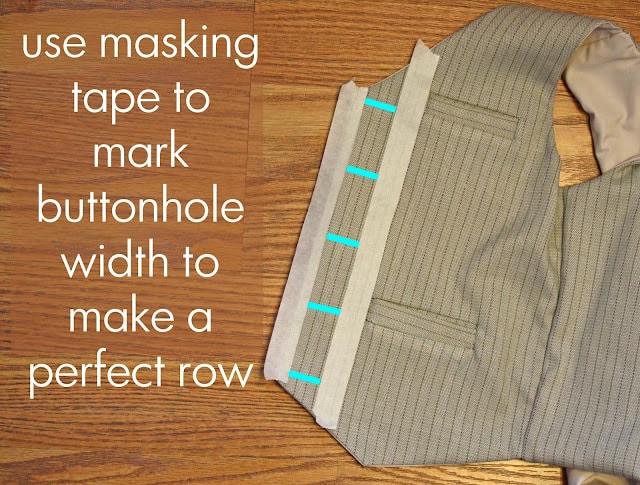
Let’s talk about some tricks for buttonholes. One of my favorites is illustrated here by my friend Jessica of Running with Scissors.
Another is that whether you use an attachment like mine or a buttonhole foot, the underside of that foot is textured and can snag fabric when you’re trying to slide it under. So here’s what I do:
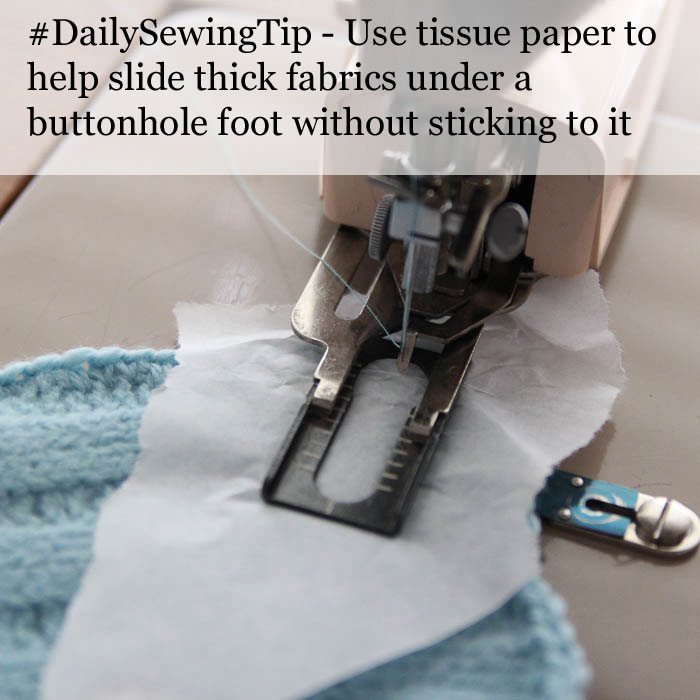
Once you’re done sewing the buttonhole, the tissue paper rips away easily.
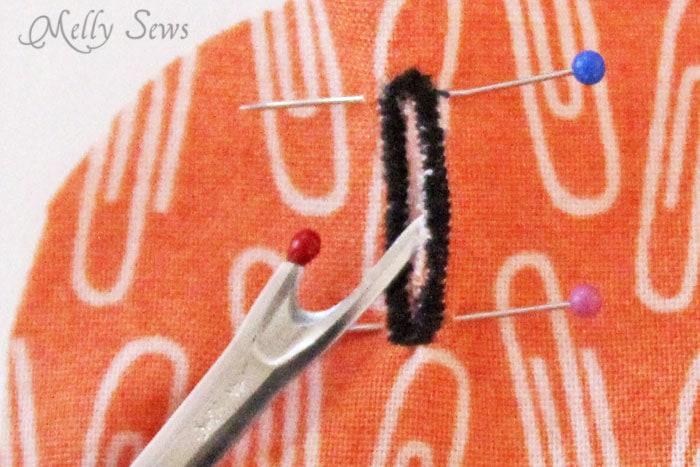
Finally, when you cut the buttonhole center, you can use scissors or a seam ripper. Either way, this is a helpful tip to make sure you don’t cut through the buttonhole.
So, have any more buttonhole tips? Share in the comments or in the Facebook group. And be ready to share your finished blazers tomorrow!
Kristi Andres
Those are great tips. I’ve never sewn over twice. Before I cut the button hole I use fray check over it (letting it dry before I cut it) and it holds up much better.
Anne
Great post!! Buttonholes totally stress me out! I just use the manual buttonhole on my machine, but I’ve got a special foot that at least makes them all the same size. I’ve got a Craft Gossip post scheduled for later today that links to your tutorial:
http://sewing.craftgossip.com/tutorial-sewing-buttonholes-2/2014/04/10/
–Anne
JudeB
Hi there
I just wanted to say thanks for the tips. The one that I found most helpful was sewing the hole twice – why I’ve never thought of that before I just don’t know, but it makes SO much sense, and I’ll certainly remember it next time I sew a buttonhole.
Karyn
Great tips! I hadn’t thought to sew around it twice.
Anna
I’ve been using the manual buttonhole setting on my machine, but I think there’s a buttonhole foot lurking in my tin of sewing machine feet somewhere. I think I’ll definitely try sewing over it twice next time, and see how the buttonhole foot works, too. I’ve been using snaps on my daughter’s dresses as much as possible so I can avoid buttonholes, but I have a button stash and snaps add up quickly, so I think it might be time for more practice. She’s not even a year old yet, it’s not like she’ll care if her dresses have slightly wonky buttonholes for a while.
Sandra Leuty
Maybe for experimenting, you could play with some of the scrap fabric, and make a couple of buttonholes, to see how they work, and I Totally agree that going around twice is a smarter and firmer buttonhole. I like the fray check idea to, and I always start the seam ripper at one end of the buttonhole, to the middle, then turn around and start from the other end of the buttonhole to the middle…learned that one a long time ago, the hard way. Relax and enjoy, and thank you for all your comments, it’s fun seeing how other people have developed tricks and pass on their knowledge.
Julie
How spooky, I have 3 pairs of my lads school trousers where the hooky bit have come away on the waist band and I need to make a button hole & add a button to fix them. I plan to do them later today , so finding all this help is very timely!
I have always done the manual (bit rubbishy) version and struggled to make it look nice/work well. You have kindly explained why. Thank for the great advice.
Trish
thank you for the great tips, especially going around twice. Look forward to more.
Dorothy Sainsbury
Great tip for sewing around the buttonhole twice, so much like the “tailored finish” that I wanted, will certainly try this out. Many thanks.
Brigitta
I stumbled on this post today, after I had found my old buttonholer attachment, and figured out how to install it. (Thank you, all those lovely sewers on YouTube!) I have a Greist, which I inherited when I bought my house from the previous owner, but it had no manual. It turns out that my buttonholer requires a zig-zag machine, and one that has a high shank. It came with 13 cams: 1 tiny hole, 8 straight buttonhole cams of various lengths, and 4 keyhole cams. I tried it out, and after a few false tries, I made a perfect buttonhole. Yes, I did have to go around twice, but I have to do that with the buttonhole stitch on my machine, too. I must say, now that I figured it out, I am never going back the the buttonhole stitche on my machine. This does a far superior job of it, and takes all the guess work out of trying to get the length right. I can see how easy it will be to use this to make perfect rows of even buttonholes on my next project. My buttonholer alsi lets me set the width of the slot between the buttonhole’s two long edges. I recommend everyone to try and find one on eBay or some rummage sale (I don’t think they are made anymore, which is a pity. They make such lovely buttonholes.)
Teach You To Sew
Great tips, Melissa! Sewing a buttonhole doesn’t need to be difficult – and you’ve shown how easy it can be! Well done!
Polly
Thanks for the tips!
I’ve been doing it all wrong and just couldn’t make them look good….. I was cutting the hole first and then attempting to sew around the edges….. off to try this out!!