

Hey y’all – today we’ve got a loooong ol’ post – we’ve been building toward this all month as we talk about fit. The hardest thing to fit and (I think) the reason so many women give up sewing for themselves is CURVES. So today we’re going to cover how to do bust adjustments.
Now, before we get into the nitty gritty of how to do them, let’s talk about WHY you need to adjust the bust. Why can’t you just choose the pattern size that matches your bust size? In order to explain this, let’s look at the illustration below.
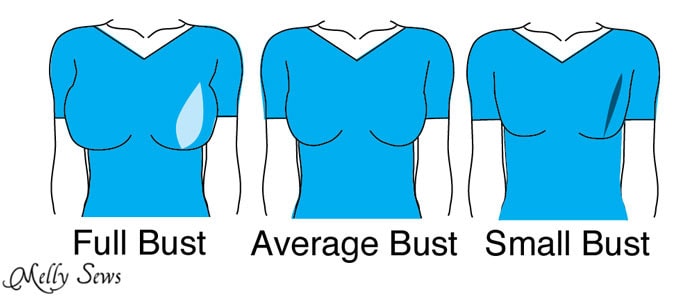
See the problem? The exact same size frame – shoulders and arms – can all have different size busts. And the different size busts can either stretch out a pattern over the bust or leave a wrinkle when the bust is smaller than the pattern.
When patterns are graded, shoulders, waists, armscye lengths, etc all increase and decrease (for more explanation and pictures of pattern grading, see this post). But if the only thing increasing or decreasing is your cup size, then you don’t want all of those points to change.
If your bust is “average” (depending on the designer, average is often a B cup, though I draft for in between a C and D cup) then choosing by the bust measurement will work great. But if you’re not (and most of us aren’t) then depending on the style, you might have gaping armholes, wrinkles where they shouldn’t be, clothes riding up, and a whole host of other possible problems. And the more fitted the pattern, the more this will be a problem.
So what’s a woman to do? Adjust the bust! We need to figure out a way to get that extra needed fabric over the full bust, or take away the excess over the small bust.
How do you know which size to start with and whether you need a bust adjustment? Well, if you’ve drafted your own sloper, you’ll want to compare shoulder/armscye lengths to the pattern you’re thinking about sewing. These are the most important areas to fit straight from the pattern, then you adjust bust/waist/length.
But what if the shoulders/armscye don’t look at all like your sloper? The easiest way to choose starting size then is if the pattern includes a high bust measurement, then you choose size based on that. If it doesn’t, and you know what cup size the pattern was drafted for, you can subtract the cup size from the bust size to get a high bust measurement. Cups sizes A=1″, B=2″, C=3″, D=4″, etc. The inches are the difference between bust and high bust. So, for example, Big 4 patterns are drafted for a B cup (unless the pattern specifically says otherwise). To get a high bust measurement you’d take the bust measurement and subtract 2. Compare those results with your high bust measurement to choose your size.
But what if you have no idea what cup size the pattern is drafted for? Then look at the other measurements for the pattern. If your waist and hips are in one size but your bust is in another range, you need a bust adjustment.
So now let’s dig into how to do bust adjustments. Remember that the goal of a bust adjustment is to add more fabric to or take fabric from the bust area WITHOUT changing the rest of the pattern lengths.
Here’s a little video overview of some types of full bust adjustments, but for more details, make sure to keep reading. You can also watch the video below on YouTube here.
We’ll start with a basic bodice with waist and bust darts.
And if you’re on the opposite end and need a small bust adjustment, watch the video below.
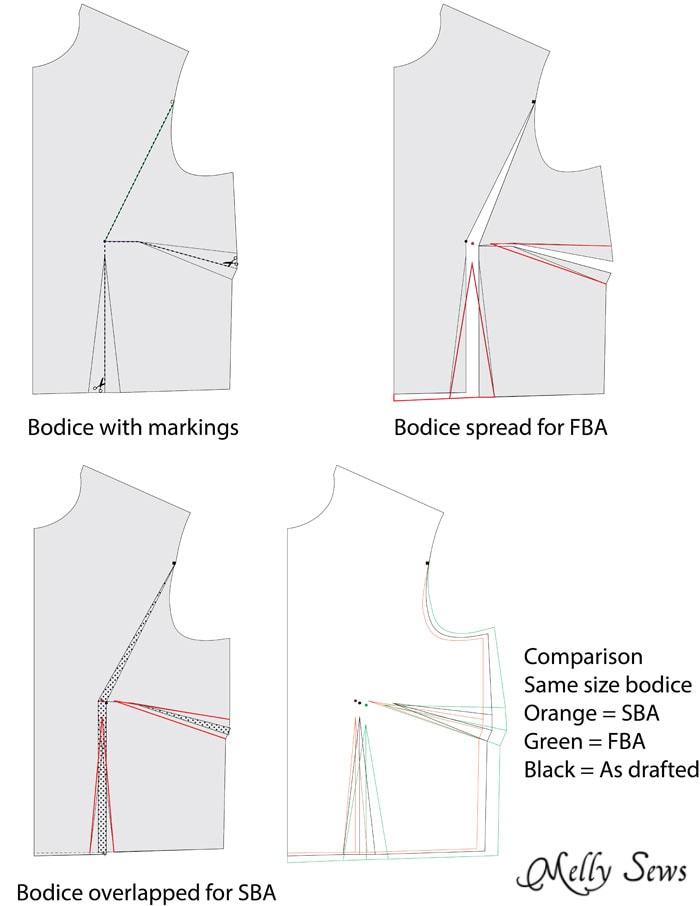
To do a bust adjustment, first you cut on the markings shown above through the center of the waist dart to the bust point and then up to the armscye. Then you cut from the side seam through the center of the bust dart to but not through the bust point. This creates two hinges in your pattern to adjust the room in the bust.
How do you know how much room to add or take out of the bust? First, check how much your bust differs from the bust measurement of the pattern size you’re using. Then take that number and divide by two – and that’s how much you need to increase or decrease a bodice pattern piece that covers half the body (as most do). So for example, if my bust measurement = 2″ more than the pattern, 2/1 = 1 and I would need to do a 1″ bust adjustment.
Spread these hinges for a full bust adjustment (FBA) or overlap them for a small bust adjustment (SBA). The amount you spread or overlap should be your bust adjustment amount measured in the vertical cut, then you align the pie piece shaped side wedge from there so the pattern lays flat.
If you’re doing an FBA, add paper under the spread and tape the pattern to it. Center your new bust point in between the points of the old darts. Then you’ll redraw the darts. On a full bust adjustment, the darts get bigger and their points are further away from the bust point. In a small bust adjustment the darts get smaller and their points closer to the bust point. Keep side seams straight and you’ll need to redraw the waistline. You can see in the comparison that the full bust adjusted pattern will take up more fabric and have more shaping from the darts, while the opposite is true of the SBA pattern, but the shoulder is the same on all three sizes.
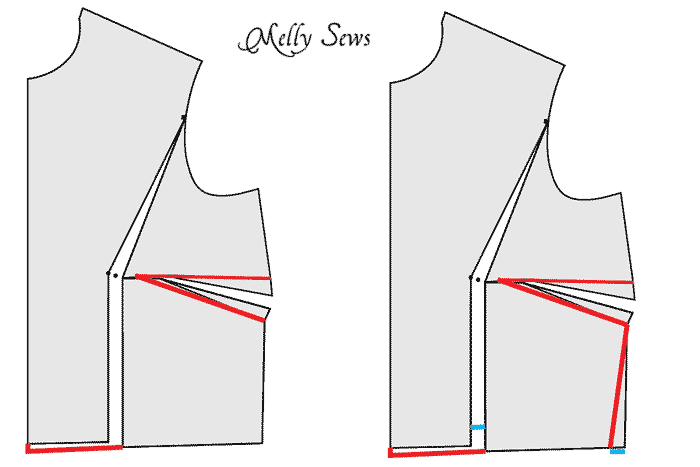
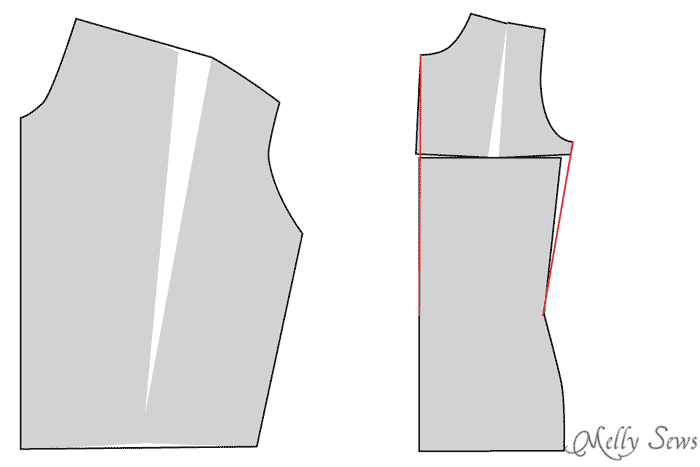
If your pattern doesn’t have the waist dart, you’ll need to add a step and redraw the side seam to take out or add back width that got changed at the waist. See the diagram above – this is on the FBA. On an SBA, the side seam will not angle in but be straight or even angle out since the bust and waist on a SBA frame would be closer to the same size.
OK, now that we’ve got the concept of how to do a bust adjustment, let’s look at how to do it on different types of style lines. What about princess seams?
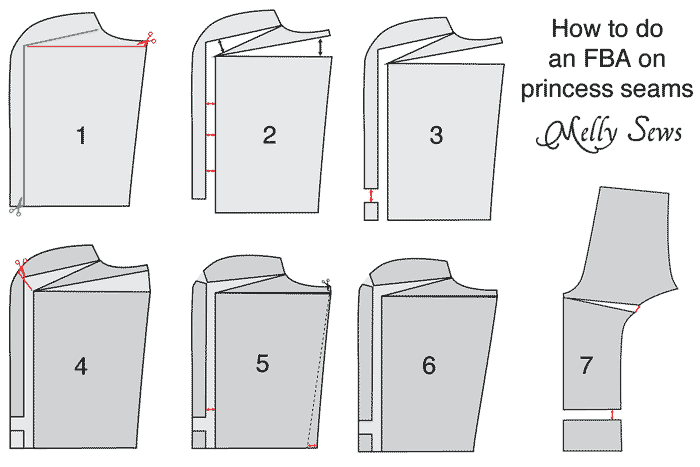
The FBA on a princess seam requires alteration to the side front first, much like we did with the basic FBA. But then on Step 4 we cut the newly taped back together pattern again – to close the dart we added on the side seam and increase the bust curve. Since we did that, we also have to redraw the side seam (step 6), like we would in a no waist dart situation. Finally, we also have to increase the length of the center front piece to match the new side front piece. You do this (step 7) by slashing and spreading the pattern the same amount in the curve as you did on the side front curve, and by lengthening the same amount that you did on the side front.

The princess seam SBA, on the other hand, is comparatively easy. Just slash and overlap on the curve the same amount on both the side front and front, then redraw the new, shallower curves.
What if your pattern has no darts and adding them wouldn’t be a good idea – like a t-shirt? Then you can do a rotate and trace method with a large piece of paper. First, draw a vertical line to line your pattern up. Then draw a perpendicular horizontal line at armscye level. Rotate and trace parts of your pattern as shown below.
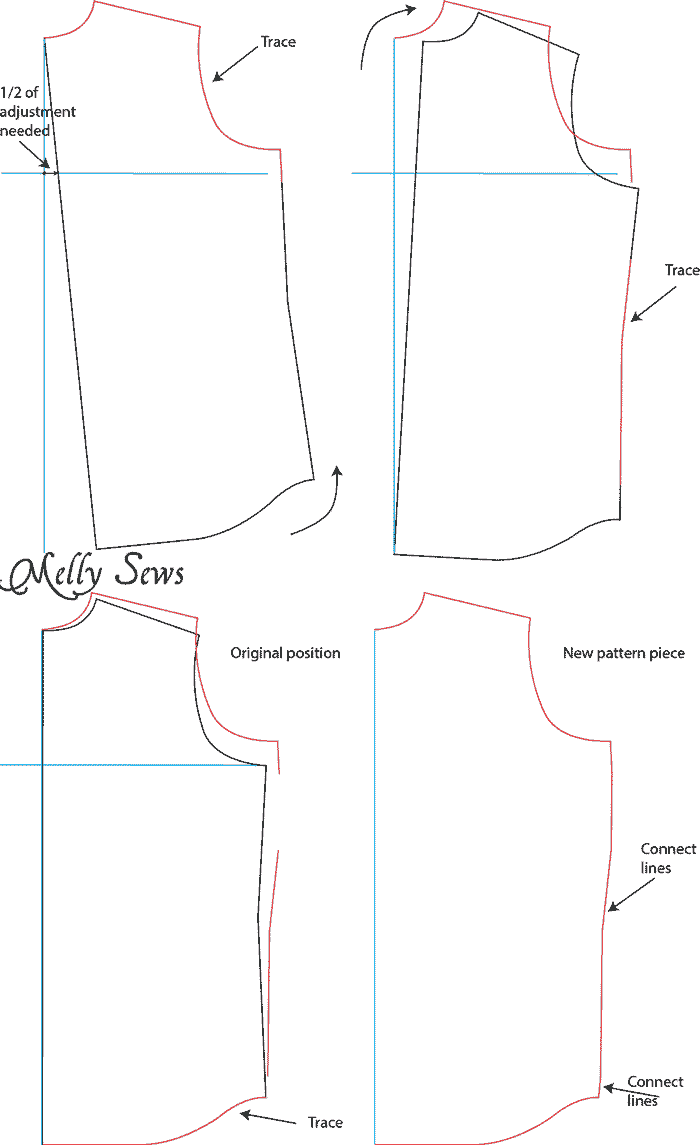
The problem with this FBA method is that is does add some length to the side seam. If it’s not too much length, you can stretch the back piece as you sew to the same length as the front piece. Once the seam is steamed, most of the wrinkles will disappear as the fabric settles onto your body. Another option is to redraw a curved front hem that ends at the same level on the side seam as the back pattern piece.
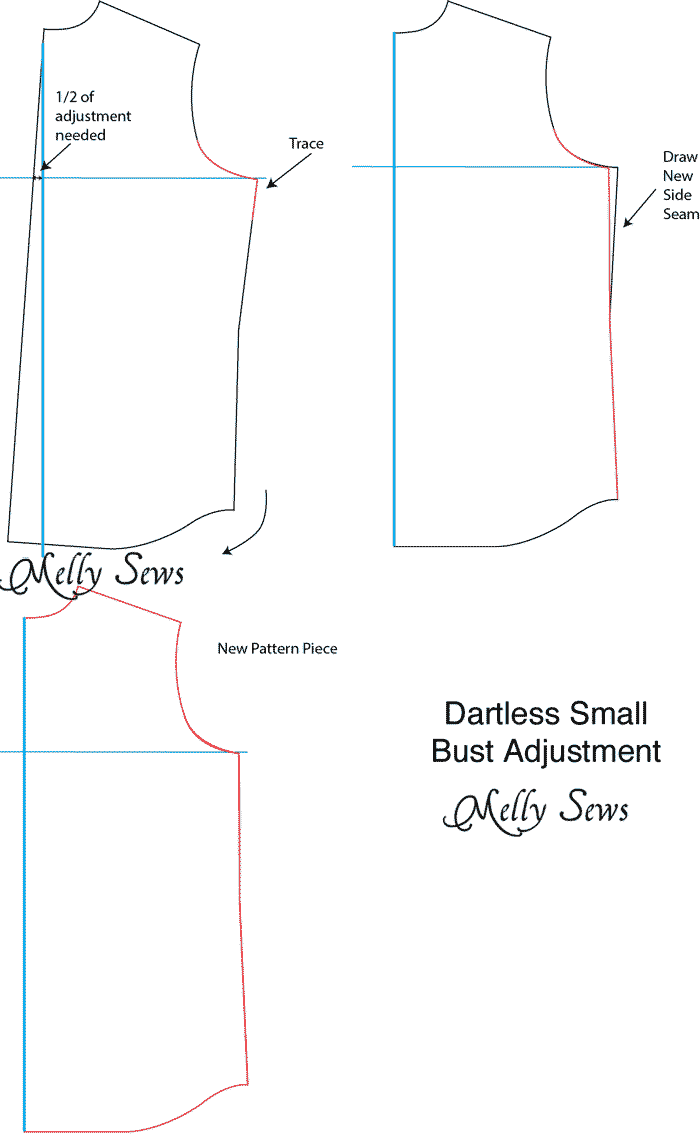
Rotating and tracing an SBA is an easier proposition, as shown above.
Below is an example from my post about drafting a bodice that shows how you’d slash and spread when the bust dart fullness is changed to gathers under the bust.
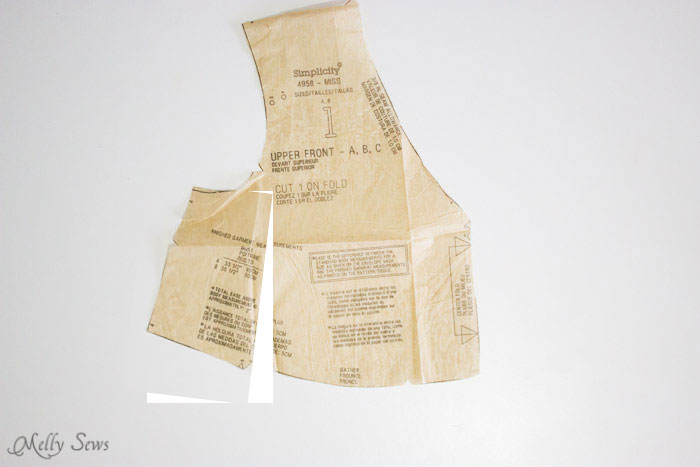
Two more dart examples. My Marigold pattern (shown above), doesn’t have a dart, instead transferring bust fullness to shoulder seam gathers. So in order to FBA that pattern, I’d do like the diagram on the left below and slash and spread the shoulder to add fabric, which would also make more gathers at the shoulder.
The example on the right above is another way to add bust width to a dartless pattern, like a fitted t-shirt, by slashing and spreading the upper bodice, then redrawing side seams. This one works best for very small adjustments, because too much rotation will mess with the shoulder seam.
So, the moral of the story with bust darts – much like the fact that there isn’t a single right way to sew, there is also not a single right way to do bust darts. You’ll have to muslin, and you’ll have to experiment. And the more you do of both, the more comfortable and competent you’ll get at assessing whether you need to do a bust adjustment and the best kind to do. Just remember – the method (even if it’s one you invent!) that adds or takes away fabric in the bust area while changing the rest of the pattern the least amount, is likely to be successful.
Kristie
Wow. That is a lot of good information. Now to take time without a loud child right by me to read and comprehend all of it. Thanks a bunch!
Anne
We must, we must, we must adjust the bust! I’ve got a Craft Gossip post scheduled for this morning that links to your tutorial: http://sewing.craftgossip.com/?p=84566 –Anne
Lisa
Another fabulous and informative post. Thank you so much!
Penny Reveile
Where have you been all my life?! I got so discouraged sewing for myself and never getting the fit right. I’ll have to dust off the sewing machine for sure! Thanks
Nell
Thanks for this! 🙂 Your illustrations are great and explanation is better than I’ve seen before. I appreciate having
the adjustments for princess line as well. Both for large and small adjustments. Very nice.
Kelly T
Thank you for this in depth post!!! T shirt patterns are usually just fine when I sew one up, but dress patterns & woven shirt patterns never fit right because my bust is much smaller than the average woman. (Lucky me). This helps me out a lot, I’ve been putting it off, and have several things I’ve made lately that don’t fit- this will push me in the right direction!
Beckie C
So helpful and marketable. I have been so fortunate and so blessed to perfectly fit into McCall’s fashion patterns most of my 57 years: Even fitted McCall’s patterns. So many friends ask me to sew for them when much alteration from the outset with any pattern is required. Early on, I was tasked with re-sizing a fitted dress, then sewing a muslin test dress, then sewing a plaid dress. Still, my customer was not satisfied, even with 5 additional free fittings for readjustments that “hurt”, especially with plaid, more than helped. Such was the case with a very large, tall men for whom I sewed casual clothes one year. His annual weight gain from 350 to 700 pounds precluded altering his altered patterns, much less buying any garment large enough to alter. A career girl without children, I never found enough time to go with enough money to sit in tailoring classes. So, you’ve helped me tremendously where it comes to sewing, altering and recycling for others.
Ramona
Thank you so much for this wonderful post. I definitely need to do a FBA and have been nervous to try. Your post made it so much more understandable!
Pennyp
Wowza! I will have to read it again with a pattern in front of me, measuring tape next to me and pencil in hand. But this is ah-maz-ing!!! Someone just answered my biggest alterations questions!!!!!!!!!!!!!! I think I’ll hack up a couple of those 1.99 tees from Michaels and see what I can do with ’em!!!!
You still and forever ROCK!!!!!!!!
Melanie
I cannot thank you enough for this! I have a very small bust and have seen a zillion explanations on FBA but nothing for SBA. This helps sooooooo much! <3
Carroll Kelly
This is exactly the information I need to help me sew a dress for a neighbor. A million thank yous.
L Diane Johnson
Melly…you are my champion. I so much appreciate this thoughtful post. You explained simply, what takes others a mountain of explaining/demonstrating to even get one aspect of Bust Adjustmenting across to the novice.
I now fully understand the dynamics of a small bust adjustment. Most folks skip one step or another. Yours is concise, comprehensive and to the point,
I will be using this demo today, as I tackle what otherwise was would have been a sure failure. Can’t wait to see the fabric hang just right on my body.
Thank You!!!!!
Virginia
Melly,
Thank you so much. The pattern I have gives directions for FBA, but only for one size and I needed more. I did not know how to calculate how much to enlarge the pattern. Thank you, I am going to adjust the bust tonight.
Sincerely,
Ifeoma
Very useful information. I love it. Thanks and God bless you.
Maria
Great information,I was looking for something like this.Thank you!
Stephanie Allen
Thank you for the SBA video, this was such a good refresher and I’ll be linking your tutorial in my upcoming blog post! https://thepetitesewist.blogspot.com/2017/07/kathryn-dress-by-itch-to-stitch.html
Pat in CO
Nice job explaining. And here’s what I tell my customers:
You Must. You Must. You Must adjust the Bust!
The bigger the better, the tighter the sweater.
The boys depend on us!
Carrie
YES YES YES!! The SBA worked perfect although I did raise the bust point 1/2 inch too. But doing that alone still left a lot of baggie fabric under the dart. Although the pattern says a 34 bust, the “ease” is for 37.5 inches which doesn’t work for SB gals. Thank you! I have followed your tutorials and ideas for sometime. I appreciate your wealth of knowledge and sharing alteration videos. I have been afraid to alter patterns but since they are made different than 30-40 years ago, it is now a necessity. Many thanks!