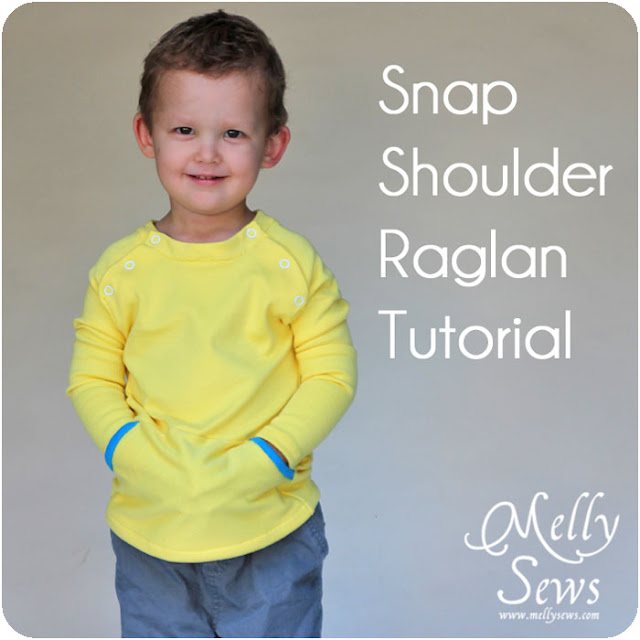
For today’s knock off, I was inspired by this pin, which unfortunately wasn’t from the original source but from a blog home page, but I finally found the post and the shirt was credited to Mini Boden. And no longer available. The pitfalls of Pinterest.
So I’m going to give you a tutorial on how to make this.
Supplies:
Fabric
*Raglan t-shirt pattern
Drafting paper (or newspaper, or regular paper taped together. Whatever works)
*Caveat – I used my Sewing for Boys Raw-Edged Raglan pattern. THIS IS A TERRIBLE IDEA – don’t repeat my mistake. I love this pattern, but it was hair-pulling to adapt it to this idea because of the curved edges, and involved making facings and lots of seam ripping. Go make sure you have a straight-edged raglan pattern, like this one.
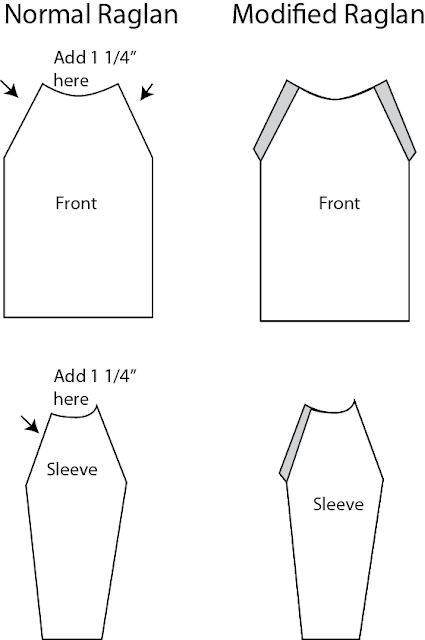
To modify your raglan pattern, you’ll need to redraft the front and sleeve pieces like this:
The gray areas on my diagram are extra fabric that you will fold under to make the openings where the snaps will be. You need to add this to the shoulder edges of the front piece, and to the front shoulder edge of the sleeve. Cut your new pieces and the original shirt back out of your fabric.
1. Make sure you cut your pocket to be as wide as your shirt front (simply move it closer to/further away from the fold) . Then, take a 1 inch wide piece of contrast knit and pin it to the ride sides together on the curved edge like so. Stitch.
2. Flip that piece to the wrong side of the pocket, pin again, stitch and trim. A stretch stitch isn’t important here, as this part doesn’t need to stretch much.
Pictured below: Wrong side of fabric on left, right side on right
3. Line up the bottom edge of the pocket with the bottom of the shirt. Mark the top of the pocket with a pin. Flip the pocket so it is upside down, right sides together with the shirt, and overlap the pin by at least 1/4″, then remove the pin and stitch this edge.
4. Flip the pocket down, and the top and curved edges are finished. Pin the sides and bottom to the shirt and treat them as if they are part of the shirt from here on out.
5. Fold the top edges that you added to your shirt front to the wrong side. Press and pin. Repeat with the sleeve edges.
6. Sew your sleeves to the shirt back on the back shoulder edges (use a stretch stitch from here on out).
7. Pin the shirt front edges so that they overlap the sleeve front edges.
8. Sew about 2 inches of the overlapped seam from the bottom edge up. Keep your stitching close to the edge of the shirt front.
9. Leaving the shirt front and sleeve edges pinned together, sew the rest of the shirt like you normally would.
10. Unpin the shirt front. Now cut two pieces of neck binding that are at least 2 inches wide. One should be at least one inch wider than your back neck+sleeves length, the other should be 1 inch wider than your front neck length.
11. Pin the binding to your shirt front and back, right sides together. There should be 1/2″ over hanging each edge.
12. Stitch.
13. Fold the binding in half, right sides together, and stitch across the short ends so that your seam is even with the edge of the shirt front on the front piece and with the sleeve edge on the back piece.
14. Trim seam if necessary, then turn the binding right side out, tucking in the seam into the binding so you have a nice neat finish.
15. Stitch in the ditch on the right side of the shirt to secure the binding down.
16. Finally, you can add the snaps. I put one on each side into the neck binding, then spaced the other two evenly.
17. Hem your shirt and sleeves. When you hem the shirt front, sew the pocket right into the hem.
And then torture your kid by making him model for you. Not really, my boys usually love photo shoots, but Bean had just woken up from a nap and was grumpy, so I have a lot of shots that look like this:
Or this:
But then he finally started warming up.
Happy sewing!


Tara - A Spectacled Owl
I love this so much! I really really wish I could sew! My 4 year old is obsessed with yellow & it is hard to find yellow shirts that are incredibly ugly! This is adorable (and so is your little guy!)
OnceUpona Sew
Thanks for the great tutorial. I have been struggling to get my raglan neck the right size. I am hoping this helps. I think I am going to try opening on only one shoulder! Thanks for sharing.
Donna @onceupinasewinmgmachine.com
folkhaven
This is such a clear tutorial.. thank you! Also thanks for the warning about which pattern to use… I probably would have headed straight for the one in Sewing for Boys.
Diana - FreeStyleMama
This is so sweet! Just love it! I’d love you to come link this up at my Pin Me Linky Party.
Joanne
Awesome tutorial. It’s so adorable!!
Lindsay @ 402CenterStreet.blogspot.com
This is so cute! Thank you for the tutorial. I’m pinning it for future reference. 🙂
Faith
This is just great! My kiddo has a 99% head circumference and even shirts with one side button have to be forced on. This should eliminate the need! I will be trying this out tomorrow!!
Mary O
My three year old niece is undergoing chemotherapy. This pattern is perfect for access to her chemo port. Thank you!