
Today I’m going to show you how to make a basic t-shirt pattern based off of a t-shirt you already have. If you read all the way through the post, there is also a sample pattern you can download that fits sizes 2T-4T.
This tutorial is the first of three parts – I’m going to show you the basic principal of rub-off pattern making with a boys t-shirt, then the second part will be how to alter that pattern, so I can show you how I made the Bean’s Baby V-Neck T-shirt, and the third part will be a tutorial of making a pattern from a blazer – a lot more complicated.
Also, if you have a kid in sizes 2-4T and just want a free pattern to start with, scroll all the way to the bottom of this tutorial.
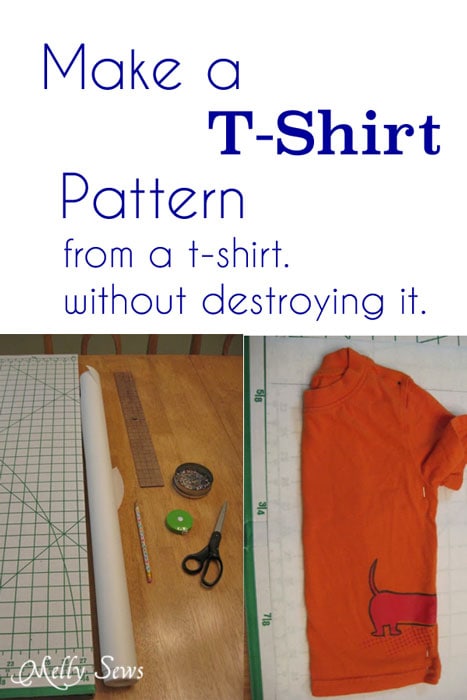
Let’s get started. You will need:
- Pins
- Pencil
- Large Paper – this can be kraft paper, butcher paper, medical exam table paper or even just printer paper taped together.
- Garment to copy
- A large piece of cardboard – this can be any large piece of cardboard, I just like this one because it folds up and stores neatly.
- A ruler, preferably a clear quilting ruler
- A measuring tape
- Scissors

First, lay your paper on the cardboard. Then you want to draw perpendicular lines on the paper. This is where the clear ruler comes in handy – you can use it to make sure you’ve got a 90 degree angle.

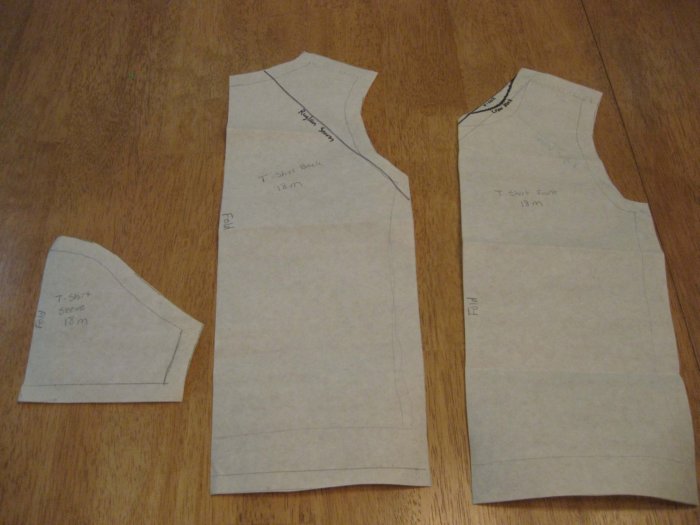
Next, fold your t-shirt in half, front sides out. We’ll be making the pattern for the front first. Make sure you have the side seams (if there are any) together, and have matched the sleeve and shoulder seams. I pin the shirt in half to make sure. Next, line up the center front of the shirt with your vertical line, and line up the hem with your horizontal line. Stick a couple of pins all the way through the shirt into the cardboard to hold it in place.


So far, so good. Here’s where the rub-off method comes in – using pins pushed all the way through into the cardboard, outline the sleeve seam and the collar seam – the two seams you can’t trace easily since there is other fabric in the way. You could fold up the shirt some more to see these seams to trace, but it wouldn’t be as precise. It would work fine to do it that way for an easy garment like a t-shirt, but when we do something more complicated, like the blazer, that won’t work. Your garment should look like this:

Remove those pins and you will have a pinpricked outline of the curved seam. By connecting the dots with a pencil, you can draw in the seam.


(PS – if you have trouble finding either your confirmation email or the email with the pattern link, try checking your spam, trash, junk, bulk, social and/or promotional email tabs or folders. Free pattern links are also included in every weekly newsletter; these go out on Friday afternoons. Due to the number of subscribers I can’t email pattern links to individuals.)
kendascrafts
Great tip! I’ve always just folded the sleeves, etc. in to trace the piece that I needed, and you are right, its not as accurate. Thanks for sharing this new method for making a pattern!
Glamour Glory
this is great! Thank you for posting this! My son has gone through a growth spurt and I need to make him new shirts!
Reyna
http://www.glamglory.blogspot.com
http://www.facebook.com/glamglory
Seamingly Smitten
What a great tip about the pinning method to get those hard to trace curves!
Jenny @Seamingly Smitten
Tamanna
Thanks! I never realized that you have uploaded a free pattern 🙂
Becky S
I am brand new to sewing and my goal is to make dresses for my daughter (who is 9) I get frustrated because most people post tutorials on making dresses for toddlers. I am happy to see maybe I can make my own pattern to do the top part of her dresses and just follow the rest of the design. thanks for putting this up.
Becky
lynne
I am new at sewing and want to make a costume. The top for the costume is really like a vneck tshirt. Using your method to make my own pattern, I am free to choose the right fabric. What I need is tips on making the vneck neckline piece. I don’t quite understand what you said above about making a pattern for the neckline piece, so can you tell me in more details? 🙂
Thanks in advance. I love the idea of using pins to trace the curve of the sleeve too.
Melissa Mora
Look at the top of the post where I linked to Bean’s Baby V-Neck shirt – there are much more detailed instructions about the V-neck in that post.
kadasher
hi,
i really love your work, its been very inspiring. i have two boys 6 and 8 years, can i modify this patterns to their size? how do i go about it? thank so much.
llynnda
I have been doing this for years but usually just with knits. Didn’t know it was called Rub. I always thought of it as Rob! I was a stretch and sew instructor for years and frequently used this method for knit fabric when there wasn’t a pattern available. I have also used this method for woven fabric with some success. My estimate for ease does not always work out . Love your explanation and I will now call is Rub. It sounds so much better than Rob!
Silvia
Lovely tutorial, I just made the patter from a tshirt, but the back is a bit different from the front : longer and the shoulders are a big bigger and the curves where the sleeves are don’t really match with the front…what do you suggest me to do? Shall I just use the back and cut out the rounded part of the neck?
Thanks
SILVIA
Melissa Mora
The front and back arm curves should be different; usually there is more curve to the front than the back. The shoulder width should match, however. You need to modify your pattern to make sure the shoulders are the same width and that the length of the side seam is the same.