
Sew a camisole with adjustable straps. This DIY tutorial includes a free sewing pattern, video and written instructions.

Hey y’all, I’m updating one of my most popular older posts on how to sew a camisole with some new pictures and a video tutorial. You can use this top pattern in this post to make either a lace or bias trimmed tank top, perfect for summer. This could be a year round wardrobe staple as well, just add a cardigan or blazer over it in cooler weather.
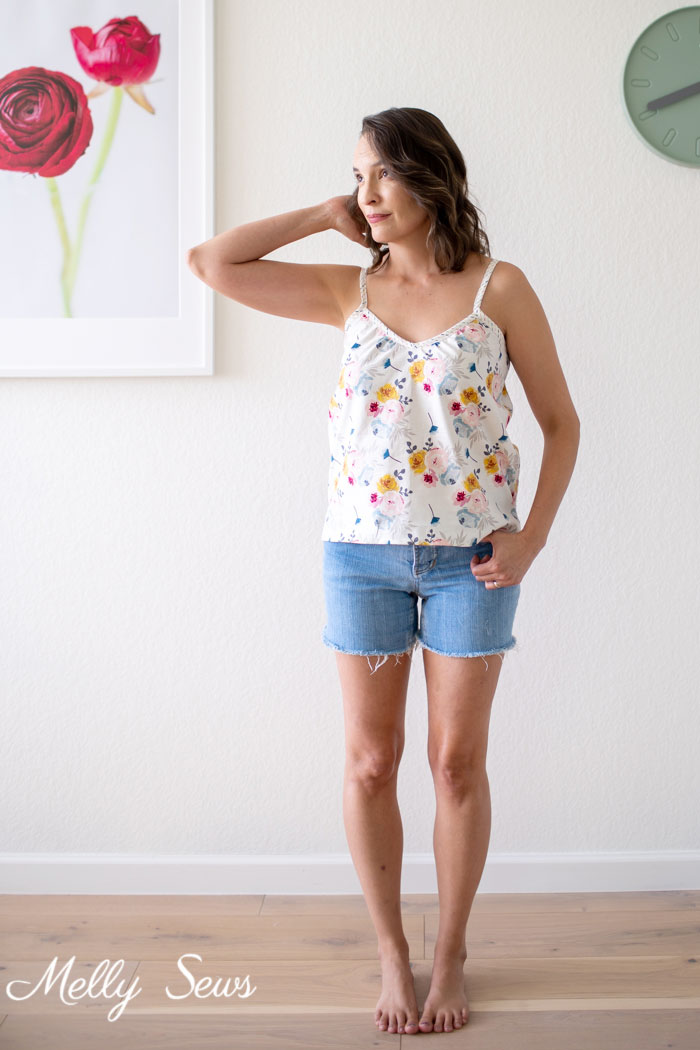
This camisole sewing pattern has a slight v neckline, thin straps that are bias cut, a split hem and no bust darts. Cami tops like this can be made in lightweight fabrics like silk, cotton voile and rayon challis or mid weight fabrics like the quilting cotton I used for this one. The fabrics in the tank above are from my Blooms and Bobbins collection with Riley Black Designs.
At the time of publication, you can get this fabric in these places:
Fat Quarter Shop
Missouri Star
FabricWorm
Fabric.com

Materials to Sew a Camisole
Just like the original version, this top has the elastic back and adjustable straps. Want to make your own? You’ll need
- The pattern (see below)
- Approximately 1 yard of fabric, depending on size
- 1/2 yard of 3/8″ wide elastic
- 2 yards of 1/2″ wide double fold bias tape (see how to make your own here)
- Lingerie slides (affiliate link)
- Optional: 2 yards of lace trim
- Optional: a bodkin for pulling the elastic (affiliate link)
This free pattern is in my size 34″ bust/ 36″ hips. If your bust/hips are bigger, then you’ll need to resize, which I explain in the video tutorial. Or check this post for written instructions to make patterns bigger or smaller.
When you are choosing your fabric, consider the drape. Silk and rayon are going to drape more than the quilting cotton I am wearing in this post.
How to Get the Free Camisole Pattern
To get this pattern, click your preferred option from the buttons below as a newsletter subscriber or gallery access pass purchaser. Note that the free version of the pattern does not have printable instructions.
 |  |  |
Please note that all my free patterns are licensed for personal use only (no selling items made from this unless you purchase it) and by downloading you are agreeing to this license.
How to Sew the Summer Breeze Tank
To make this, you can watch the video below or on YouTube here. Alternately, you can scroll past the video for the the photos and written instructions. Note that I show the lace version in the written instructions and the bias tape version in the video, but you can use the lace guide to cut the bias tape.
Note that the instructions below show how to finish the tank with the lace on the front. If you’re using bias tape to finish the front then refer to the video above.
Print your pdf pattern and cut out all your pattern pieces.

Written Instructions for the Camisole Pattern
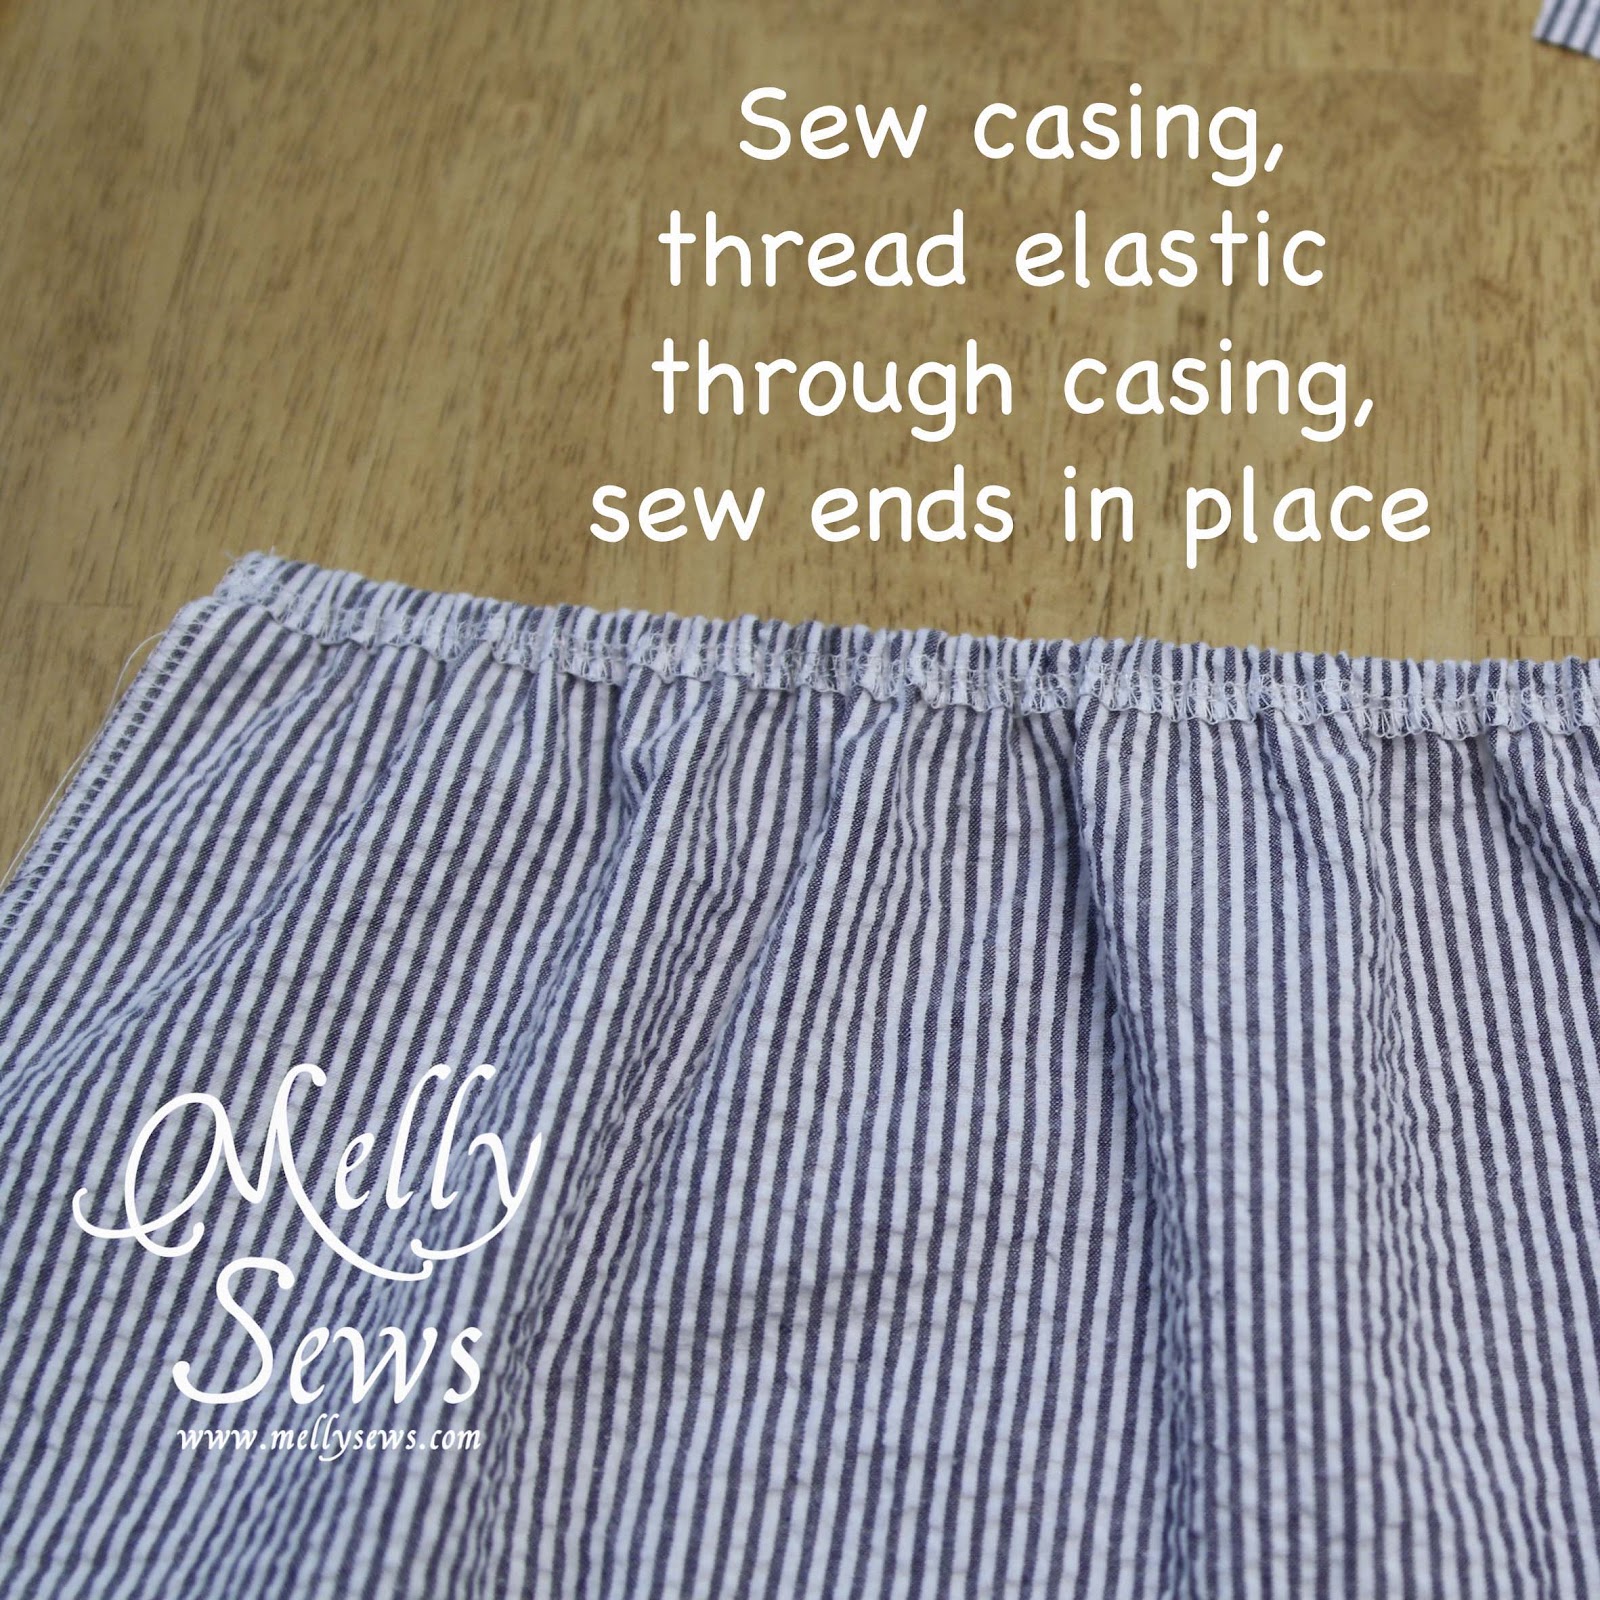
Start by finishing the top edge of the back with either a serger or by zig zag stitching over the edge of the fabric. Then fold this edge down to form the back casing.
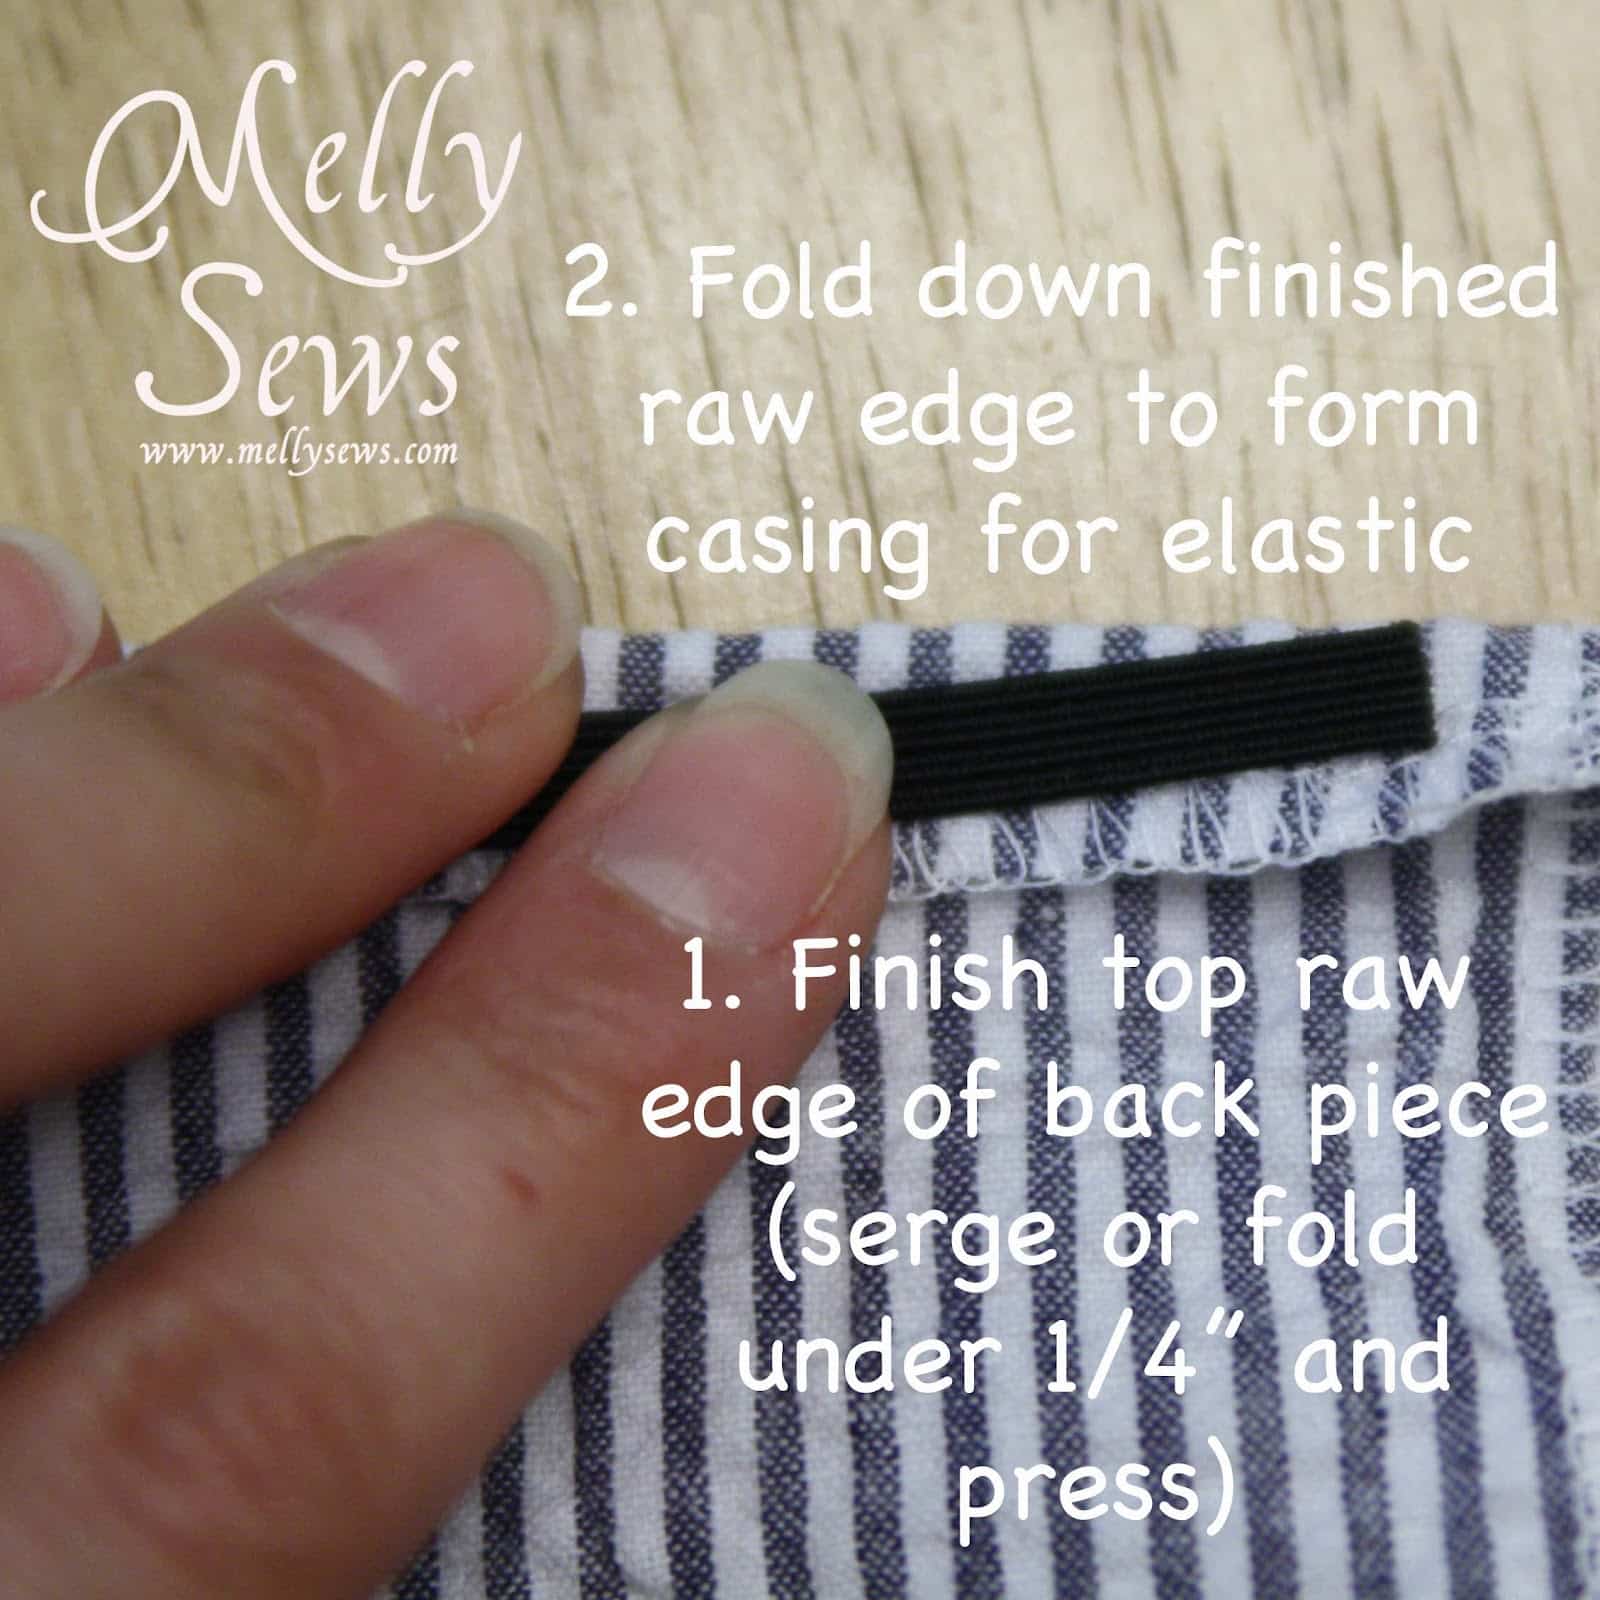
Stitch the edge of the fabric to form the casing, then thread elastic through the casing using a safety pin or bodkin. Stitch the elastic down at the ends.
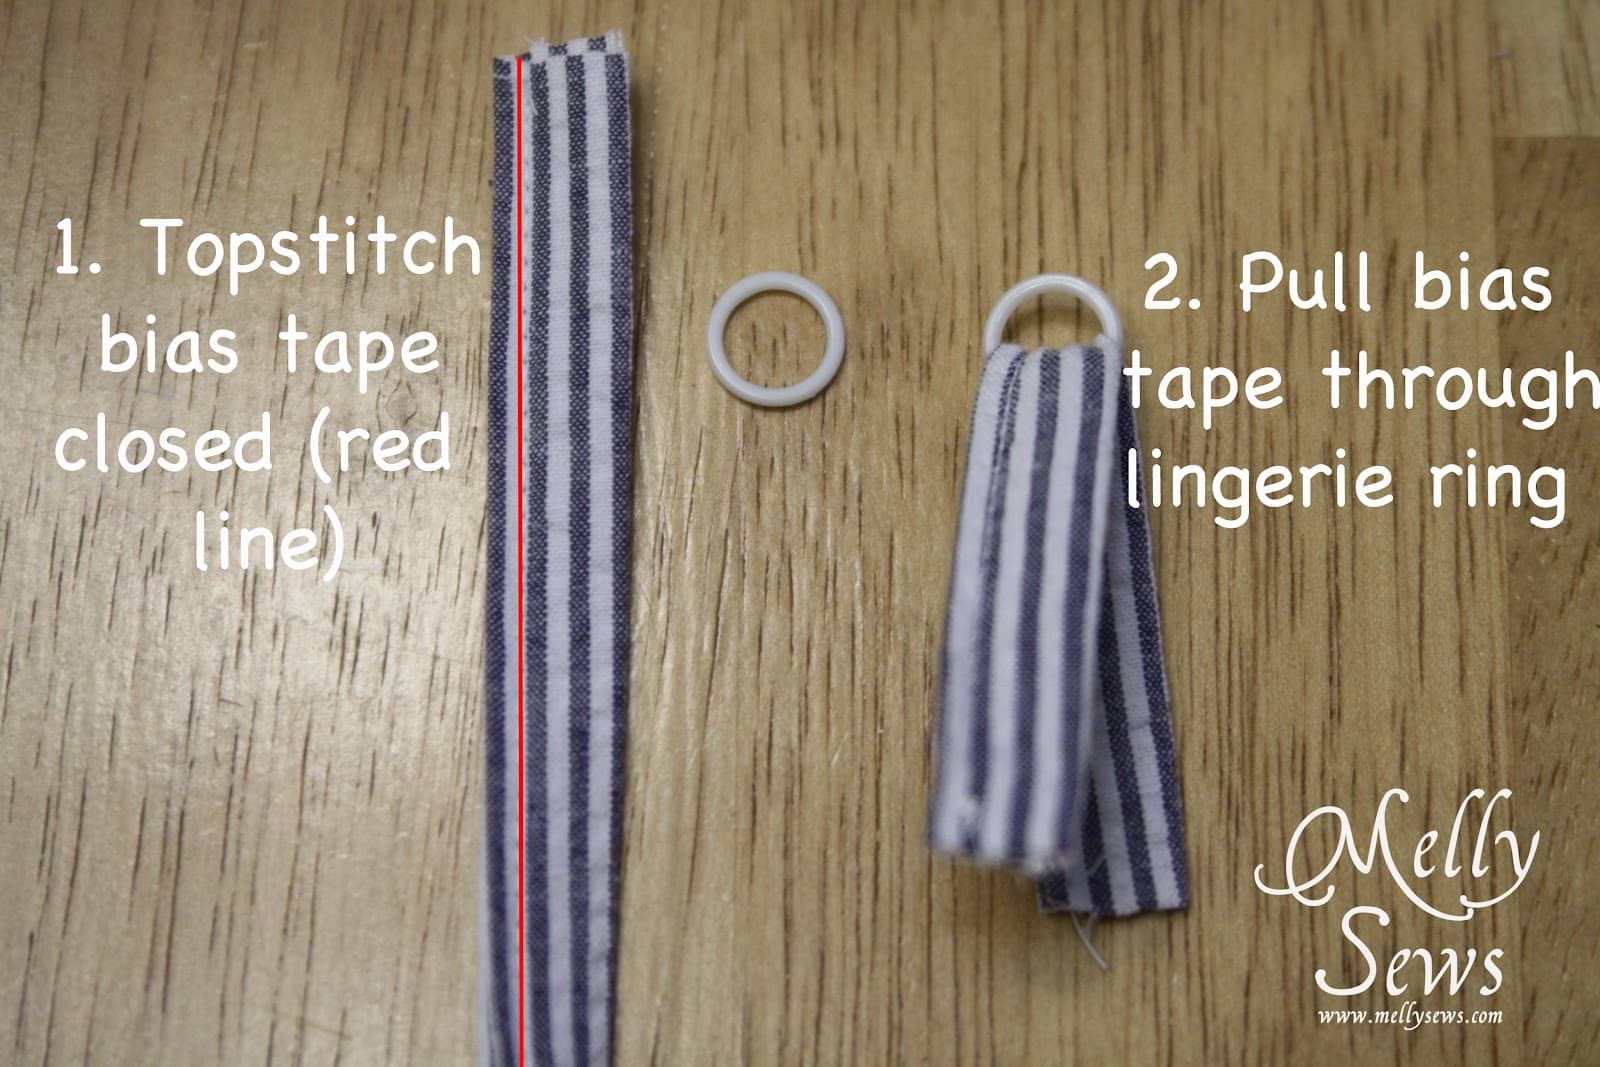
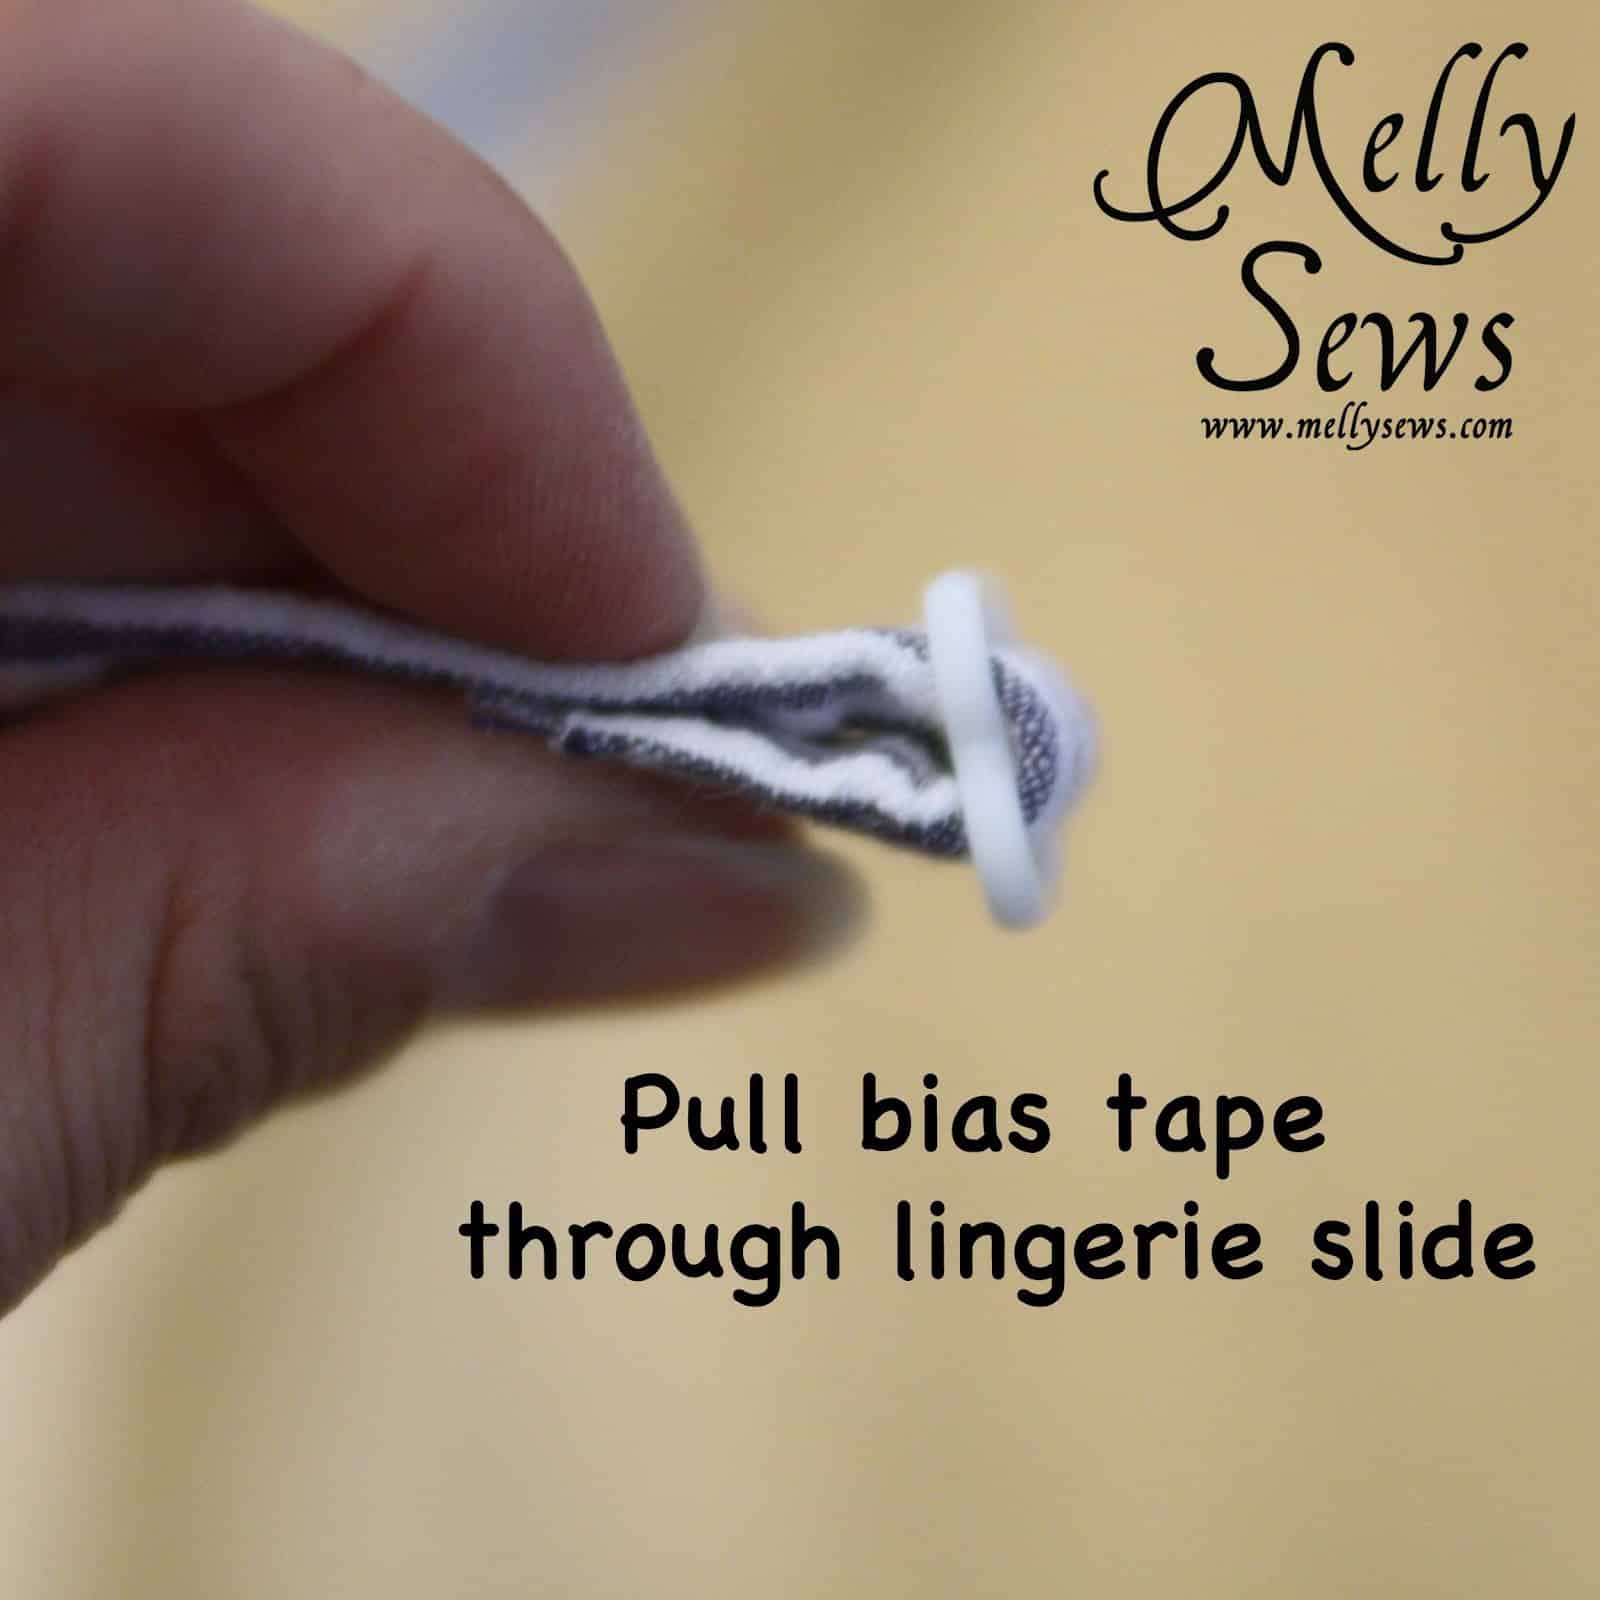
Cut or make 2 pieces of double fold bias tape that are 3 inches long.
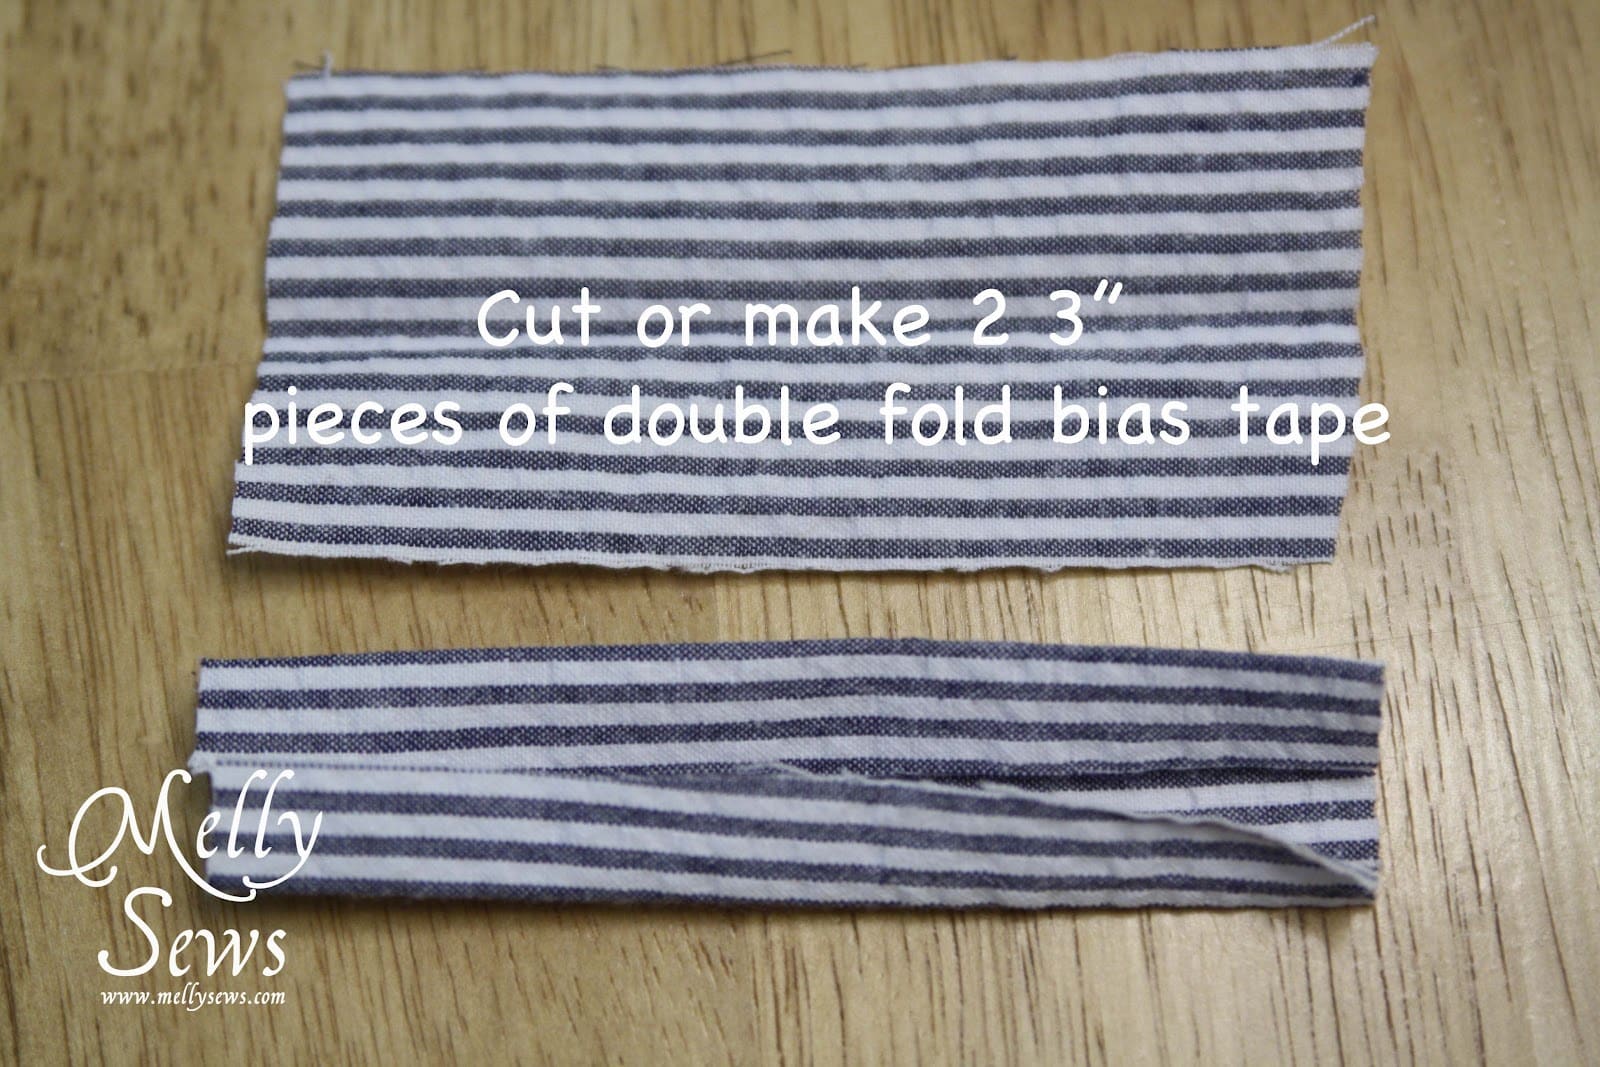
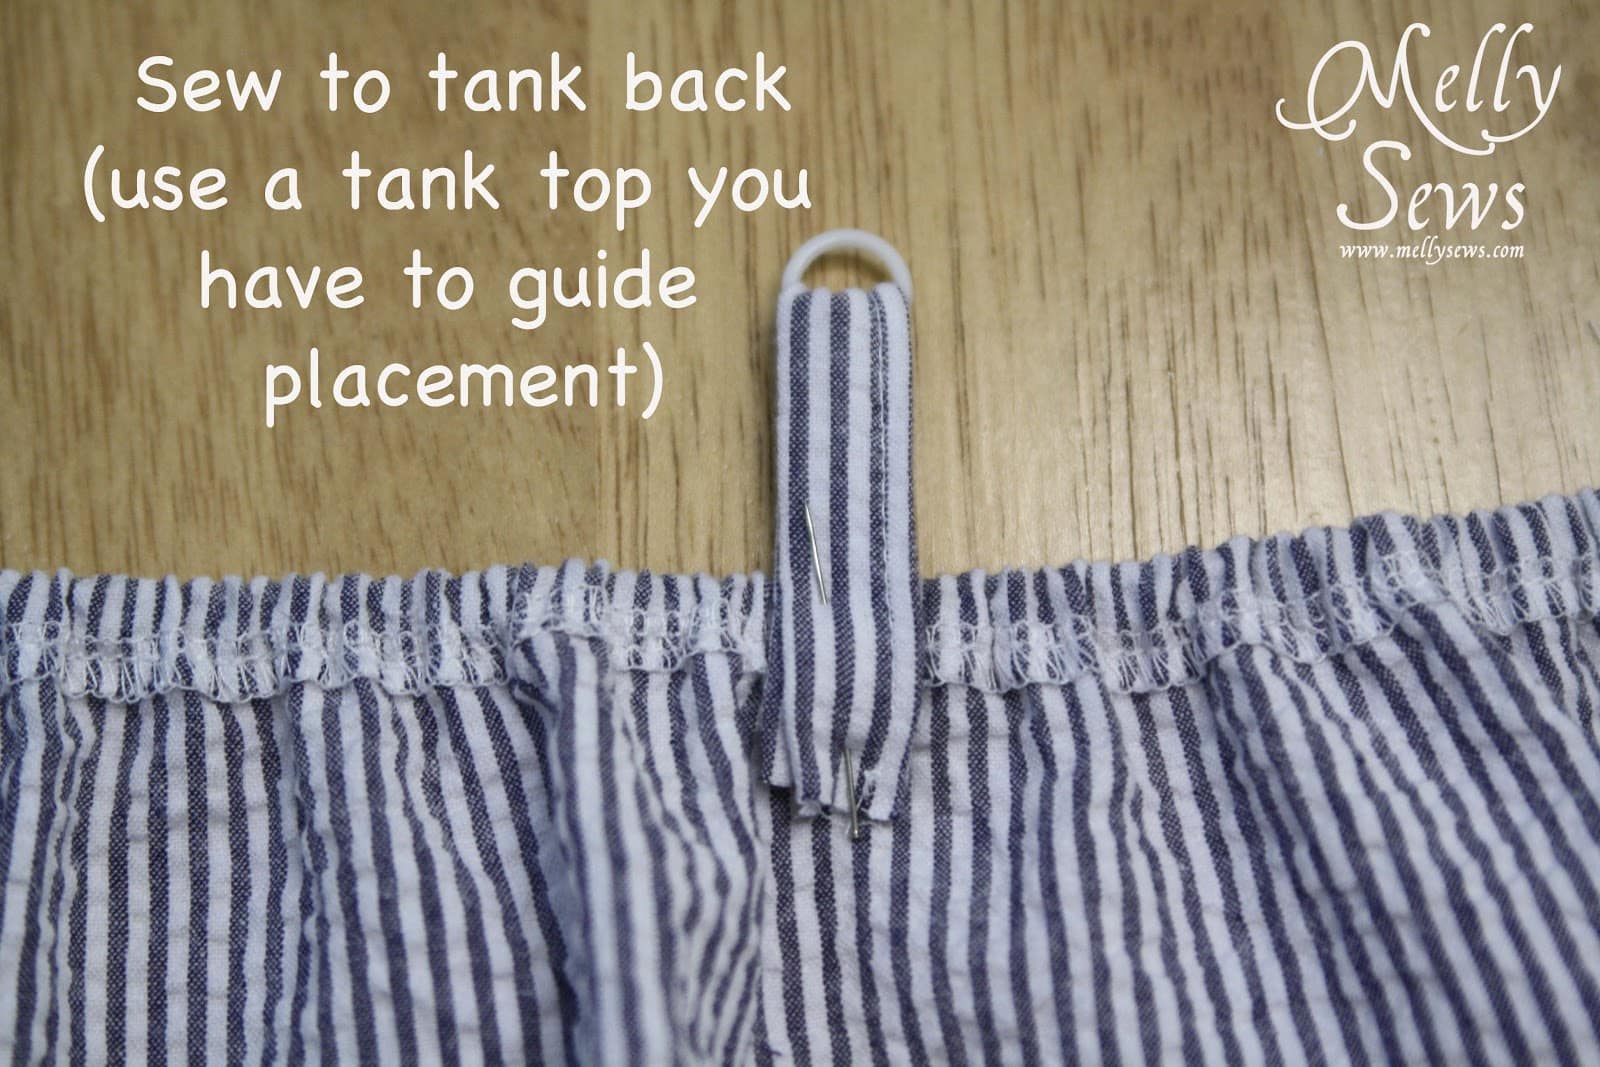
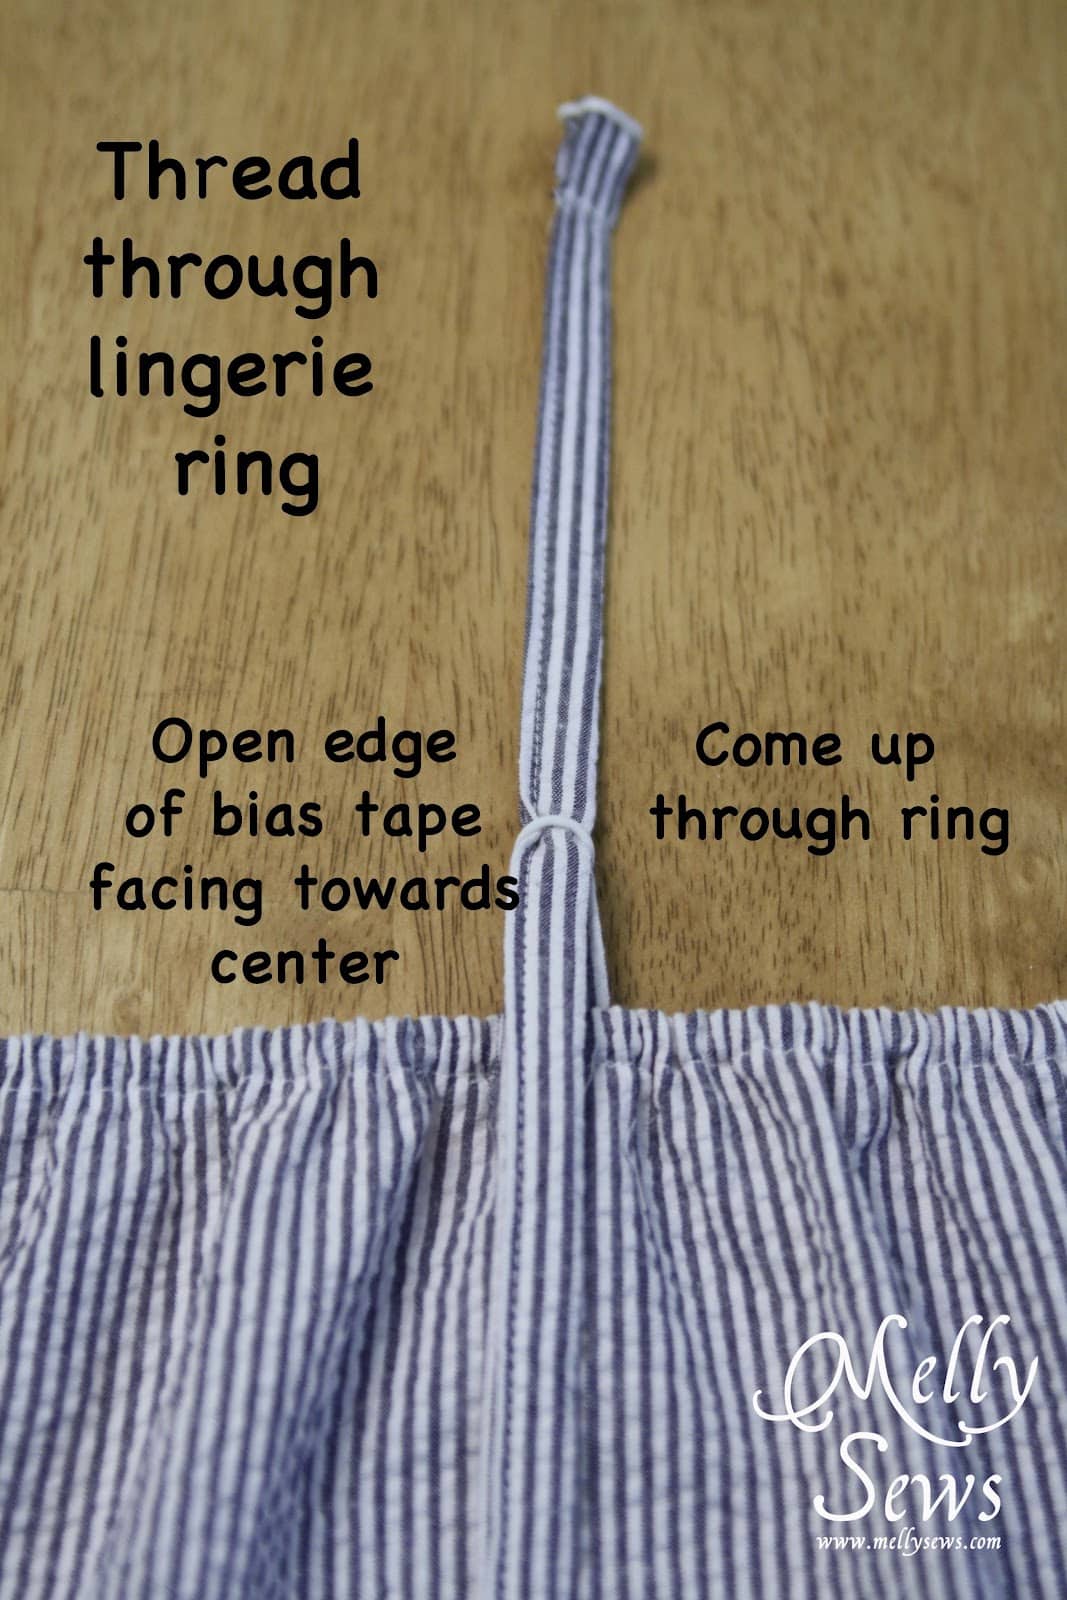
Topstitch the bias tape closed at the open end and then thread each piece through the lingerie rings.
Sew these to the back of the camisole.
Sew the lace pieces together at the center front to form a wide V.

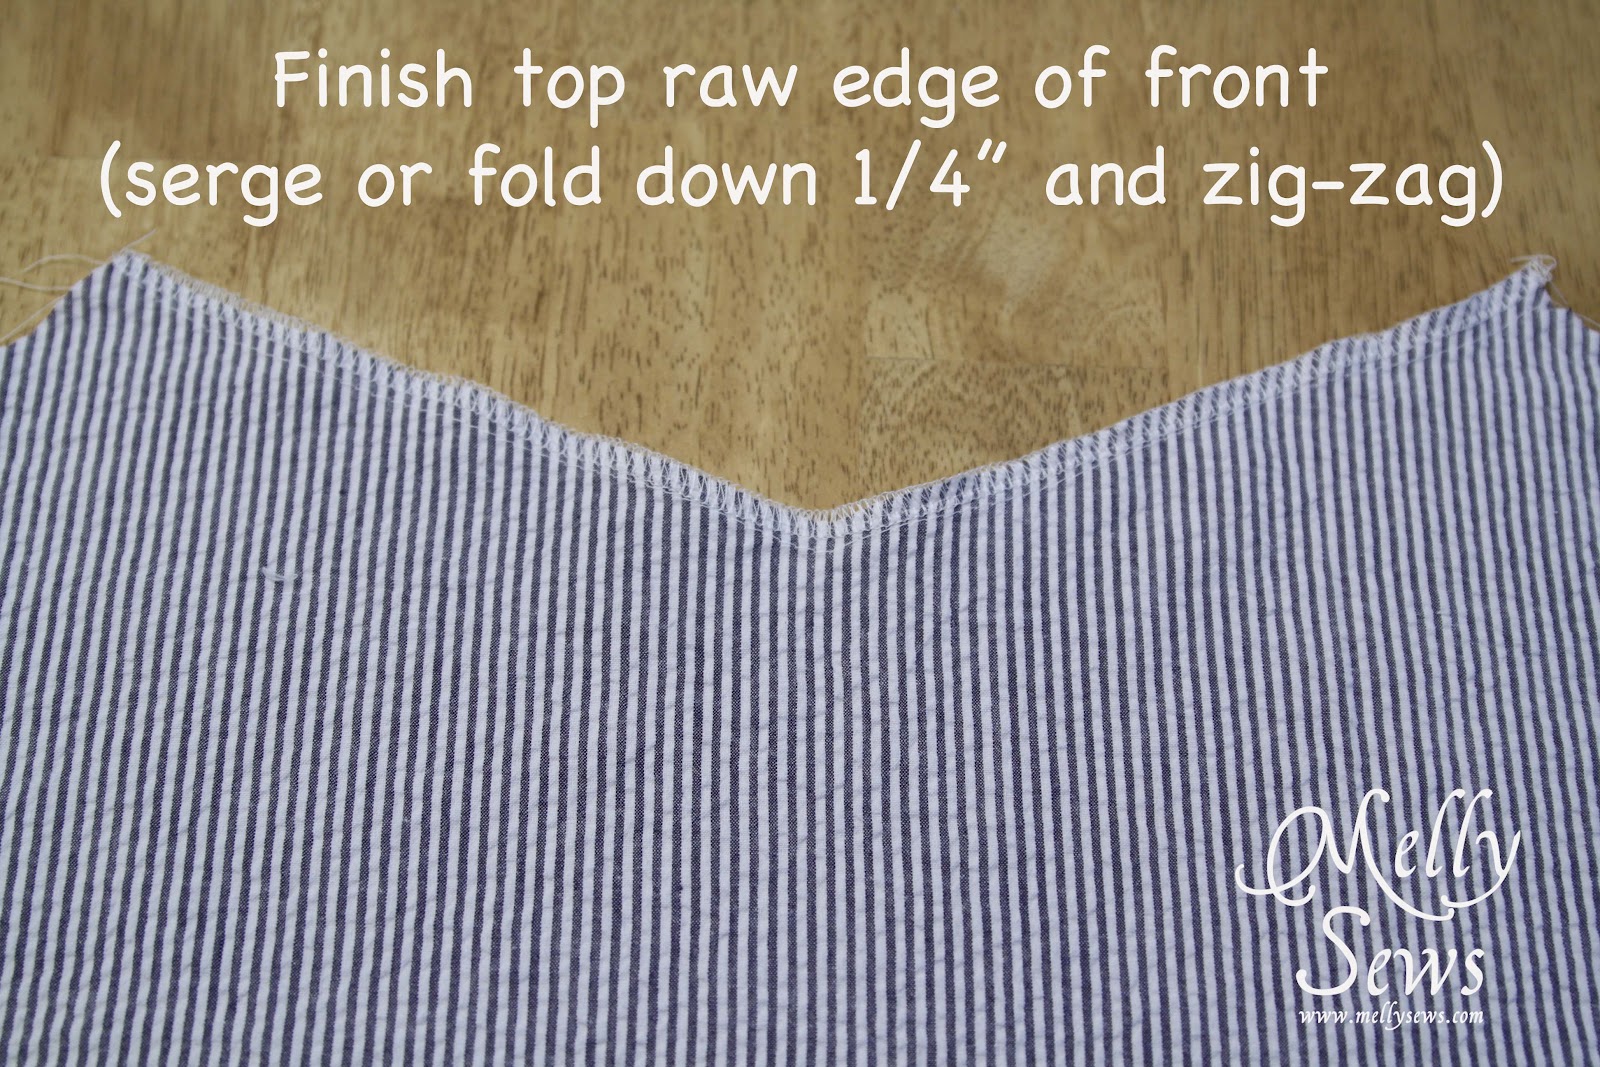
Finish the top edge of the camisole front with a serger or zig zag. Then fold it down 1/4 inch.
Gather the top edge of the neck to the same length as the lace.
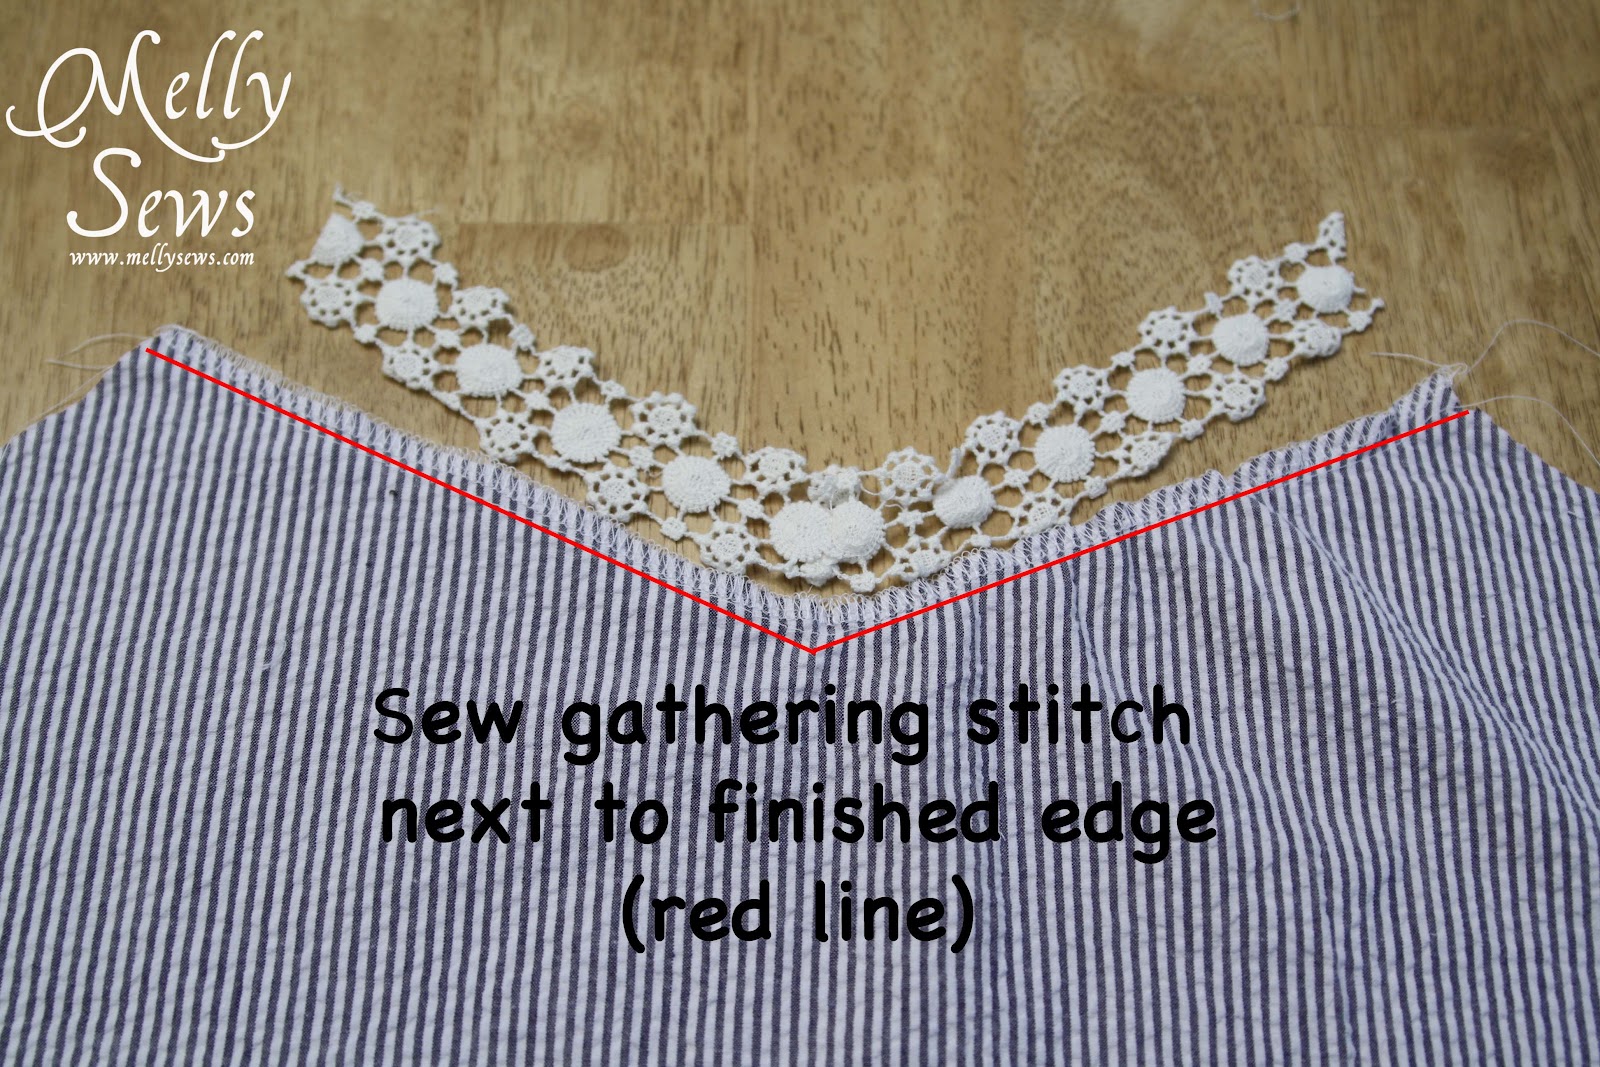
Stitch the lace on top of the camisole front.

Cut two 18 inch strips of bias tape for the straps. Next you’ll topstitch 4 inches on one end of each piece closed.

Thread the closed end of one strap through the lingerie slider. Repeat with other strap/slider.
Zig zag stitch over the raw edge of the strap in order to secure and finish it.

Thread one strap through the ring and then bring it back up.
And subsequently thread the end back through the slider again.

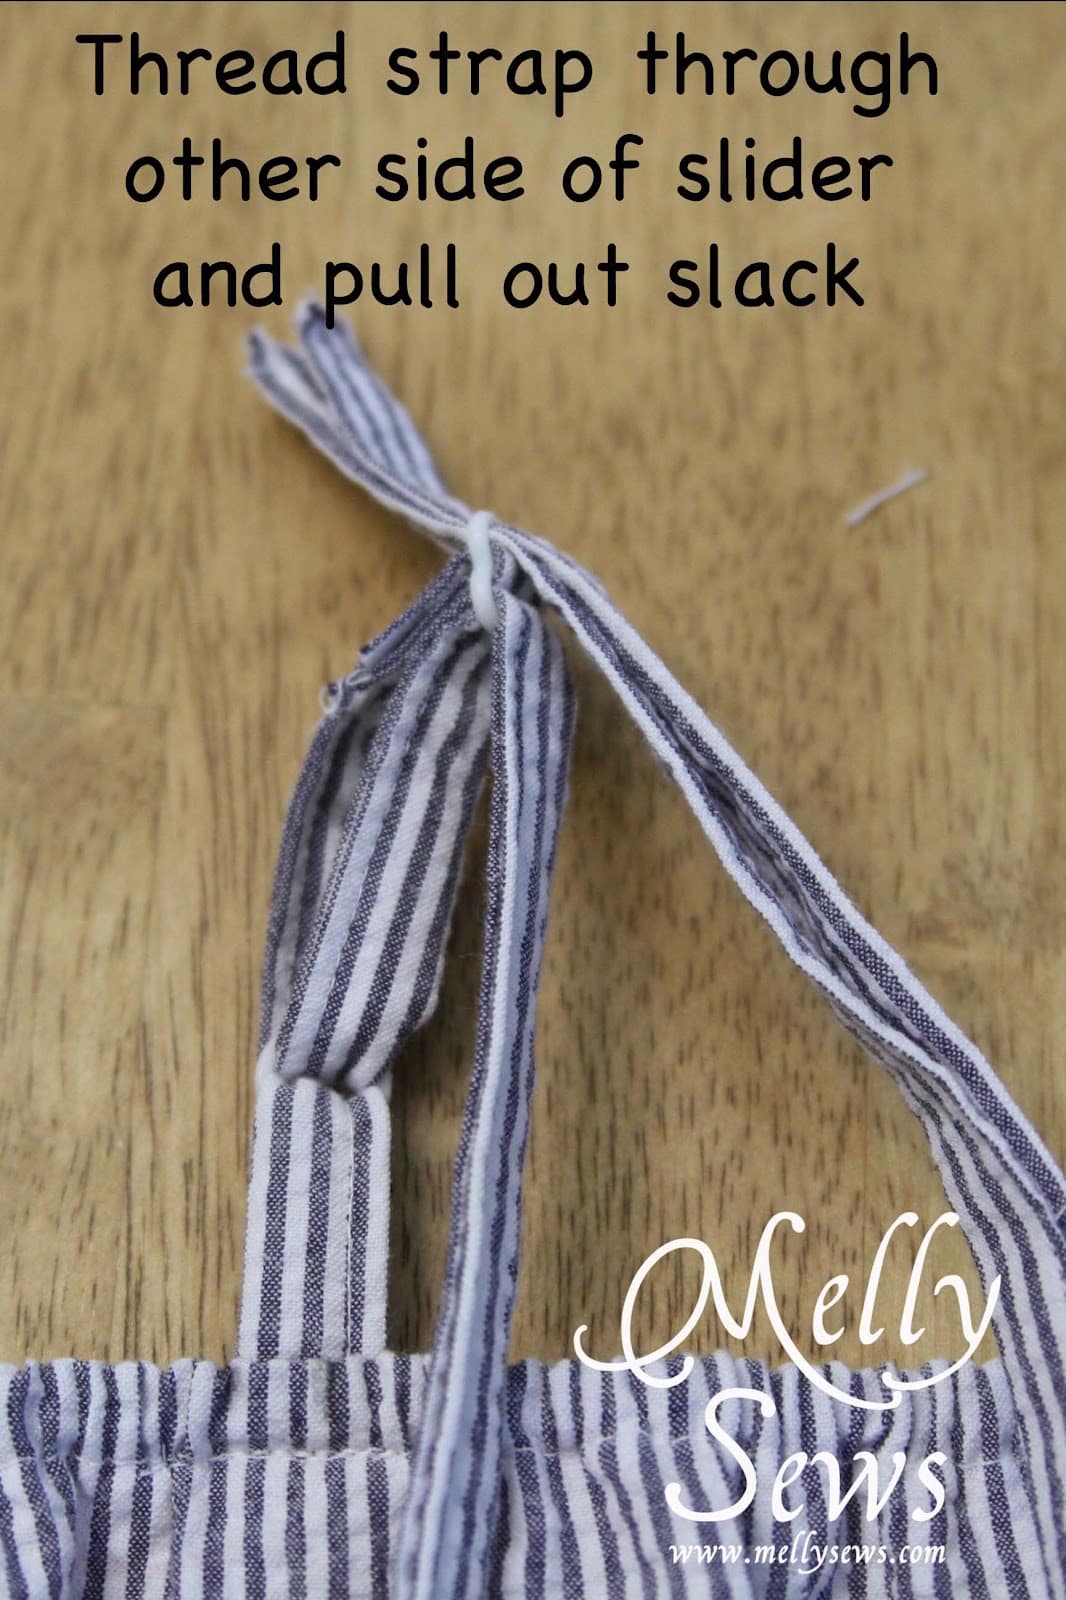
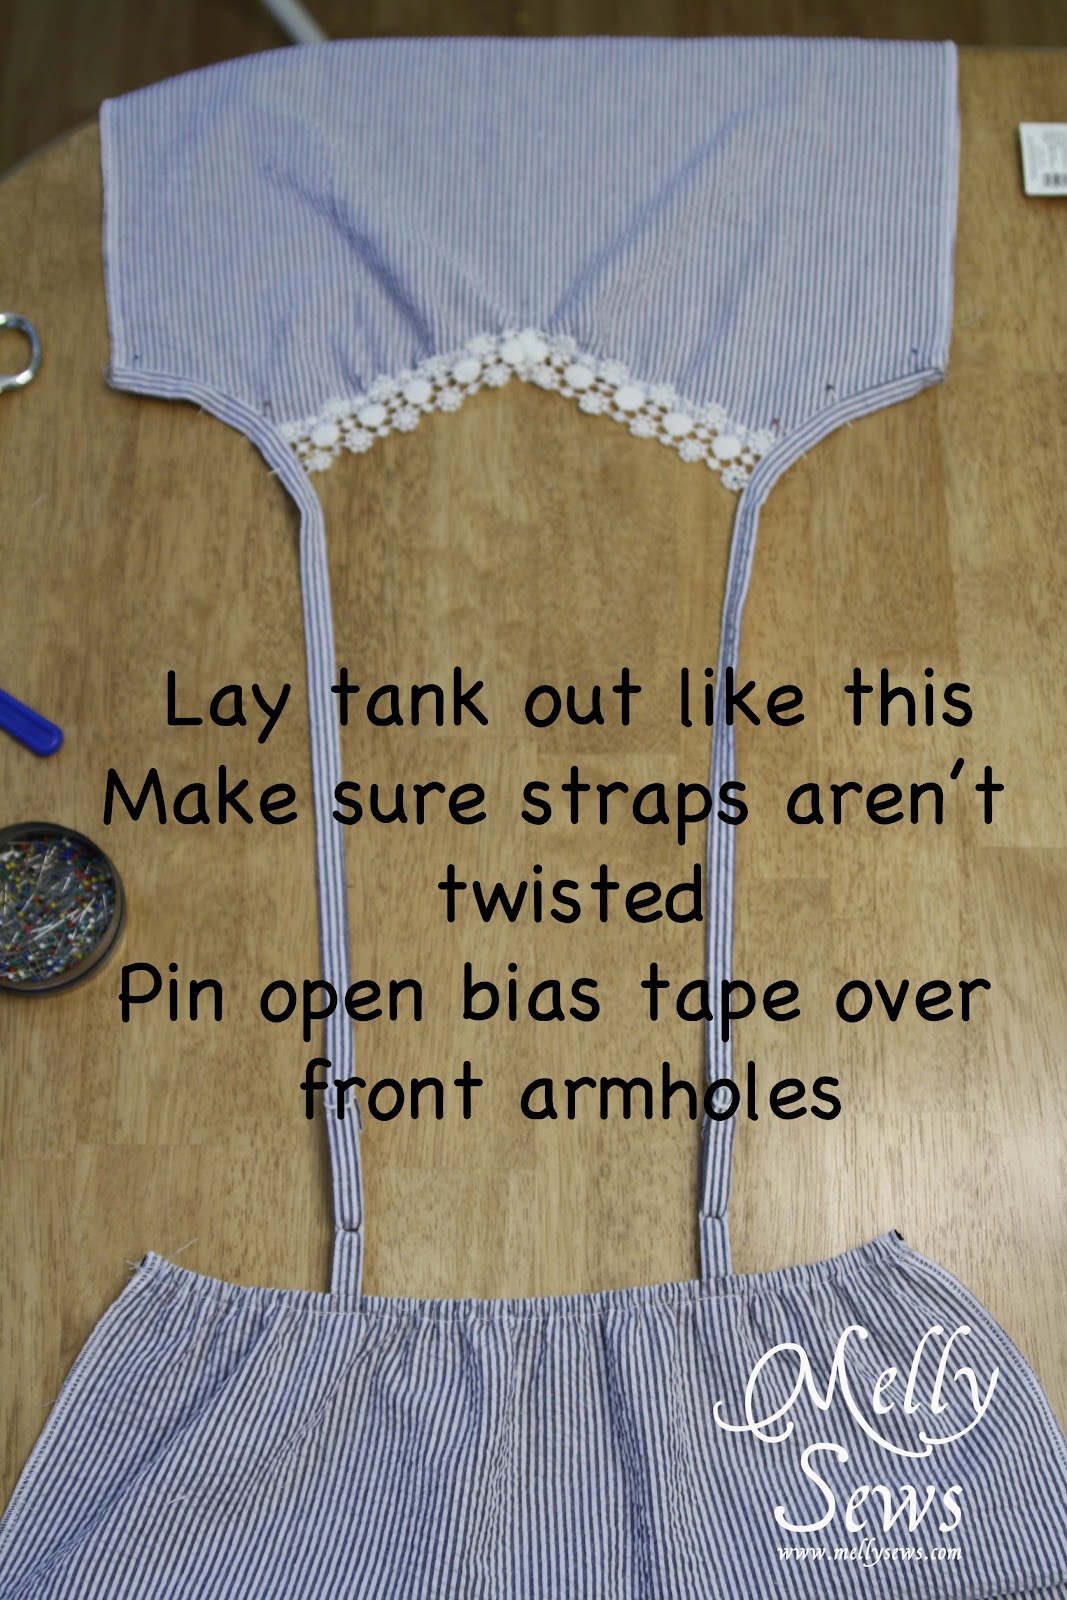
Now make sure your straps aren’t twisted and also that the closed ends are through the rings and sliders with the majority of the strap open above. The open side of the straps should face toward center back.

And then pin the armscye edges of the front piece sandwiched into the open bias tape of the straps.
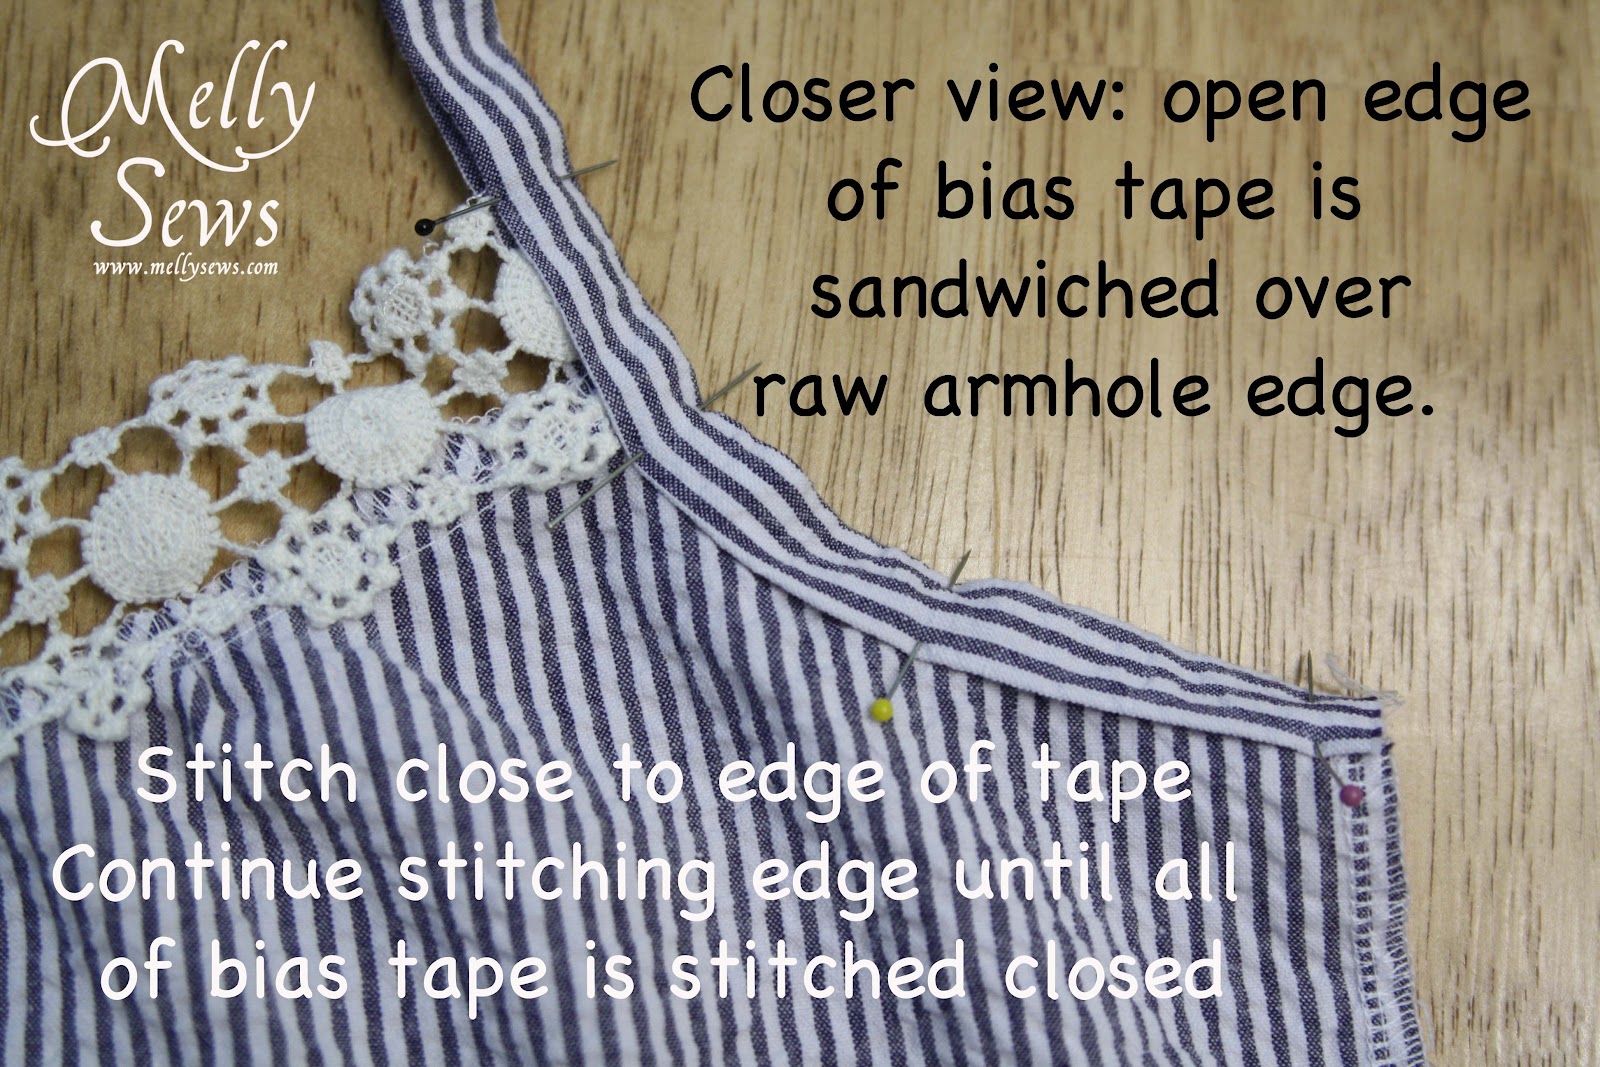
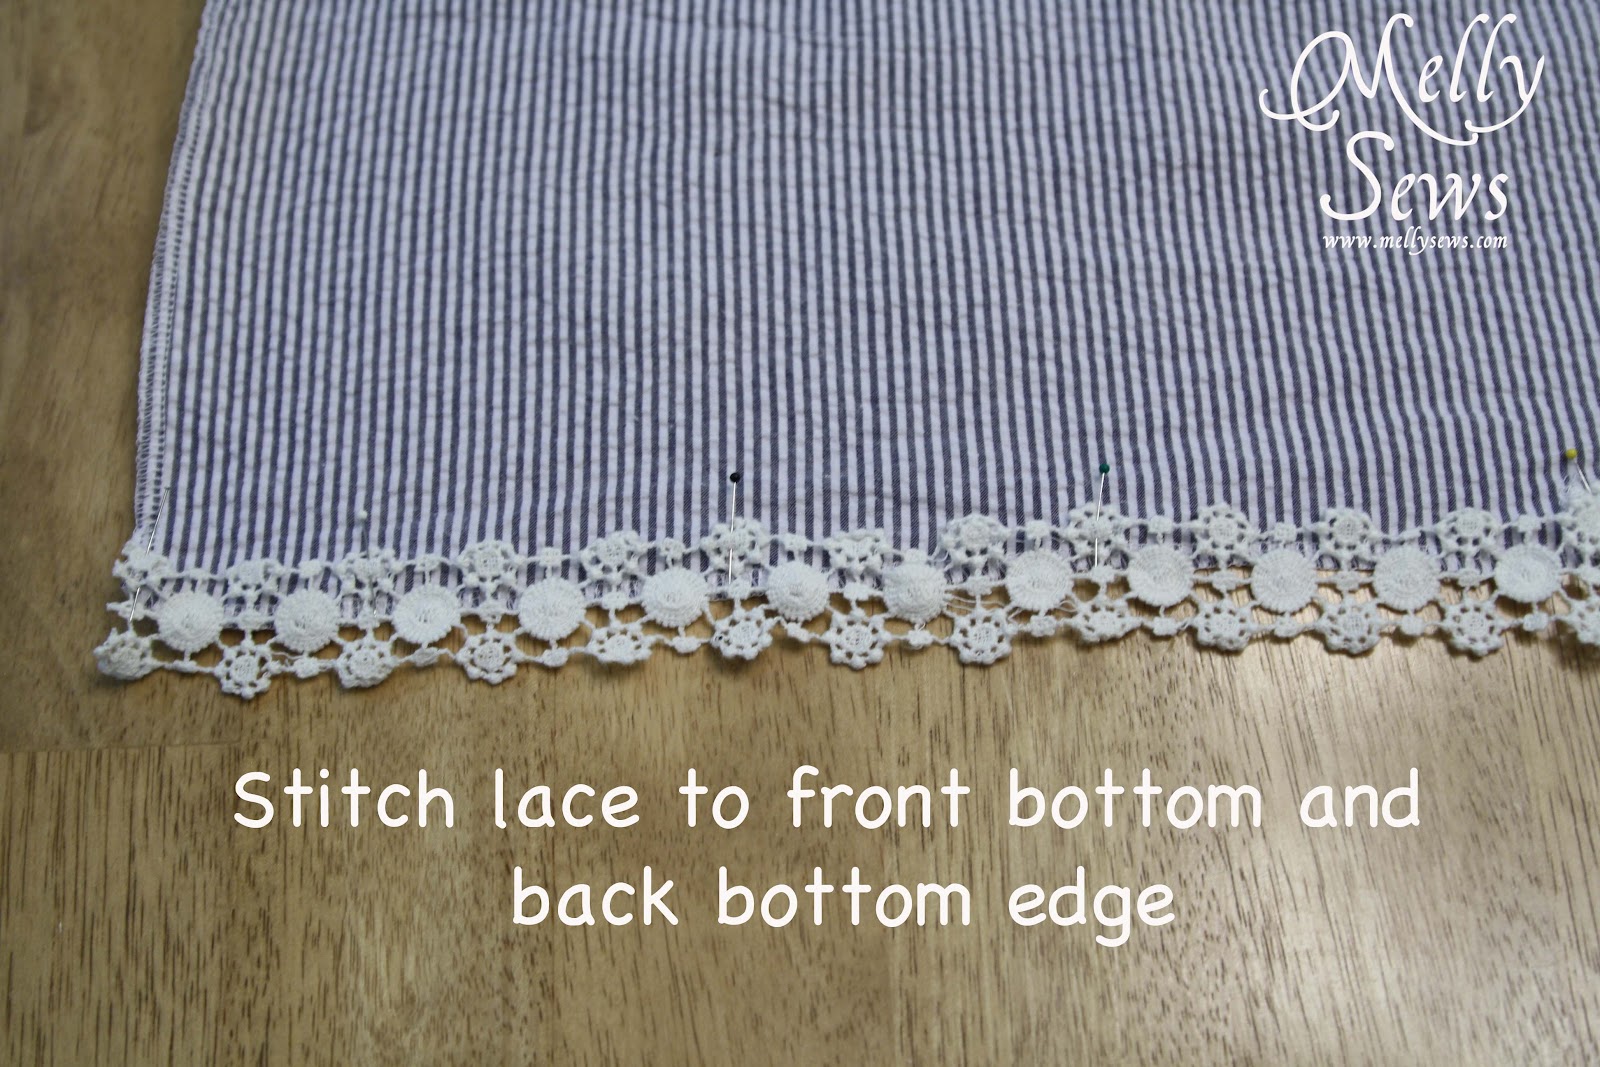
Stitch the straps closed at the armsyces, which will also catch the front fabric to finish it and attach straps. Then stitch lace to the bottom of the front and back pieces at the hem.
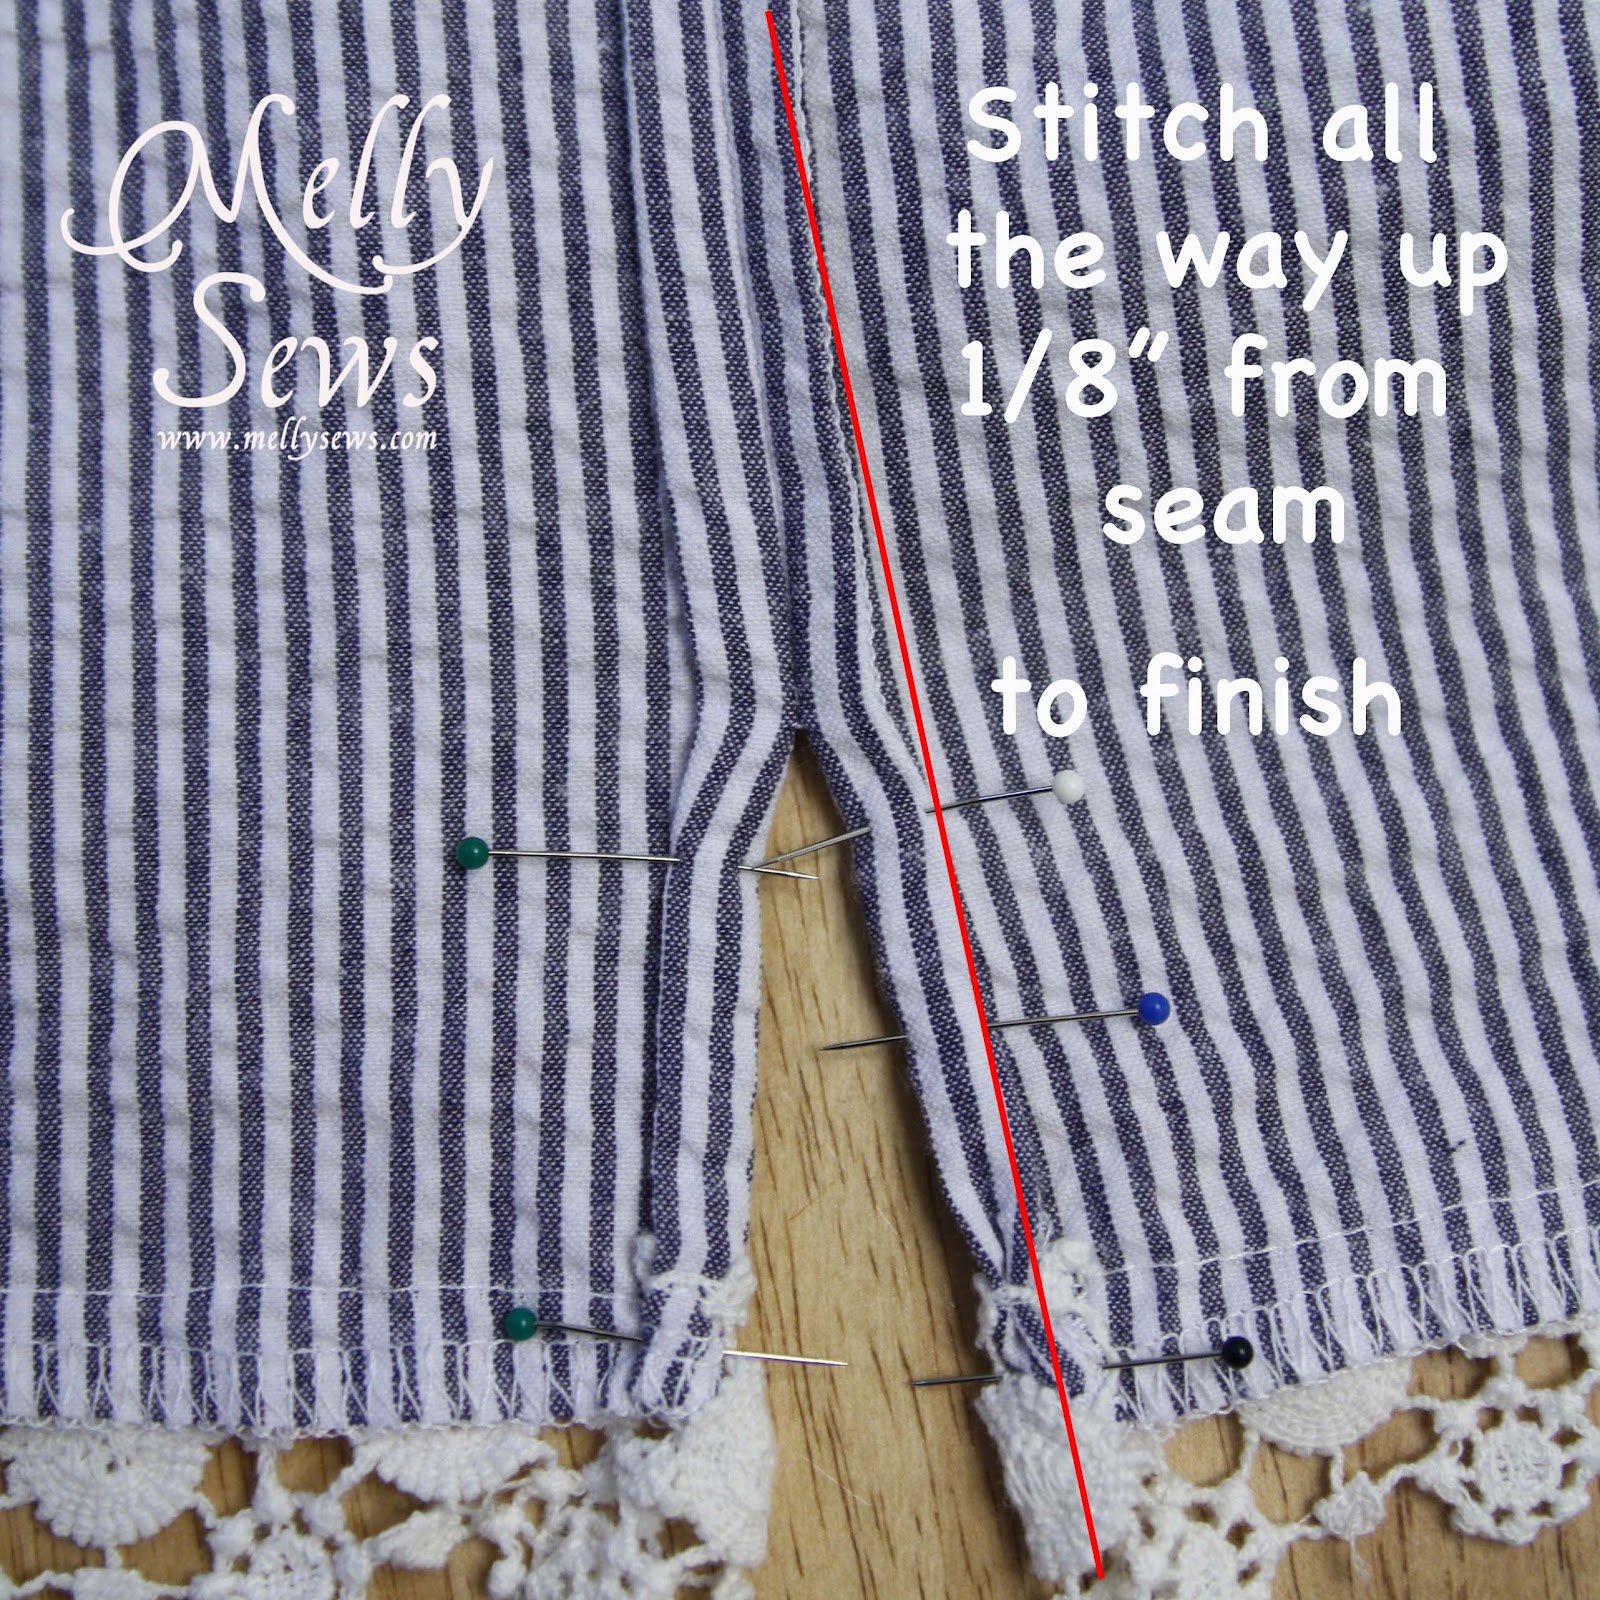
IMPORTANT – In the step below, DON’T sew all the way to the bottom – instead leave the bottom 3 inches (including lace) open to form the side vents. Also, use a 5/8″ seam allowance here.
Sew side seams.

Fold the raw edges of the seam allowance under toward the stitching line and then pin.

After that, you’ll stitch next to side seams to finish edges and secure the folded fabric.
And finally you can throw it on on a hot summer day!

Bonnie and Trish @ Uncommon
Adorable!!! Looks great!!!
Etcetorize
This is so pretty! I love the added detail in the straps. I probably would’ve taken the easy route and just slapped on some non-adjustable straps, but yours are so much nicer. If you’re looking for another place to share your creative projects, stop by Etcetorize. Would love to see you there, there’s never enough sewing projects!
marissa
this turned out great I love this! I hope you’ll stop by and add this and any other posts you’re proud of to my Wednesday What We Wore, Read, and Made Link party
marissa
http://raegunwear.blogspot.com
Emilia
Soooo cute. it is very generous of you to share. although, my body won’t fit, it inspires me to try to draft on myself….
Betsy
Adorable! I can see this longer as a lounger or sleep shirt – depending upon how my next week turns out, maybe I can try to draft it larger (1x) – I will post again.
Debi
This is so pretty. I have a Blog Hop, and I would love it if you would link this post. You can find it at
http://www.adornedfromabove.com/2012/07/3-face-masks-from-your-kitchen-and.html
It is called Wednesdays Adorned From Above Blog Hop.
I hope to see you there. Have a great Day.
Debi Bolocofsky
Adorned From Above
http://www.adornedfromabove.com
Palak
Wow! The adjustable straps are so clever! The tank looks great– and you look great in it!
Laura
This is beautiful- especially love the lace trim!
CÖ SER
this is so pretty….thanks!!
carolyn
Justine of SewCountryChick
So pretty Melissa! I have often wondered how to make those type of adjustable straps
Misty @Creative Itch
Love the lace on this tank!
Thanks for sharing @’Sew Cute Tuesday’.
I’ll be featuring you tomorrow, so be sure
to stop by and grab a ‘featured’ button!
Cary
What about a rayon challis? Too thick, you think?
Melinda
This is so cute. I like Betsy’s idea of a sleep shirt. Thanks for sharing the pattern (I will have to grade it) and the tutorial. I have never done adjustable straps.
Kay
This is the kind of tops my granddaughter likes, so am going to make one to fit her. She is a little bigger busted than a 32 so will adjust, but as I can sew I think i can figure out how to make it bigger. Thanks for sharing.
Sarah Cureton
WOW! Great tutorial Melly. Perfect for my grand daughter for whom I sew often.
DOTTIE
Thank you for this beautiful tank top. I will make an attempt to make one for myself; unfortunately for me, I will use one of my older tanks to make my alternations since over the years I sort of “expanded some what” lol. And unfortunately for me have never been able to have the smaller bust (which in some cases/times envy those that have been blessed that way), since toting those bigger umm boobs around cause some back pains some times. So just ignore those whom just insist on gripping, you can not please every body out there. I think you have done a great job and thank you again.
debbie b
VERY WELL DONE !!!! young woman . THANK U FOR THE STRAPS !! 🙂 I usually try to recycle
something
which doesn’t always work well. CONGRATS ON YOUR NEW TOP !! mending for EVER it seems
Debbie
What a great tutorial. I used to be flat chested, then got hit with the puberty stick after having children…lol. I will give this a go and do a FBA to get it to fit. Thanks for sharing.
Debbie…(0;
<
Danita
You really are such a sweet person and YES I am sad you have to explain yourself to anyone who might complain why you didn’t make this for “them” in “their” size for free! But you are too nice, and handle yourself with poise and grace. That’s why I enjoy reading your blogs and viewing your patterns so much. I am an experienced seamstress of 30 years and still love learning from your tutorials, and tips. Sometimes the new way IS better, faster and easier! THANK YOU!
What I especially will be looking forward to is boy patterns and tips. In all my years there have only been girls to sew for. An occasional boy costume, but nothing of real substance. I just found out I am having my first grandson and am thrilled. I am also nervous about what sort of things I can make for the little guy. (So I will be coming to you for help AND encouragement!)
Thank you again for your confidence, kindness and excellence! I really appreciate you!
Your humble reader.
C.S. Weaver
I always say, “Never look a gift horse in the mouth.” Thanks for how generous you are with your lovely patterns.
Charmaine
Thank you so much for sharing your pattern. I think it looks adorable and I’m definitely going to make one for myself.
Sarah
I love this tank. I recently started collecting summer material for shirts, shirt-dresses, etc. The stripped material I have would look awesome, but I’m going to do it on the bias.
~ Karen ~
I just finished making this. I used linen fabric (recycled from a large pair of thrifted pants) and trimmed it with handmade crochet lace. The drape of the linen works beautifully with this pattern!! Thank you so much for sharing it!!
Sarah Jane
Melly, you are so inspiring! Got some real-deals on thrift-shop plaid mens shirts which are lightweight but opaque, which is perfect for this tank. I am ready to start! Thanks for your generosity in sharing these patterns and the nifty videos!
Sarah
Maude
Wow that’s such a good idea! I love it!!!
Megan
I’m so happy to have found this post—thanks for sharing! Now I’m looking forward to making a bunch of these, hopefully over the holiday weekend. Even though fall is on its way, my cool-weather wardrobe consists mostly of layers, and these would be perfect for transitioning under a cardigan.
Jess Olney
Thank you as always for your very helpful videos and free patterns! I have learned so much and was afraid to grade patterns, but you inspired me to give it a go, especially if I use old sheets to test out the patterns (and now am awaiting my fabric order). I was so pleased with the results of this tank! I just need to figure out how to get it wider for my hips–small chested, but post-kids and Quarantine hips (=. I loved learning so many new things here! And I have bought a few patterns in your shop for those I would rather not grade myself. (;