
Smocking is a needlework technique in which fabric is stitched together to make three dimensional details. Learn one stitch with this smocking tutorial.
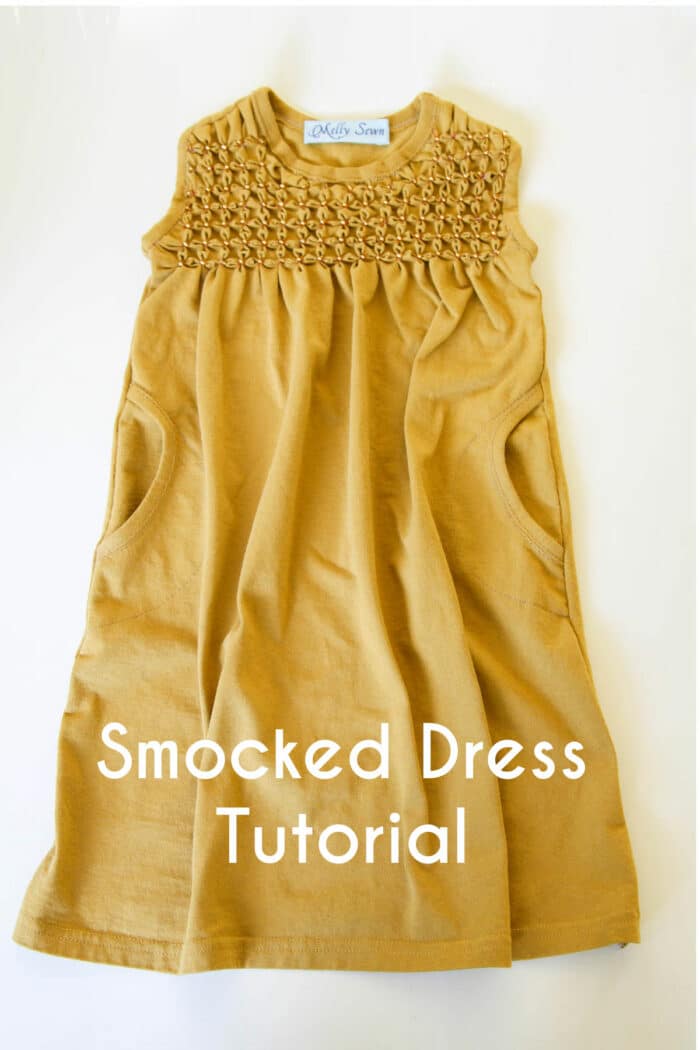
Hey y’all, today I’m sharing a tutorial for a beaded and smocked stitch. I used this diy stitching method to sew the top of this dress that I up cycled from a t-shirt.
Note that there are two major types of smocking that involve different techniques. The first type is English smocking. It involves pleating fabric and then adding embroidery to the pleats. You might see cable stitch, trellis, diamond and honeycomb stitch patterns in that type of smocking. English smocking is what many think of as traditional hand smocking.
You can get close to a an English smocking pleated smocked look by shirring with elastic thread, which is shown in this tutorial. But that’s not truly smocking, it just looks similar.

The other type of smocking shown in this post is referred to as American smocking, Canadian smocking, and North American smocking. It is a method of decoratively stitching fabric so that it creates three dimensional details. These can range from pleats to geometric and even floral smocking as I show in this post. It’s another way to add some beautiful hand details to your garments.
I used this beaded floral smocking stitch on the Fields of Gold Dress.

The art of smocking requires hand sewing and lots of time and patience, but it’s not particularly difficult. And I didn’t invent it, in fact there are other tutorials on the internet that you can find. Another advantage of both kinds of smocking is that it gathers the fabric in, so that property of the stitch can contribute to style lines. You can use it on bodices and let the dress flow out below. Smocking can also be used this way on necklines, cuffs, and waistbands.
To sew this smocking stitch you’ll need your fabric, a washable marking tool, a ruler, needle and thread and beads. Note that even if you sew this stitch with elastic thread and/or on stretch fabric, it will not retain that elasticity. Some smocking stitches can be sewn and still stretch. However the beading on this one makes it non-stretchy. If you would like to skip the beads, you can still sew this stitch with embroidery floss and have that stitch show at the center of each flower. I just used regular all purpose thread to stitch.
Video of Beaded Smocking Stitch
You can see a quick video demonstration of the beaded smocking stitch below or on YouTube here, and I have more details on this specific dress and how I stitched it below the video. I show a few repeats on the first row of stitching.
Written Smocked Dress Instructions
I started with a size XL men’s cotton t-shirt. First, you mark out a grid of dots, these are where you will place your stitches. I just used washable Crayola marker for this. Note that if you use a thicker fabric you’d likely want to space your grid dots further apart. And with a thin fabrics and smaller beads your can make a smaller grid pattern.

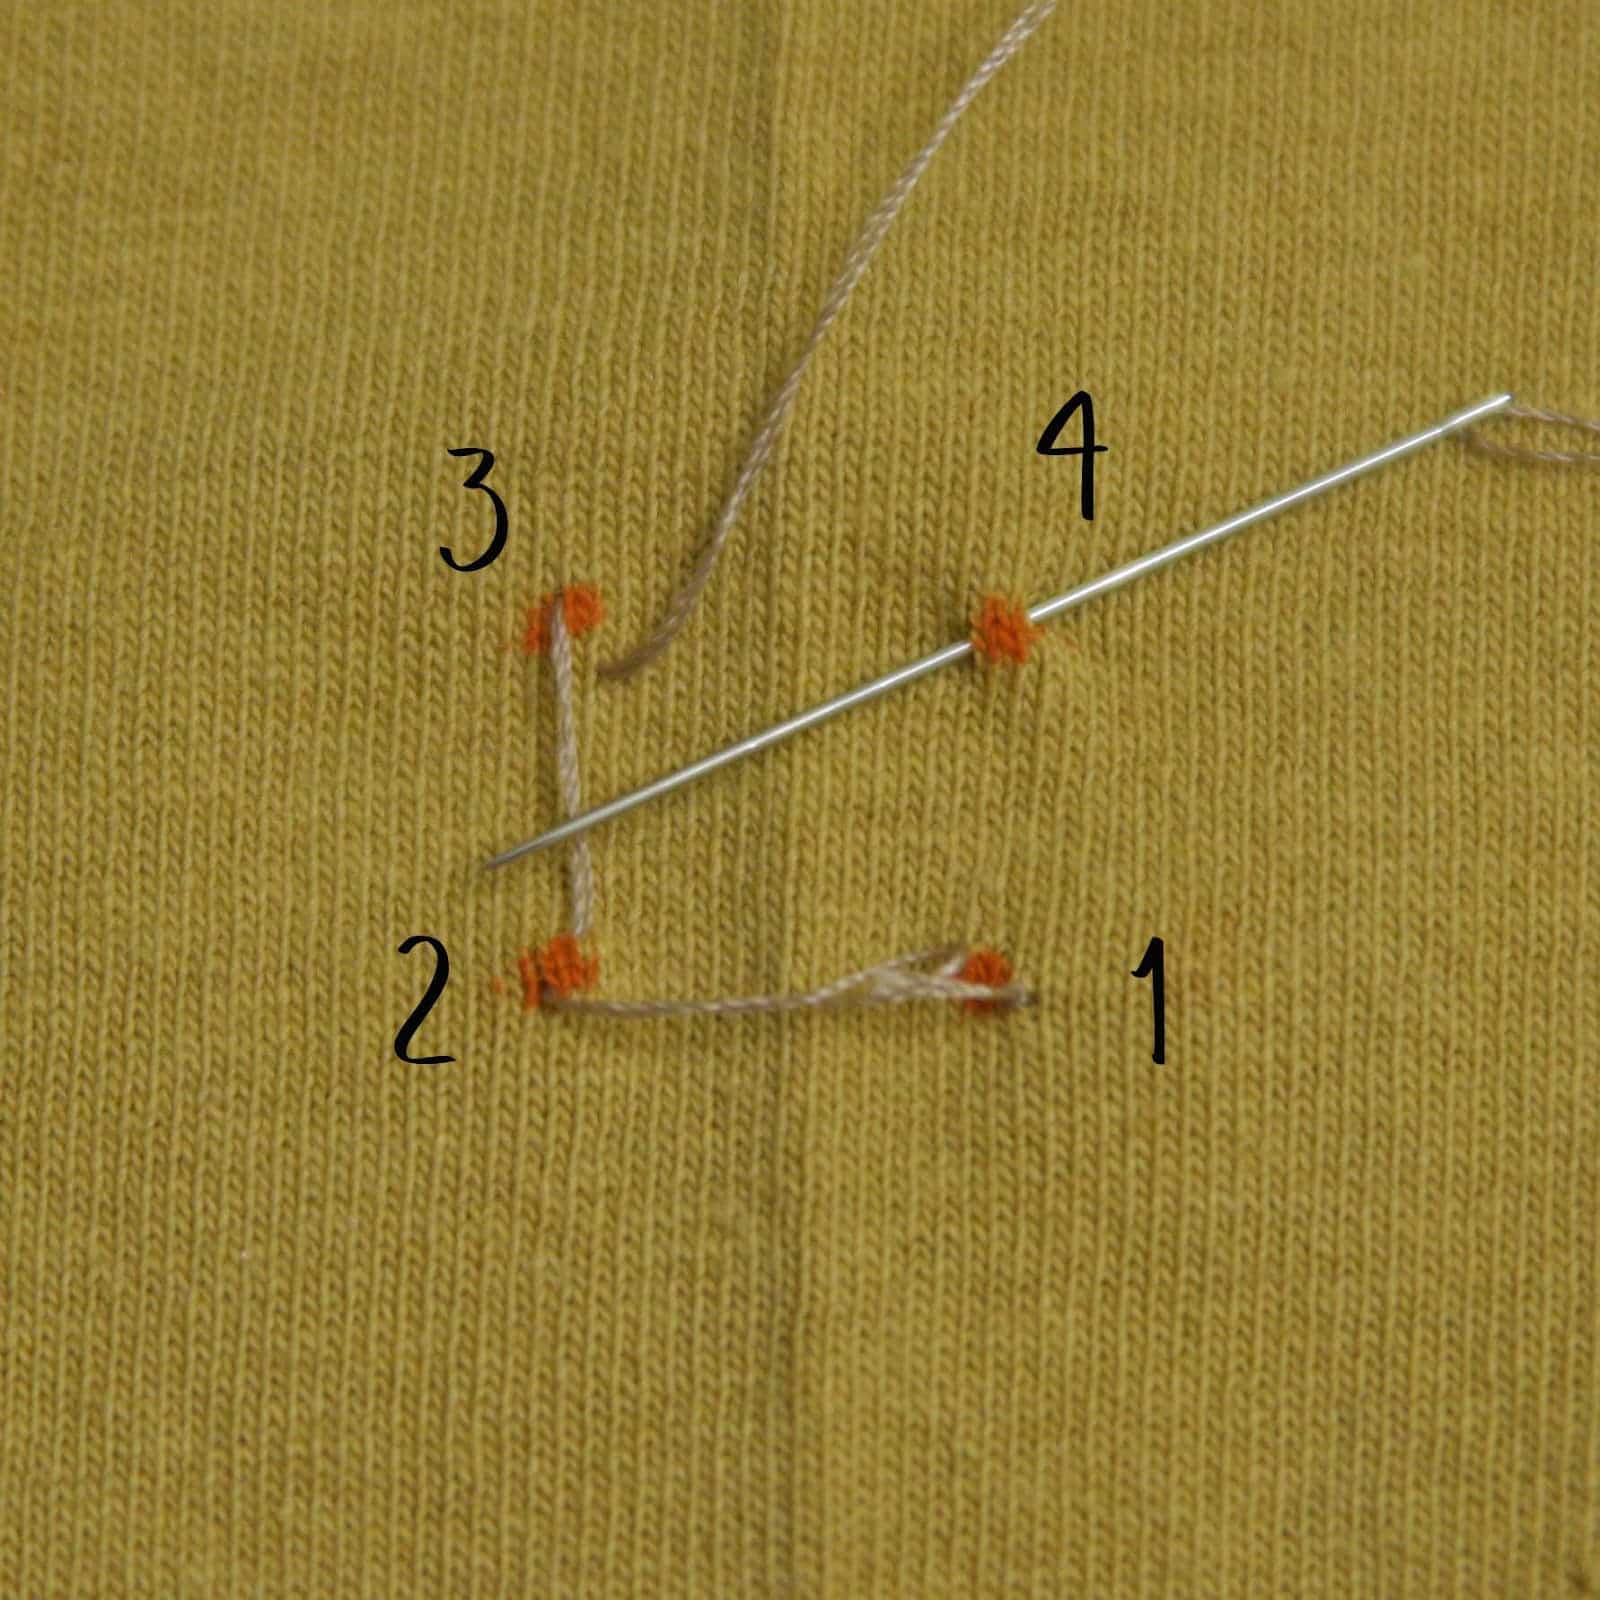
2. Next, thread your needle. You will take a stitch at each of 4 dots in the order numbered in the picture. When you take the stitch, go from the outside of the dot at an angle toward the center of the square, like you were going to make part of an X with your needle. Then take a fifth stitch in the same place as the first stitch.
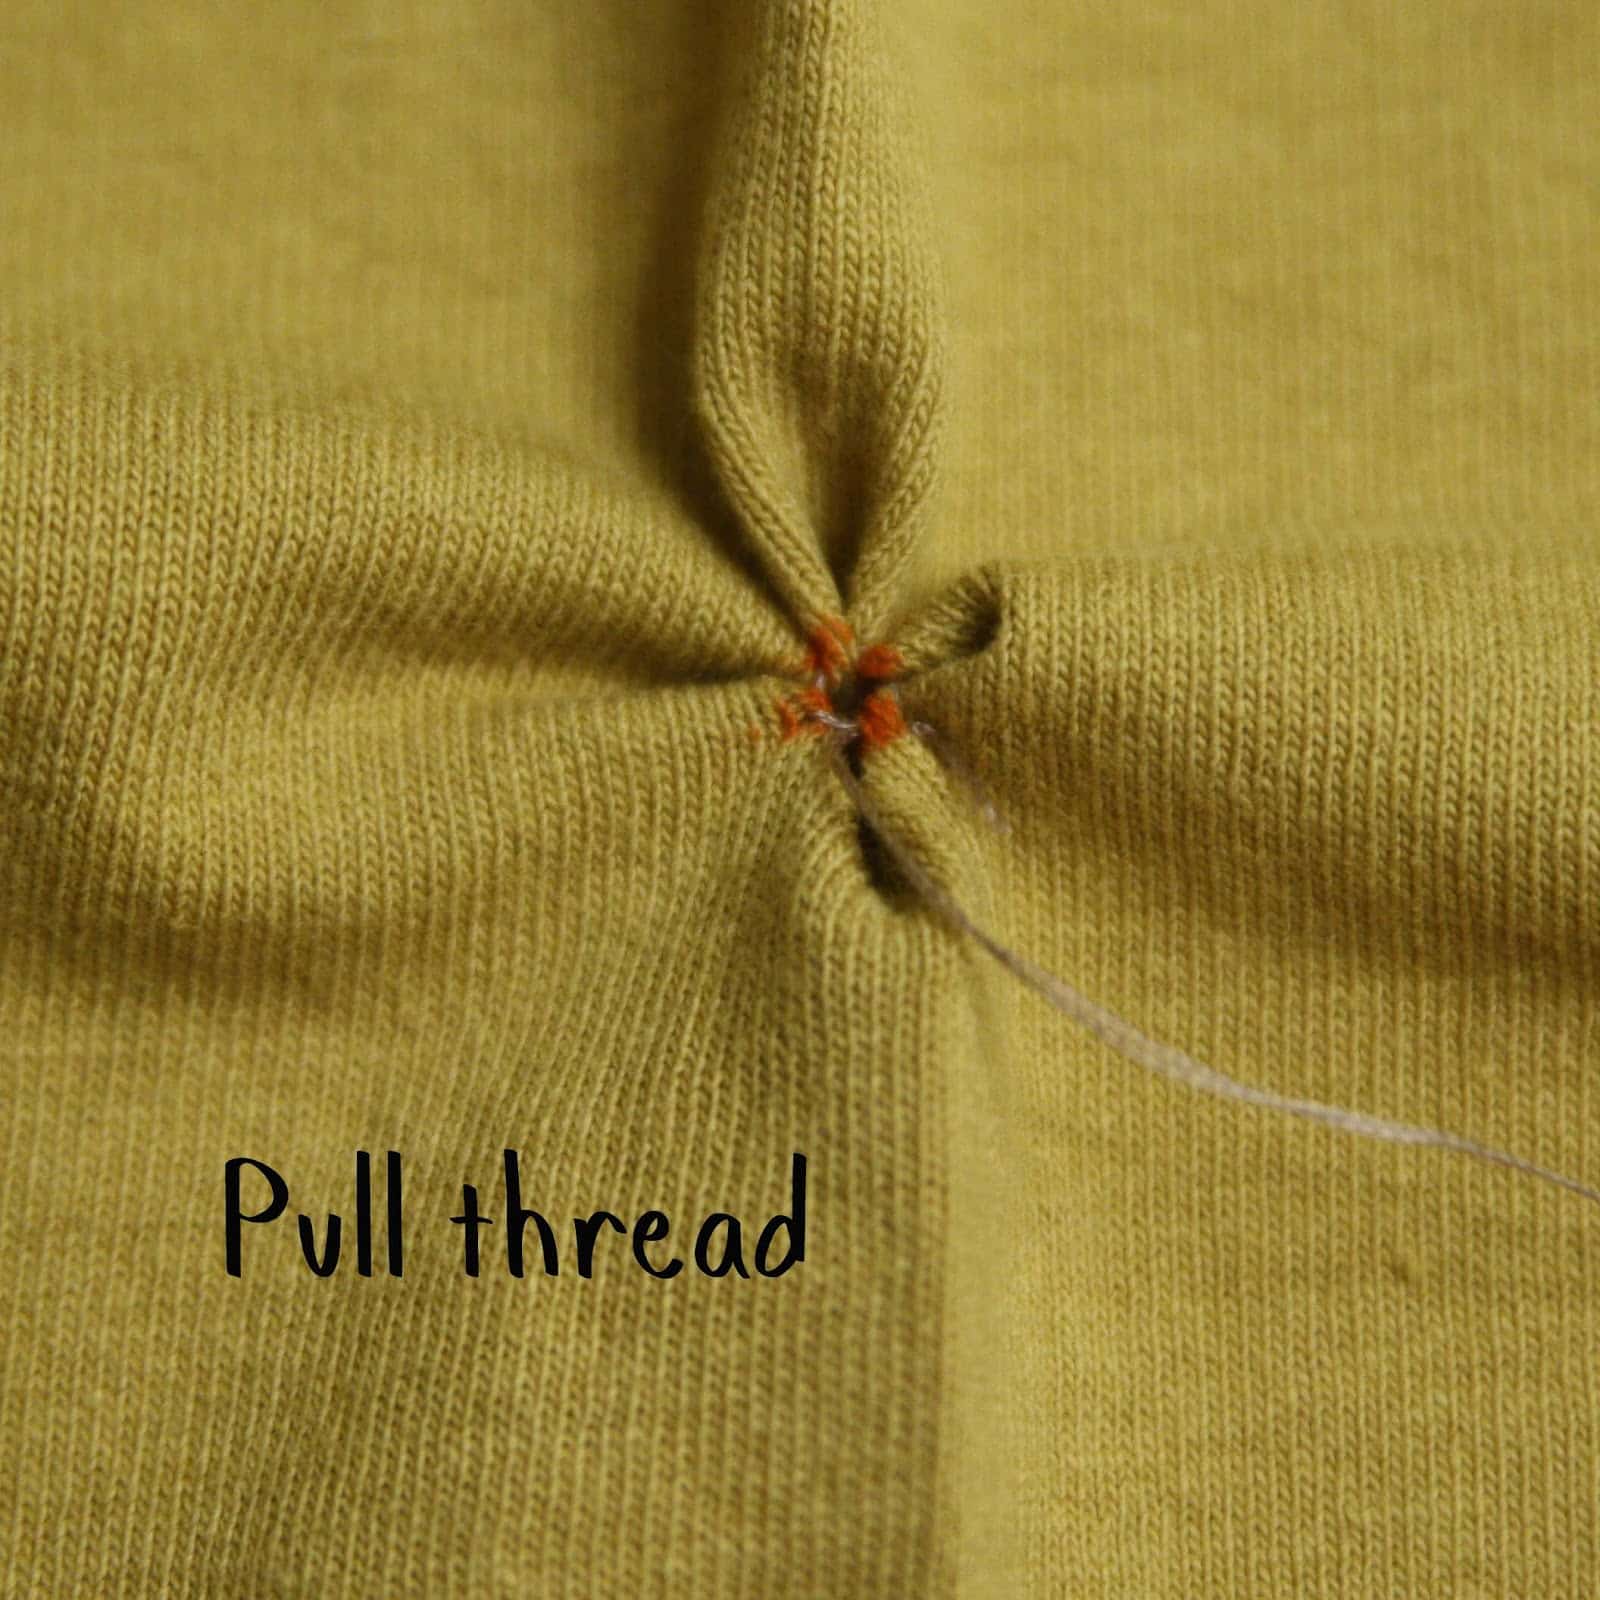
3. Pull the thread. You can see the flower shape starting to form. I found it useful to use a knitting needle to smooth out the folds and make sure this was really like a 4 petal flower.
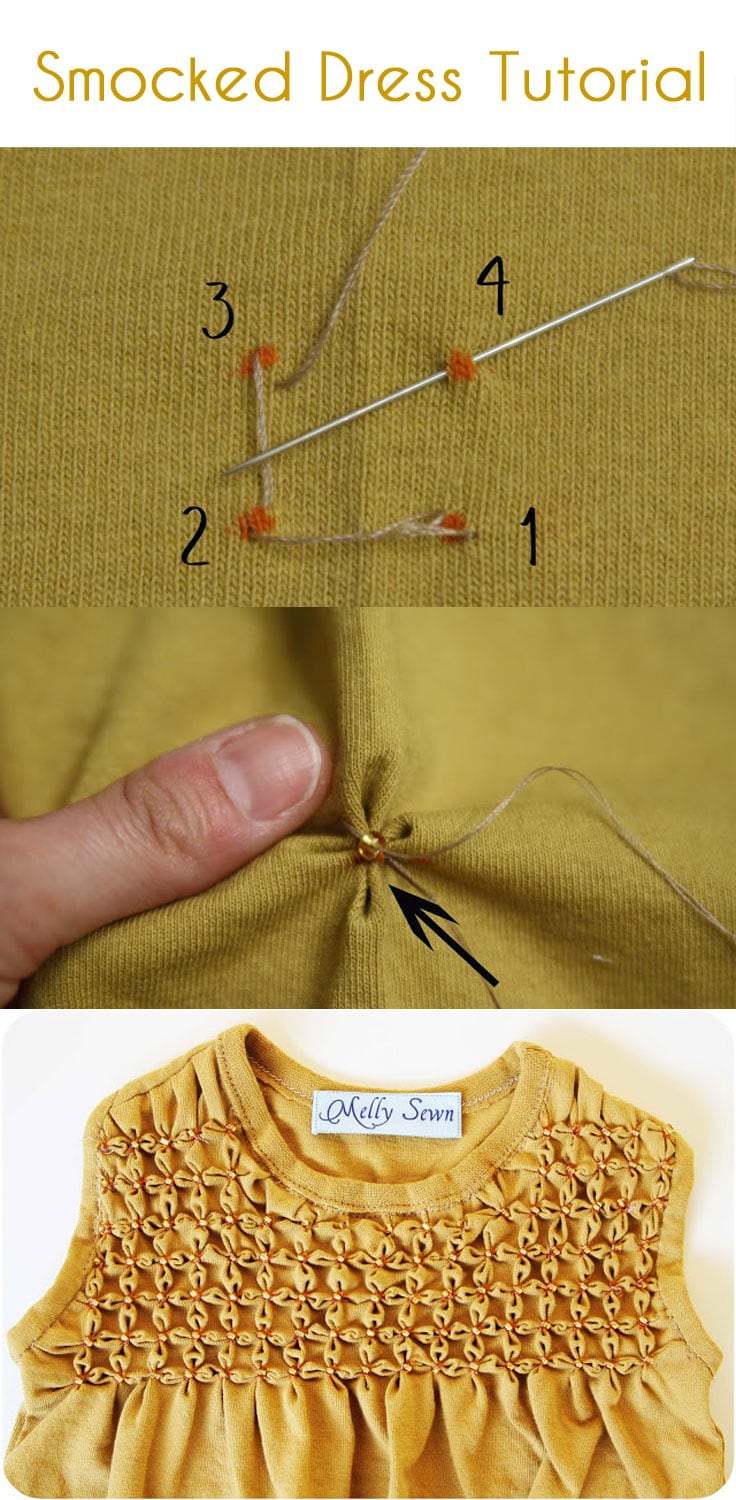
4. Pinch the petals together like so and take another stitch across the middle

5. Now string a bead, and stitch across the middle and down through the back (direction indicated by arrow). Turn the fabric over and knot the thread on the back.

6. Cut the thread and repeat many, many times.
Tips for Successful Stitching
I also found it useful to use my knitting needle to smooth out the petals between flowers as I went. Sometimes when you pull the thread the petal gets stuck on the wrong side, so I would use the knitting needle to poke the fold up on the right side.
If you’re doing this on a garment, I suggest you not cut the pattern out until AFTER you’ve smocked – as you can see from my grid, this shrunk an XL shirt down to fit a size 6 girl. You lose about 1/2″ of both length and width for every one of these flowers you make, so purchase a lot more width and length than normal when buying your fabric and planning your design. That way the finished item can still fit.


Heather Green
Wow wow wow! How long did this take you? Amazing!!
Unknown
voted for you on project run and play! that’s amazing
Etcetorize
Wow! I never would’ve thought it was that easy. It looks beautiful!
Emily
wow, beautiful! I am so going to try this for my niece! I love anything that involves using old t-shirts :o)
milou
Oh thank you! I wondered how you did!
The result is superb!
suzyhomemaker
Wow, it looks so professional. I am very impressed.
Farida
Wow! very nice………
thanks for sharing
Jan M
I have really enjoyed reading about your use of flower smocking in these cute outfits! Great job!
jess
Mel Seriously THIS IS AMAZING. I cannot believe how much work went into this. Instant love. Great work and great color.
Tina
Amazing! What patience you have, too!
Crafty Mischief
Darling! I love it!
Joan
Thanks so much for posting this tutorial. I’m off to scour my Tshirt pile right now.
SweetPepperRose
Oh how I love this! thanks for sharing your how-to =)
JoAnn
sweetpepperrose.blogspot.com
KasiaJ
Oh wow. This is beautiful. It must have taken forever! You must love that little girl or something. 🙂
Reinventing Mimi B
What a cute idea! I really like the final look.
Popping over from Tatertots and Jello,
~Mimi B~
Aunt B
I’ve done some smocking but never thought to use a T=shirt this way. Great idea!
ShirleyC
Thanks for the tutorial. I loved it the first time I saw your dress on PR&P.
Highland Monkey's
Absolutely brilliant and thanks for putting a tutorial on how you made this lovely dress.
Angela
Very clever. Would never have thought to use a T-shirt this way. Beautiful!
Marie
Looks amazing. I wish I had that kind of patience! 🙂
Katie Goldsworthy
I’ve always wondered how people did this! It’s beautiful and thanks for the tutorial!
–Katie
@ Creatively Living
Amy
This is beautiful, I had no idea smocking was so simple, just very labor intensive. 🙂 I’m a self-taught sew-er and was told by a very experienced one to not even think about smocking, I’m thinking I’ll find another experienced sew-er to take advice from! 🙂 Thank you for sharing this.
Cherished Bliss
This is stunning! I don’t think it could have turned out any better than it did! : ) I would love for you to share at my party!
Hope to see you there!
http://www.cherishedbliss.com/2012/05/craft-and-tell.html
Laurel @ Ducks in a Row
This is definitely a labor of love – but so worth it!!
תמר
(sorry about my broken english)
it’s great! I like the idea and the way you make it.
can you please explain what you did in the shoulders? It’s seems like you unstitch it and made some folds. Am I right?
Melissa
I cut out the dress after I did the smocking. To sew the sides and shoulders, I just pinned the folds from the smocking down like pleats.
Mandy @ Sugar Bee Crafts
Thanks for linking to TAke-A-Look Tuesday – you were featured today!!
–Mandy, http://www.SugarBeeCrafts.com
Glamour Glory
Amazing! It’s so gorgeous, love it!
-Reyna
http://www.glamglory.blogspot.com
http://www.facebook.com/glamglory
mrslauralynn
Wow, that is so clever! The finished product looks like it was really complicated to make but the tutorial makes it look so simple! I bet it take ages though! I’m going to try this one out, looks like its worth the effort! 🙂
Jenilyn
This is wonderful and beautifully executed! I would love for you to link this up to “I Made This” at Grits & Giggles! http://www.gritsandgiggles.blogspot.com/2012/05/i-made-this-4.html
Beverly {Flamingo Toes}
Melissa this is such a great tutorial!! I love the way the smocking turned out!! Thanks for linking up – I featured you today! http://www.flamingotoes.com/2012/05/crush-of-the-week-think-pink-features-49/
Emily
Wow! Love the look and the tutorial. Maybe I’ll get motivated to try it. 🙂
Pam
Your smocking is adorable, Melissa!!! Hope you don’t mind, but I’m pinning this…
judy
i really love this and i want make some for my girls .congrats u did a great job ,please send a website where i can get more tutorial on this cause am using fabric.Thank you
Irene
Where did you get that lovely pattern for the dress itself? I would LOVE to try to recreate the whole dress you made.
Thanks!
Melissa Mora
It was a self-drafted pattern.
Paula
How didyou create the binding for the neck and the little pockets? So adorable!
Melissa Mora
I used the ribbing from the collar on the shirt for the pockets and extra pieces from the t-shirt for the neck and armholes.
MinnesotaE
I’d also like to know the pattern you used. Or did you just wing it? I love the added pockets. Little girls love pockets too!
Melissa Mora
It was a self-drafted pattern.
Jamie
Thank you for showing the details! This is such a cute and intricate technique!
ani
Got hooked to your handiwork! tried something similar, without cutting the t shirt just minimised the size.
katia
beautiful thanks
Brenda
So cute! I have done English smocking but I haven’t ever seen American smocking. I will have to try this.