
Learn to sew a zipper in a zip purse with this easy DIY
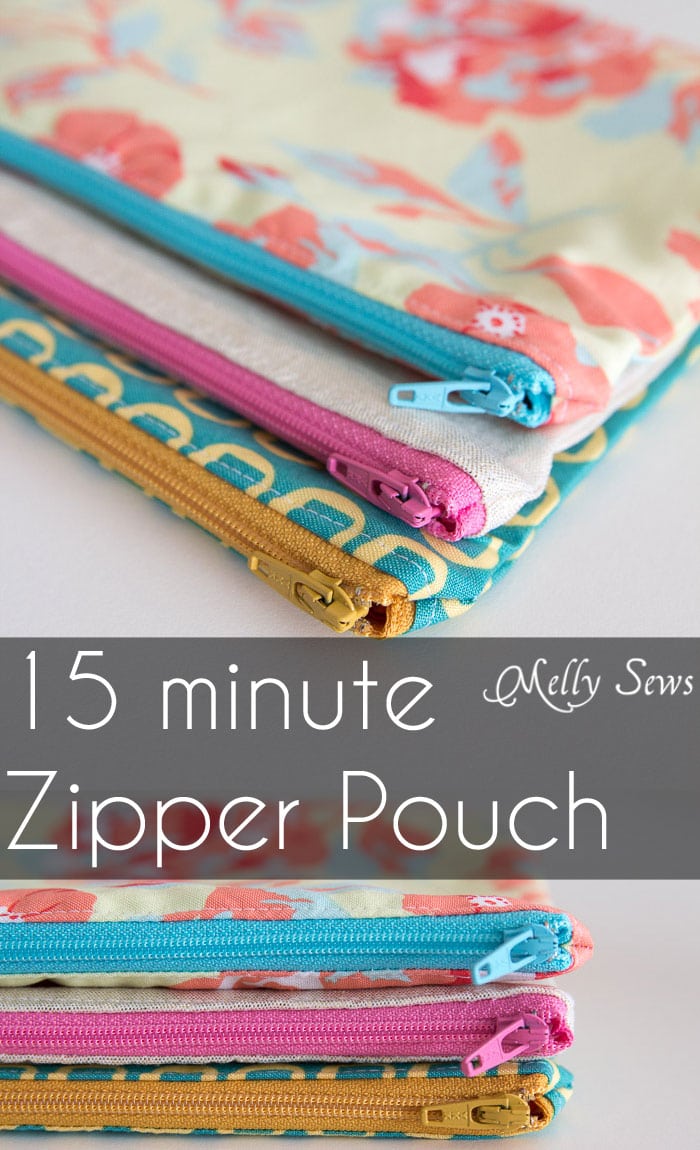
Hey y’all – the theme for this month is Accessories, so I’m going to be kicking that off with a classic – how to sew a zipper pouch tutorial. Today I’ve got both a written and video tutorial for you, so either way you prefer to learn, we’ve got it covered! Zipper pouches make great gifts and are a good way to use fabric scraps.

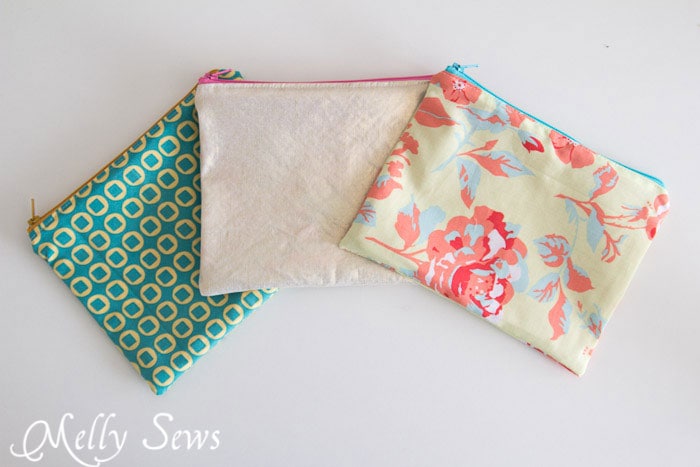
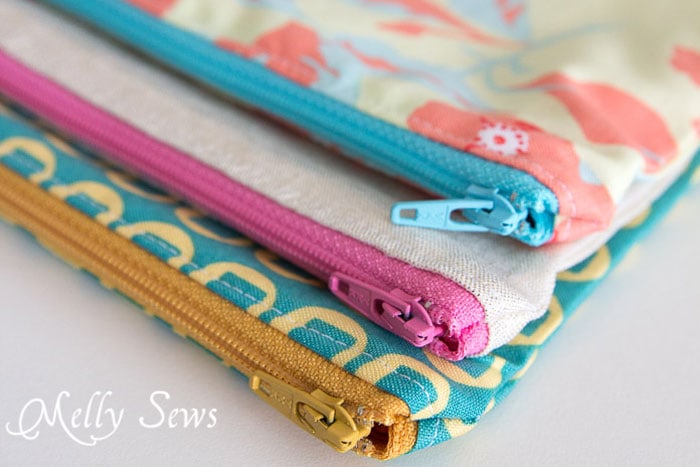
BTW – I sewed the one in the video (in 15 minutes if you take out video set up time), forgot to photograph any of it, and so then decided to sew the 3 in the photos. Altogether, those 3 only took 35 minutes, so these are also some of the best craft fair items to sew since they’re quick, easy, pretty and functional. So many possibilities!
This post contains affiliate links. As an Amazon Associate I earn from qualifying purchases. All affiliate links are identified with (affiliate link) after the link or a commissions earned statement above the link(s).
Zipper Pouch Supplies
Let’s get started. You’ll need:
- A zipper, at least 9 inches long. If yours is longer, I’ll show how to shorten it (I tend to buy 20″ zippers in bulk and then just shorten as needed).
- Two outer fabric pieces, 9 in long x 7 in tall
- Two lining fabric pieces, 9 in long x 7 in tall
- This stacker has a cute assortment of fabrics you could make a bunch of zipper pouches from.
Though I have listed these dimensions, remember that you can use this same technique to make these in ANY SIZE you want! Just make sure your zipper is at least as long as the edge of the fabric you’re going to sew it to.
OK, for those of you who prefer a video tutorial showing how to make a zippered pouch, watch the one below. If for some reason it won’t load, you can also watch how to make a DIY zip pouch on YouTube here. And if you’re a written tutorial gal (or guy), keep scrolling to the written tutorial below the video.
To start, if your zipper is too long, make a mark 1/2″ from where the edge of the fabric will hit. Center the zipper under your presser foot at that mark, and set your machine to a wide zig-zag with a very short stitch length. Hand crank your machine to check that your needle isn’t going to hit the zipper whilst zigging or zagging, (VERY important if using a metal zipper) and then sew a few stitches and backstitch over them to create a new zipper stop out of thread.
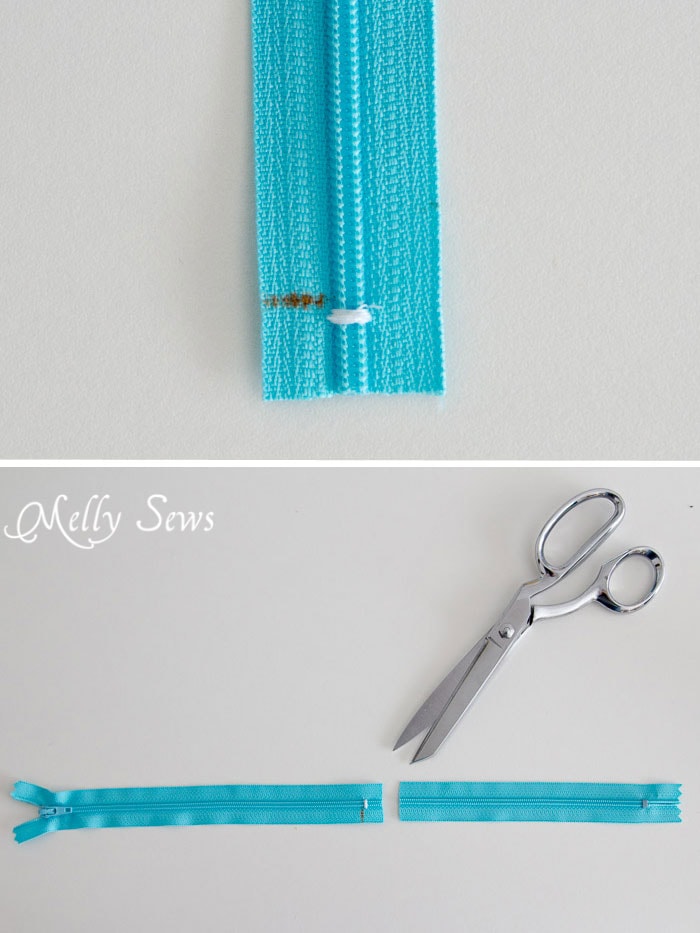
Cut the zipper so it is 9 in long. If it’s an nylon coil zipper, you can cut right through the teeth. If it’s metal, carefully cut between teeth.
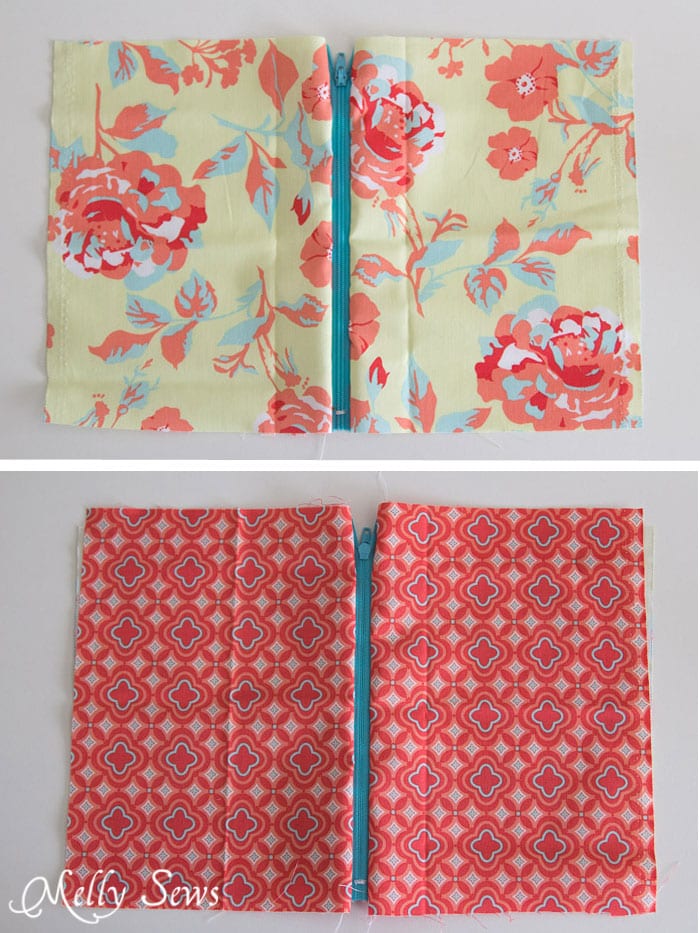
Next, place the zipper right sides together with one of the pieces of outer fabric, matching the edges. Switch to a zipper foot on your sewing machine and stitch the zipper to the fabric.
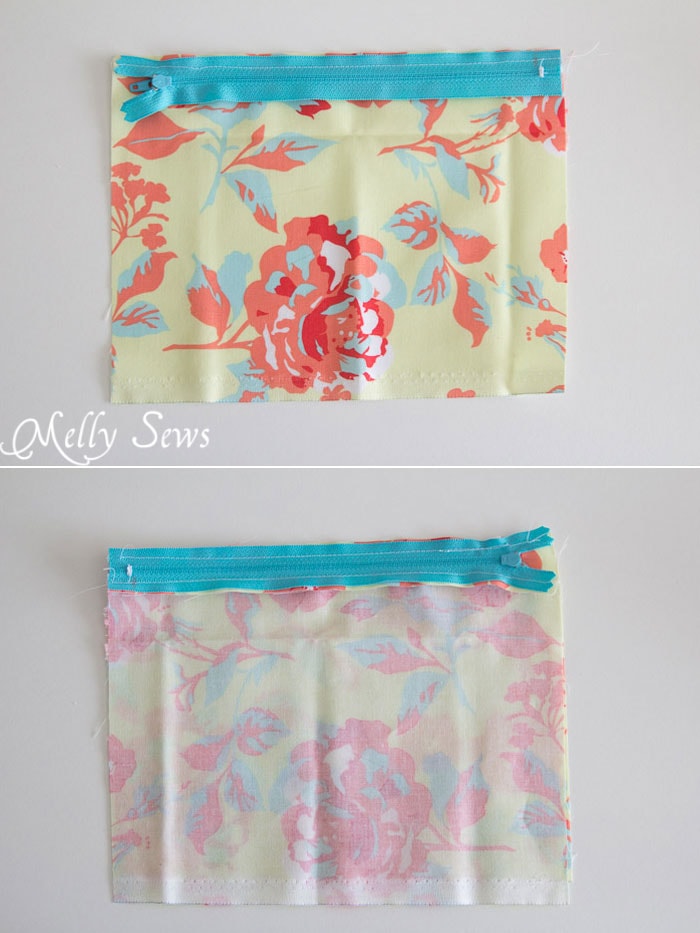
Match the other edge of the zipper right sides together with the other piece of outer fabric and stitch this side.
Sandwich one long edge of the zipper between a piece of lining and the outer fabric it is already stitched to. Stitch again, along the same stitching line on the outer fabric, to attach this side of the lining. (If this part is confusing, this is where it might help to watch the video).
Repeat with the other side of the lining.
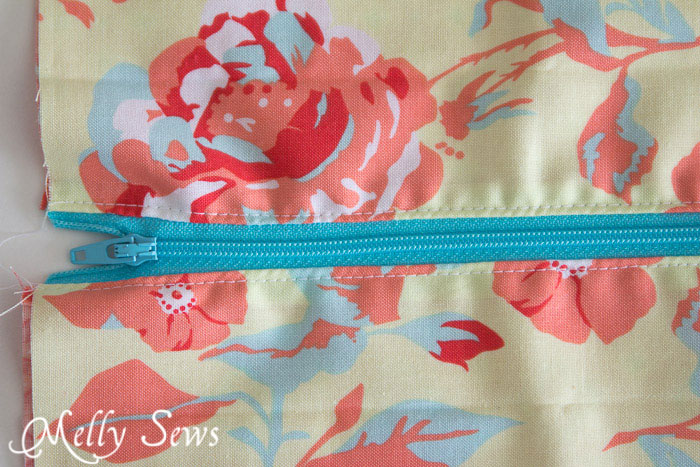
This is what your pouch should look like on the outside.
And this is the inside.
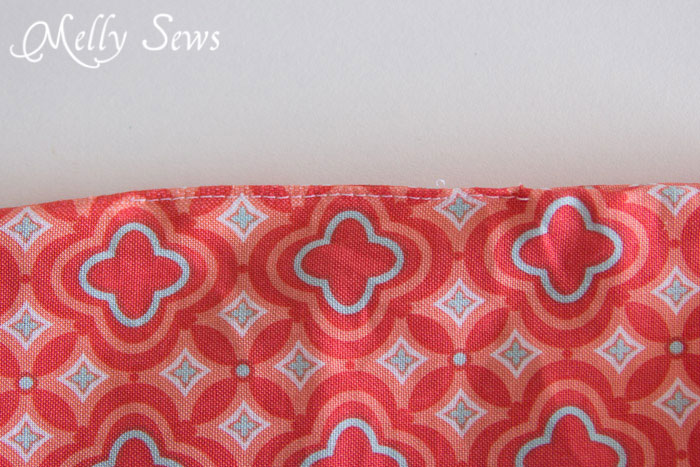
Topstitch close to the zipper to keep the fabric from popping up and getting caught.
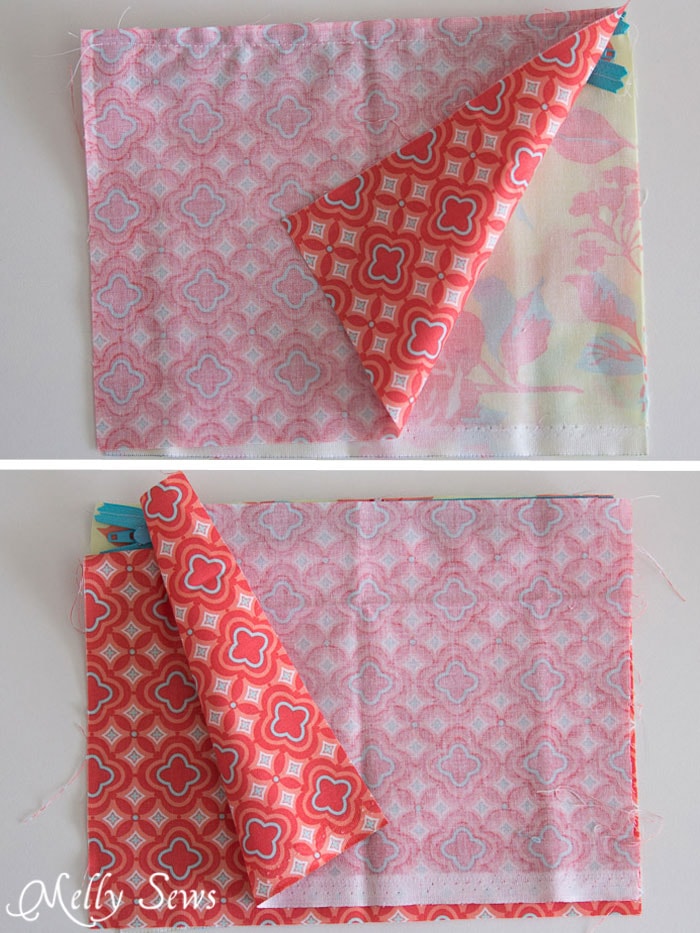
Unzip the zipper 3/4 of the way. Fold the pouch so that the outer fabrics are right sides together and the lining fabrics are right sides together. Make sure to match the outer fabrics at the zipper and fold the zipper teeth toward the lining. Folding those teeth the right way is the key to not having a pinched looking zipper when you sew this.
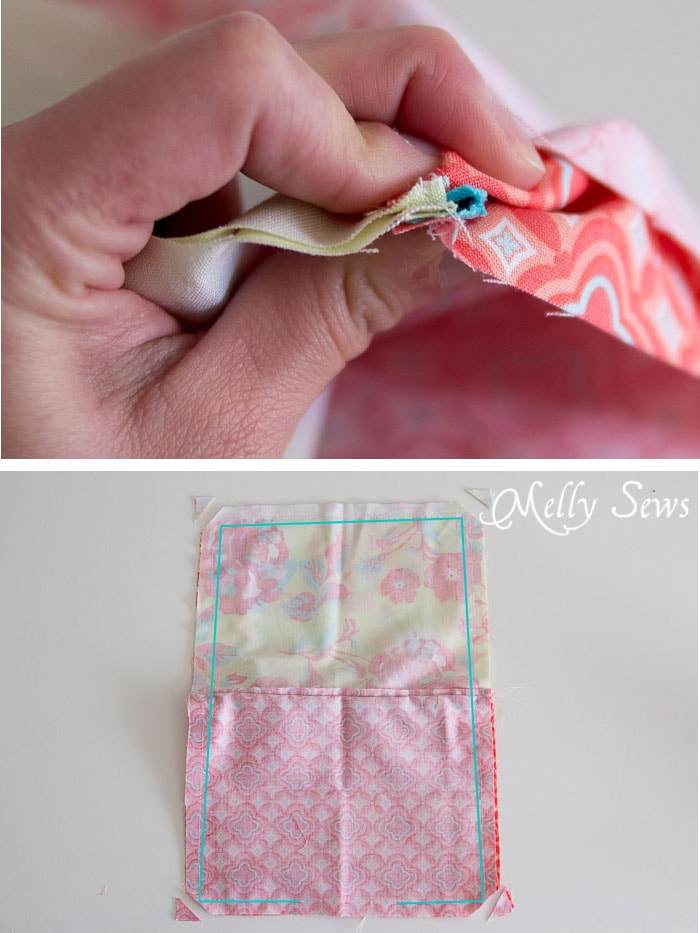
Stitch around the edges, leaving a hole in the bottom of the lining for turning. Clip the corners to but not through the stitching.
Turn the pouch right sides out.
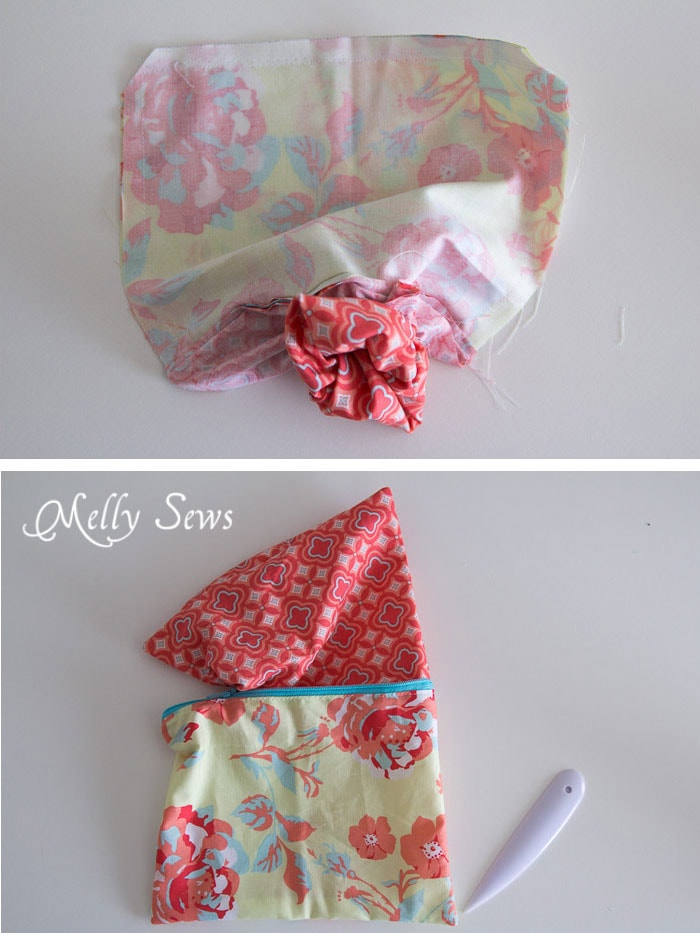
If you like, use a point turner to make sure you have sharp corners.
Fold the raw edges of the hole left in the lining toward the inside. Then you can either topstitch along the edge to close the hole (shown below) or hand finish with a blind stitch for an invisible seam.
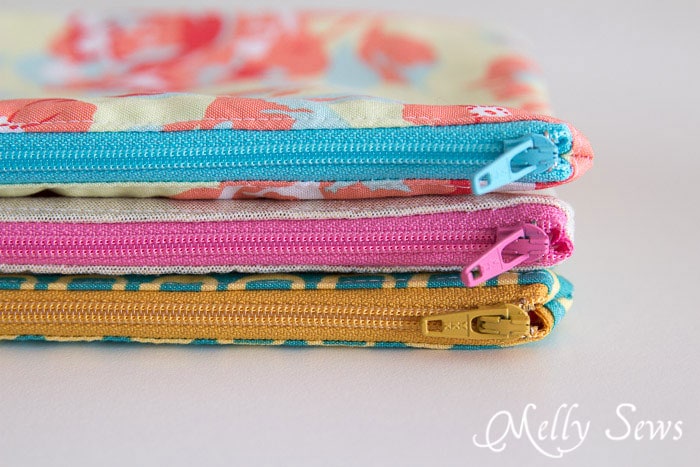
And you’re done! Zip, zip, zip it and enjoy that fun new project.
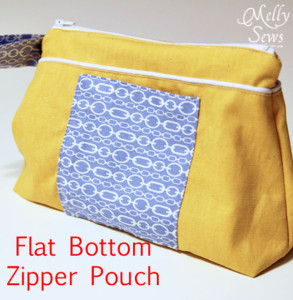
Want another zippy challenge? Try making a flat bottomed zipper pouch as shown in the post here or the video below.
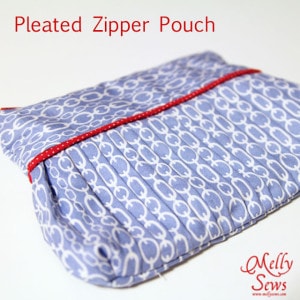
And here are even more zipper bag variations to try.
 |  |  |
Toni
Love this project and you explained it so well. I really need a way to hang it to a belt loop or something How would I do that?
Thanks
Toni
Karyl
How about using a small carabiner /hook? Insert a loop into the top of the side seam and the hook can be easily attached or removed as needed.
Beacher
Thank you! Thank you! I thought I could figure this out myself after viewing pictures of various pouches. But after several pouches and hilarious results, I knew I needed help. You’re the BEST.
Deb
Fantastic video and written instructions/pictures. Thank you so much!
sara
I love sewing so much and the video helped me a lot! I had no idea how to sew that before I watched it. Lovely pics too:-)
Janet
I leave the entire bottom lining open and just machine stitch it close. It’s easier for me to turn out and I like the look , even though it is inside.
Jean
I do that as well.
Marianna Kirwan
Thank you. Very clear and easy construction for an attractive, versatile, and useful project. Equally good for a beginner or a seasoned sewer. Thanks again.
Sue
Fantastic tutorial and written instructions, so easy to follow – thank you.
Red
Thank you so so much for this tutorial. I watched the video twice before starting …watch twice, cut once.
I’ve just finished my first zipper pouch and I’m a bit excited.
It’s a bit wobbly and I sewed a little too close to the zipper but… it works!!!
Stephanie S.
Thanks for great video and written instructions!!! This is one of the best ones I have seen in regards to adding a darn zipper!!!
Sonja Loyd
I found your marvelous pouch at ,Living with with Gotlands.com with Kim.
Its a perfect pouch for my knitting and all fibers projects.
Thank you for sharing your tutorila
sue
Thank you so much for sharing your work. I found it very helpful xxx
Rose
Perfect instructions. You make life soo much easier!
sandi
Made 5 really girlie ones for door prizes at a bridal shower.
Fiona
I can not thank you enough for this tutorial.
I am a beginner sewer, yet in one afternoon managed to make gorgeous pencil cases for both my kids!
OK, so it took more than 15 minutes per case, but I will get faster.
They are impressed and I am thrilled.
Thank you for the super clear instructions – a brilliant tutorial.
Macy Moon
Thank you! Thank you! Thank you for drawing the blue lines! That was the part I was most confused by and your tutorial cleared it up. You rock!!
Katrien
geweldig dankzij de video heb ik het helemaal zelf gedaan !!!! wel wat langer dan 15 minuten en een keertje mijn stof verkeerd gelegd maar dikke dankjewel !
Agatha
Thank you for the step-by-step and easy to follow procedures. I’ll start making some!!
San Lo
This tutorial is very useful,thank you for sharing.
Irma
Thank you so much. I loved this zipper bag so much that I decided to incorporate it into a knitting needle case that I made! Now all my small knitting essentials are contained in the case and readily available.
Shubhada
Expert way of teaching. Thankyou , you have made pouch stitching so easy !
Rhonda Harris
Thank you so much for your tutorial! I love it! I was wondering what to sew for Christmas this year as extras and you helped me solve that. I loved your tutorial so much I posted it to my FB page for Sewing Seamstress. Thanks again!
Mojgan
I am so excited! 🙂 I made this pouch,finished it right now,it’s my very first sewing, I don’t have a machine yet and I hand sewed it.thank you so much Melly for this excellent tutorial.
Jack Shannon
Well, it didn’t take 15 minutes. It took more like 2 or so hrs. . BUT! That said, I made my first zipper pouch. In fact, this is my FIRST zipper ever. I’m fairly happy with the outcome, so I’ll make another one that will be a bit smaller and faster.. LOL. Thanks for your video and written posts.
Jack Shannon Sr.
Tola usman
Thank you this is so explanatory and also very neat. God bless you.
JereeP
I made a pouch! Okay, it took me two hours, some unpicking, a lot of grumbling and a flat-out argument with my machine – but, thanks to you – I made a pouch. And it works, and looks like the real thing and everything. I feel epic! Thank you so much for sharing this. I am now a genius 🙂
Marnie Johnk
You are that and more!! You really made me smile. I had similar experience but it made me feel so great when I finished… nothing like conquering a difficult task!!!
Bee
Thanks Melly Sews. Other tutorials have you sandwich the outer layer, the zipper, and the lining and I can’t see the zipper so I end up stitching too far or too close. (First time sewer as of 11/22/2015). This pouch came out OK, but could have been a bit better. I love the way you do yours and I can’t wait to try this.
Toni
Thanks so much for this tutorial. I really appreciate that you had both a video and written one. I am going to try this out tomorrow. 🙂
Tom
This is a great idea–I have a couple of little girl grandkids could really go for this. And I can get further along with not feeling intimidated by zippers.
I go into JoAnn or Hancock and get overwhelmed by the selection of fabrics. It’s not obvious what kinds of material are appropriate for various projects. What fabric sections should I look in to get material to make these pouches work the best, from a construction perspective as well as for the end user? I guess lining could be any calico small-scale print, but the outside layer has me uncertain. Any help you want to offer?
Victoire
Hiya! Thanks for both the written instructions & video — got lost a couple of times, but it turned out so well in the end.
I changed the dimensions a bit to fit an iPhone-wallet — added some trim and a strap. Voila! Perfect purse for evening use.
What a lovely way to use up scraps — thanks again.
Kathryn
Really well done. Thoroughly and easily explained. Thank you for sharing this with us.!:-)
Lisa W. Degregorio
This is a great idea. I was looking for this information. It enabled me to sew faster. Thank you for sharing useful information.
Bri
I messed it all up on my first try, but everything went very well on my second attempt. Thank you so much!
Jenni@ApronPockets
Thank you so much for this tutorial. I have never sewn a zipper into anything as far as I can recall (I may have done it waaay back in Home Ec, but in that case, I blocked it out!). Like others it took a little longer than 15 minutes the first time because I stopped and read the directions at each step. But now I know what to do and could cut out pieces for several bags and make them much more quickly – I hope! 🙂
Virginia
I enjoyed learning how to make a zipper pouch. I will make some for gifts. Thank you
Sarah Jane Jarvis
Super tutorial. You did a great job and I feel empowered. I am going to use a net for one side so I can see the contents. SO COOL! Let me go and get started!
Arlette MONTEL
Merci for your tutorial so easy. It’s very to sew this pouches, I think I want to do a lot for gifts.
Cindy
Love them. I just sewed up 3!
hehe
Thank you. Very clear and easy construction for an attractive, versatile, and useful project. Equally good for a beginner or a seasoned sewer. Thanks again.
Reply
Marie
This is absolutely adorable and seems pretty easy as well! Thank you for sharing.
Rozianne
Amazing tutorial. I love it.
leine
I loved this zipper bag so much that I decided to incorporate it into a knitting needle case that I made!
thank you for sharing.
Ali Nurton
Great tutorial – I referred to it on my latest blog post, thanks!
http://butterflybright.blogspot.co.uk/2016/03/a-simple-zipper-pouch-in-pretty.html
Lyse
I can’t believe that I actually made this bag!! without profanity in my vocabulary! 🙂 I am not a sewer (as in the kind who sews :)) but I was able to make this without difficulty. The tutorial is the best I have ever seen. Thank you so much!
Gemma
Fantastic video and easy to learn instructions, will definitely try make this! 🙂
soumya
you have done a nice work. i was looking for this type of tutorials. thanks for sharing.
trijnewijn
I made two little girls happy, thanks to your great tutorial! Thanks a million!
https://trijnewijn.wordpress.com/2016/06/11/naaisel-199-2-ritstasjes-en-4-pennenzakken/
Barbara
I can’t wait to make my first one, you make it look sooo easy. I’ll let you know 😉
Kathy Hansen
I’ve been sewing rouge for years, which is why I’ve stayed away from zippers. This video is exactly what I needed…I’m sure I can follow your example.
Thank you so much!!
Lolita
Thank you for the tutorial! It took me about 20 min, I also added interfacing so that might account for some time. Overall, great tutorial and it came out perfect!
Jan McNeill
WOW…finally learned how to really do an easy zipper with this…and the pouch is a great little gift. Once you watch the video, things fall into place and I know the next one will be easy! Thanks so much!
Jason
Hello Melissa,
I should appreciate you for the effort you put in to teach others what you do. This is saving us a lot of time and we do it right the first time we do it. I am sure to sew a pouch without going wrong anywhere in the middle now. 🙂
Regards
Sewing Machines Guru
Hi Melissa,
This really is a great idea. I tried it after seeing this tutorial but couldn’t get it right in my first attempt. But the second attempt went successful. I wish I could share the pictures with you.
Keep up the great work.
Thanks
s
Thanks Melly for the nice and perfect toturial I enjoyed the whole vedio and you are a pretty natural teacher ☺
Antoinette Breazzano
Thank you. I am an experienced seamstress, but always looking for new items to make and new ideas of how to sew. Your tutorial is excellent. I decided to use quilted double-sided fabric for my bag which eliminates the need to line the bag. Of course it doesn’t look as nice on the inside, but it serves my purpose. I am planning to make them as gifts for a luncheon of ladies in January and am so happy I found your site. Keep up the good work.
Brenda Goldsberry
You did a great job on both the written tutorial and the video.
Jen
I am a very beginner seamstress and just learning how to do zippers. I have been looking for the right tutorial to teach myself and with this, I’ve finally found it. Thank you! Excited to try this.
Nicole Gabriel
I love this tutorial with the video it makes it look “sew” easy!
Jane
Thanks for the tutorial, Melly! I’m glad I was directed to your site. I’ll look forward to exploring again soon.
Sharon
Although I’ve been sewing for a few years now, I still consider myself a beginner as I’ve NEVER sewed a zipper until now. I love these bags. I’m still not getting the zipper right, though, at the point where we pin the entire bag and the zipper is supposed to be turned toward the lining, etc. I *thought* I was doing it right, but both bags I made came out a bit puckered. My daughter will love them but I need to keep working on this part. Thanks so much for the video and the wonderful instructions!
Mercedez
Thank you for this tutorial. I am really just learning to properly sew, other than a pillowcase when I was 8 and I was able to use your tutorial to make a pouch for my friend.
Jennifer Hebel
This tutorial saved me from certain doom on more than one occasion. Thank you
Will
Thank you so much for the excellent explanation of how to sew on a zipper. This was the first time I ever had a chance to sew a zipper and it has helped me to create many new fashionable projects.
Shambavi
Thanks for the wonderful tutorial. The video did make it easier
I made a Laptop sleeve with batting.
Carly
Brilliant tutorial; I am new to sewing (this is my 3rd project) but the combination of pictures, instructions and video made it easy to follow! My very first zip; I did manage to mess up 2 by closing the zip and letting the zip pull go right off the end, but 3rd time lucky!! It isn’t perfect, but am pretty pleased I have a working little purse! Thank you; will definitely try out more of your projects 🙂 x
Simone
OK, I made 16 of these this weekend. This is only my 3rd project. My first a Christmas stocking as I just learned how to sew. GREAT video tutorial – I can’t believe how wonderful these look. I made them using Easter material and will fill them with candy for the kids in my family. Thank you so much.
Barbara
I’ve made one of these sweet little zipper pouches so far from a quilters cotton. It turned out great! One thing I changed was to reinforce my lining front/back with a light weight iron on stabilizer/lining to give the pouch a little more support. Works out great as this is were I store my extra crochet hooks when traveling so they aren’t all loose in my crochet bag and i don’t have to worry about loosing my favored hook collection. Next I’m trying with a denim weight fabric for passports, foreign $$ etc.I want to put a belt loop on the back so it can be carried hands-free.Great tutorial, make in any size and very useful. Making several for our teachers meeting around mothers day to give with little mementos.
Chris
I have made many sets of curtains, a couple of quilts and quite a few tote bags that turned really nice. I’ve always avoided zippers until now. Thank you so much for the great tutorial.
Nicole
It’s great.
Thank you so much!
April
This was a great introduction to zippers for my 10 year old girls! We did a “sewing camp” this week while the boys were off at string camp, and this was our final project because I was sure we could finish it in the time we had left. They were such a fun and quick little pouches, and they turned out perfectly! Great instructions and video tutorial!
Gina Chua
A very clear instructions and help beginners like me.
Paula
I’ve had my zipper and material sitting on my sewing table for about a month… thinking I could just wing it! I am glad I watched your tutorial and you made it look super easy. Thanks for being clear with your instructions and I can’t wait to see how mine turns out! Blessings!
Paula
I did it! I made my cosmetic bag, using a 6″ zipper. The only issue I had was at the end when I turned it right side out, the zipper was upside down. I had to put a “hole” on the outside, and then open the zipper, then so some fenageling (sp?) and then sew again and it finally turned out to where I didn’t have to hand stitch an invisible stitch on the outside. I will definitely try again and next time hopefully figure out where I went wrong at the beginning.
Fun!!!
Pam
Awesome tutorial! I really like that you have a video to accompany the written instructions. I am a beginner and I plan on using this tutorial to sew my first zipper. Not sure if I am going to use the bag for cosmetics or sewing supplies.
Olga
Thank you so much for a great tutorial! My zipper pouch turned out nice and I love it! But I’m in love with the fabrics you used – the colors are amazing!
Mary J.
What a cute little pouch! I totally love it. I am thinking how it would look like if I make it using this fabric: http://www.mylinenfabric.com/home/10-christmas-kitten-linen-fabric.html It would be a perfect Christmas gift for my granddaughter 🙂
Pamela
I’m making totes and bags for Christmas gifts and this project is easier than some I’ve been making! Thanks for the clear directions and the video. I’m off to get some cute fabric to suit my friends’ interests and personalities!
Barb Sheppard
I have made many of these zippered pouches but it has been a while. I needed some help remembering how to make one. This tutorial is amazing. Each step is very clear and photos are easy to follow. It went together so fast and turned out perfectly.
Beth T.
Thanks for all the effort that went into this! I’m about to make my first zippered anything, and I really appreciate your tutorial.
Michelle
Thank you for making this so straightforward and well photographed – this is the easiest zipper pouch tutorial I have found!
Lija
This pouch is so cute!! Thank you for sharing andhaving the video was a great big help!
Nicole Ong
Great tutorial, just made up a couple as a last minute gift. Thanks and merry Christmas!
Eileen M Armas
Thanks for this video . So clear and easy to follow. I found your video, decided to give it a try and was done in about an hour.
Mimi42
I recently took a class at a fabric store and we made what looks like this exact bag! I am very new sewer and have only made a couple of simple projects so far. I can’t believe how great this bag came out. It took me more like an hour but it really came together easily once I got started.
Jane Hadfield
Thankyou so much for this tutorial. I am new to sewing and I found it easy to follow and understand. I now feel ready to try it for myself.
Cheryl Masters
I hate sewing in zippers, but you make it look so easy that I’m going to give it a shot. Even I should be able to do this. You are such a clever and talented gal.
Cheryl Masters
I forgot. Thank you for the tutorial.
Brannie
Thank you for this tutorial. You explained the steps very clearly, which is very important for a novice sewer like me. I feel quite confident in trying this out. Thanks again!
Purple_peach
Thanks for your great instructions – clear, concise and easy to follow. Have signed up to your newsletter ????
Rob
Hi Melly
Inspired by your zipper pouch, I made a little bag with an outside pocket of my lining garment.
This bag has two straps to carry it.
For the outside I used denim and for the lining I chose for a fabric with some constellations.
My wfe thought it was very nice made, and it has only been my third project ever.
I am a little bit proud of myself now.
Dan
Thank you very much for this. It’s going to help me make a jean purse for a friend. As a new seamster I was sure at a loss how to do this. I’m using a part of a pantleg from an old pair I wore out, and trying to figure out how to put in the lining. Now I’m going to cut out the seams and just use the two pieces.
Tammy
Thank you so much I feel brave enough to try one of these today!
Amy
This is a wonderful tutorial! I love your tip about using tape instead of pins to hold the zipper in place before sewing. Thank you so much for your time and talent!
Sheryl Pena
Thank you so much! My daughter came home and ask me to make her a pouch to keep her tips in. I went to pinterest and there you were with a 15 minute zippered, lined pouch! How could I go wrong?! I made us both very proud of me! Thanks again.
Tammy
Thank you thank you thank you! I love this zipper pouch. So glad you taught me a new skill. Again thank you
Robin
Matching pouch to go with the tote! Awesome! Thanks!
Barbara Spann
Best video I’ve seen on zippered pouches can’t wait to make one.
Linda
Great tutorial and so easy to follow.
Kathy
Well, you sure answered a lot of my questions on how to make a zipper pouch. I want to make some zipper pouches for Christmas as stocking stuffers and I had no idea where to begin. I found your page and there you are answering my questions and giving me more ideas. Thank you so very much and I am off to my sewing room to begin.
Kasi
I’m primarily a weaver and I’ve never sewn a zipper before, but I really wanted to make a woven crossbody purse. I was so nervous about sewing a zipper to the handwoven fabric! I followed your tutorial to the letter and nailed it on the first try! I’m so excited to wear it out and about now 🙂 Thank you so much!
Stacey
Thanks for providing a written tutorial and video. Its so helpful to have both!! Excited to try my first zipper pouch on this snow day!
karen Fritz
Thank you so much for this Tutorial. I must admit, it took me a while to get it right but I did it and I am so happy with the results. I did go ahead and figure out how to add a tab.
Thanks again
Janet
My twelve year old granddaughter wanted to lean to sew…I started her out getting familiar with the basics then this made a great 1st project she could easily do with me by her side and your instructions! Thank you for the easy, clear, and concise project!
jen i.
this is an awesome little project. I love how mine turned out, even though its a little wonky. but for being half hand sewn and half machine stitched it turned out great and I’m so excited. I plan on making a couple for more. one each my kids.
Elaine Reid
Made it today. So chuffed. Thank you for the clear instructions and video. Like the others, it took a lot more than 15 mins hahaha, but i watched and re-watched video as I went along.
Debra Goodrich
Thanks for making this project fun and easy.
Aidan
Thank you so much! I had never sewed a zipper before at all, and it had always seemed kind of intimidating. In the end though this was pretty easy and turned out great!
Lammy Pie
Thank you Melly. Just completed my first pouch. I’m 59 and just teaching myself to sew via YouTube having never used a sewing machine before!! You are by far the best and easiest to follow
Sabrina
Thanks for all your tutorials… I really love them and they are really helpful 🙂
Thanks
Linda
Thanks for a great tutorial – no more wonky zips now! I’ve made little bags before but could never get the zips to lay flat and look neat until following your instructions – really clear and well explained.
@nana.knits
I just completed my first bag and am on to the second. Your instructions were detailed, complete, and easy to follow (even without the video). I am making pouches for my granddaughter’s garden snips to protect small hands from the sharp points when not in use.
Marie Elena
Thank you so much for posting this! I made my adult children silk pillowcases (seems to be all the rage these days) and wanted to make little bags so they could travel with them if they wanted. This pattern was perfect and I had a bunch of miscellaneous zippers so the instructions on making them shorter was so helpful!
Judy Gordon
I will be saving this post! Thank you.
When I need to create an opening for turning, I turn the fabric 90 degrees and sew off towards the cut edge. When the fabric is turned to the right side it is almost difficult to find the opening to stitch as it turns so well.
LOVE the new short hair cut!
Melissa @HomegrownCatholics
Thank you for this tutorial! Made what i needed so quickly and easily. God bless you!
Kim
Best zipper tutorial ever!!! I’ve always been afraid of zippers and this just makes me so happy!! 2 pouches sewn and counting!
Richard
This is super groovy–thank you! To add a bit of heft, I like to fuse some interfacing to the fabric. Great tutorial!
Colleen
Seven years after the initial post and this is still my go-to! Thanks for the easy and concise instructions.
Vanessa
Thank you so much! This is a great pattern with really clear instructions. Turns out great every time!