
Don’t let your serger intimidate you. This guide for beginners is an easy way to learn how to use a serger or an overlocker machine with step by step video.
Hey y’all, today we’re going to talk about how to use a serger and go over serger basics. All this month I’m going to be focusing on sergers and how to use them. If you have one, I hope these posts help you. And if you don’t I hope they help you decide whether a serger would be useful to you in your sewing.
I made a step by step video to show the serger basics covered in this post. You can watch it below or on YouTube here. And of course, the text of this article also covers the same information. However, some things, like threading, are easier to understand by watching the video. Also, this shouldn’t preclude looking at the manual for your machine, especially if you have a different model than I do.
What Is A Serger and is it the same as an Overlocker?
Overlocker is another word used for serger. While overlocking refers to the action by which the thread loops are wrapped around the raw edge of the fabric, it is used synonymously with serging. Either word can be used to refer to this machine and the type of stitching it does.
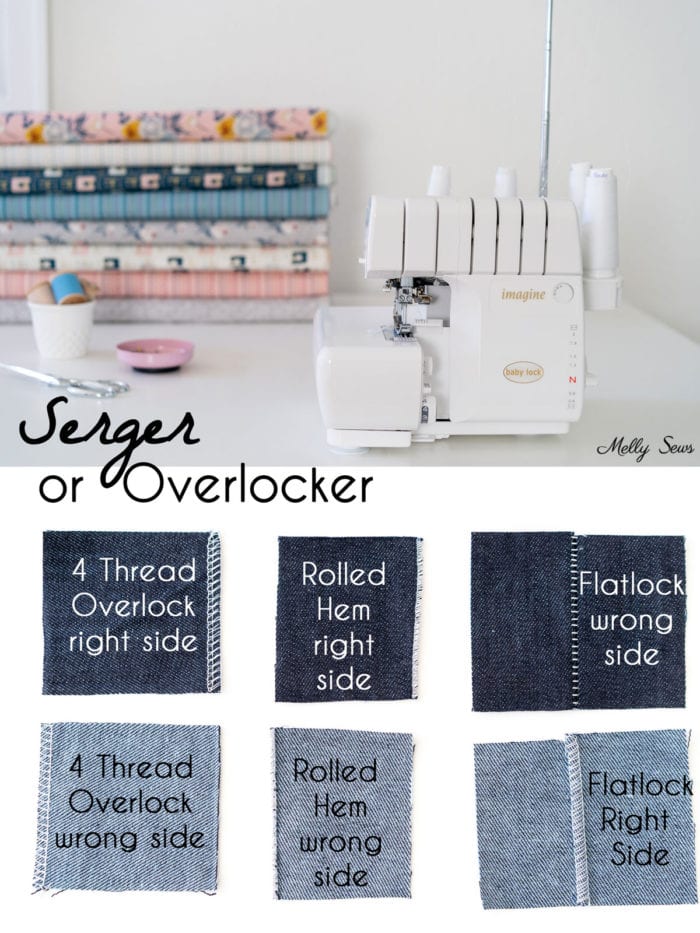
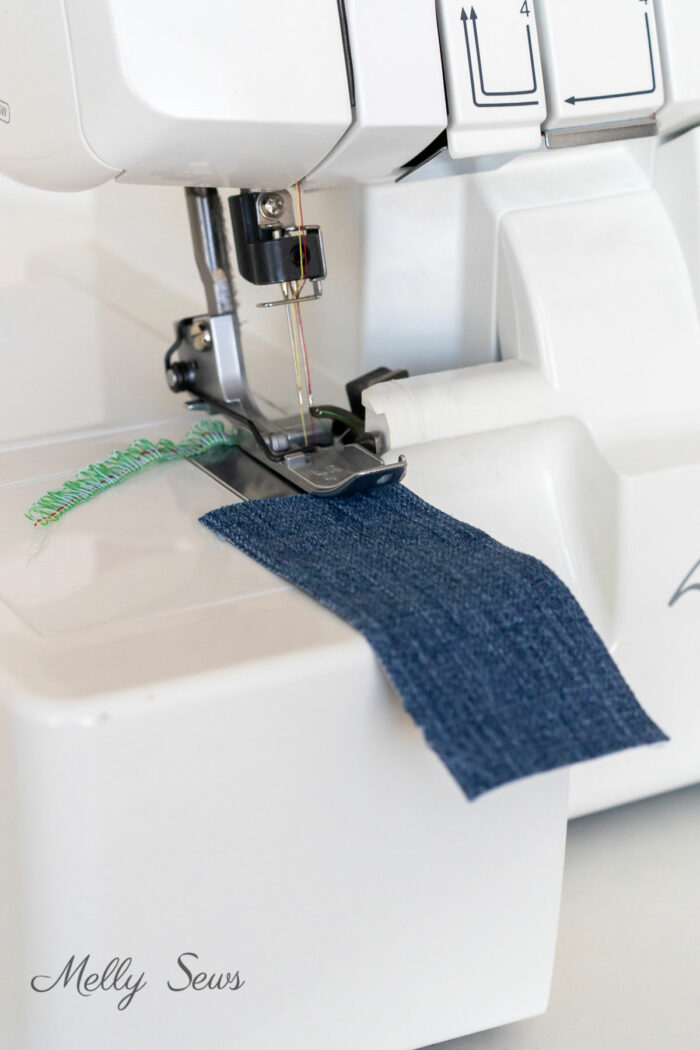
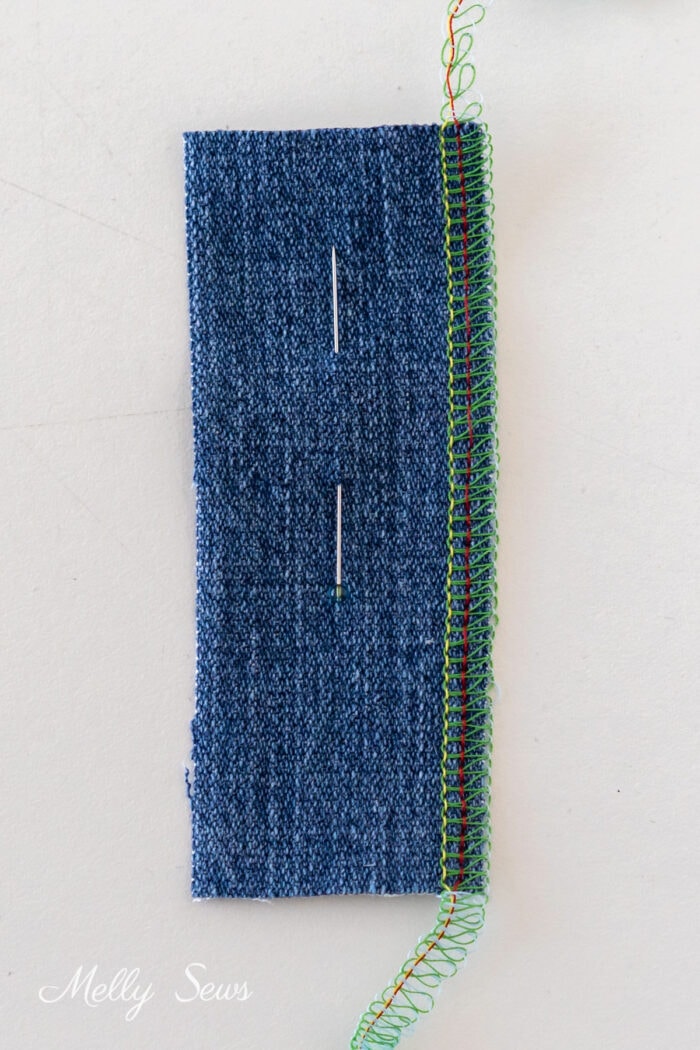
As you can see in the photo above, a serger finishes the raw edges of fabric. You often see these type of professional finishes on ready to wear clothing. This can be done with an overlock stitch or with a rolled hem stitch.
An overlock stitch sews two pieces of fabric together at the same time it finishes the edge. An overlock stitch done on a serger is also inherently stretchy. Therefore sergers are very useful if you sew a lot of knit fabrics. You can also sew a flatlock stitch with a serger. Flatlocking joins pieces of fabric with a very flat seam on the wrong side.
What Can’t A Serger Do?
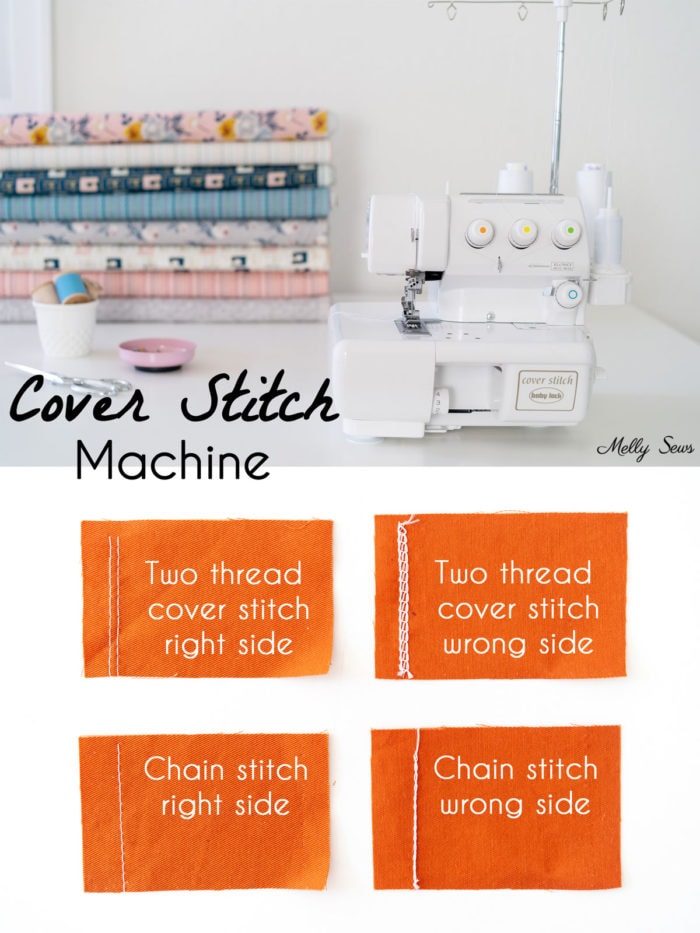
A serger does not create the hems generally seen on ready to wear t-shirts that look like straight stitches on the right side and looped stitches on the wrong side. You need a cover stitch machine to sew those, as shown below. Some machines can convert between cover stitch and serger so they are two types of machines in one. Personally, I prefer separate machines for each function, but buying a convertible machine can save money over two separate machines.
Which Serger Should I Buy?
If you are in the market for a serger, I have two recommendations, the same two machines I show in the video. The first new serger I purchased was a Brother 1034d (affiliate link). This is a solid budget option that sewed quite adequately until I upgraded to my current Imagine serger. The Imagine has air threading for the loopers as well as automatic tension. It cost about 8 times what the Brother did, but it hums right along though I’ve now put many more hours on it than I did the Brother. The Imagine model has been discontinued by Baby Lock. However the Victory model appears to be substantially the same machine with all the features I love in my Imagine.
A note: there are a few 3-thread overlocker machines on the market. I do not recommend buying these. You can use a 4 thread machine with only 3 threads if desired (like when doing a flatlock stitch) but you cannot do the more sturdy and stable 4 thread overlock stitch with a 3 thread machine.
Parts of an Overlocker
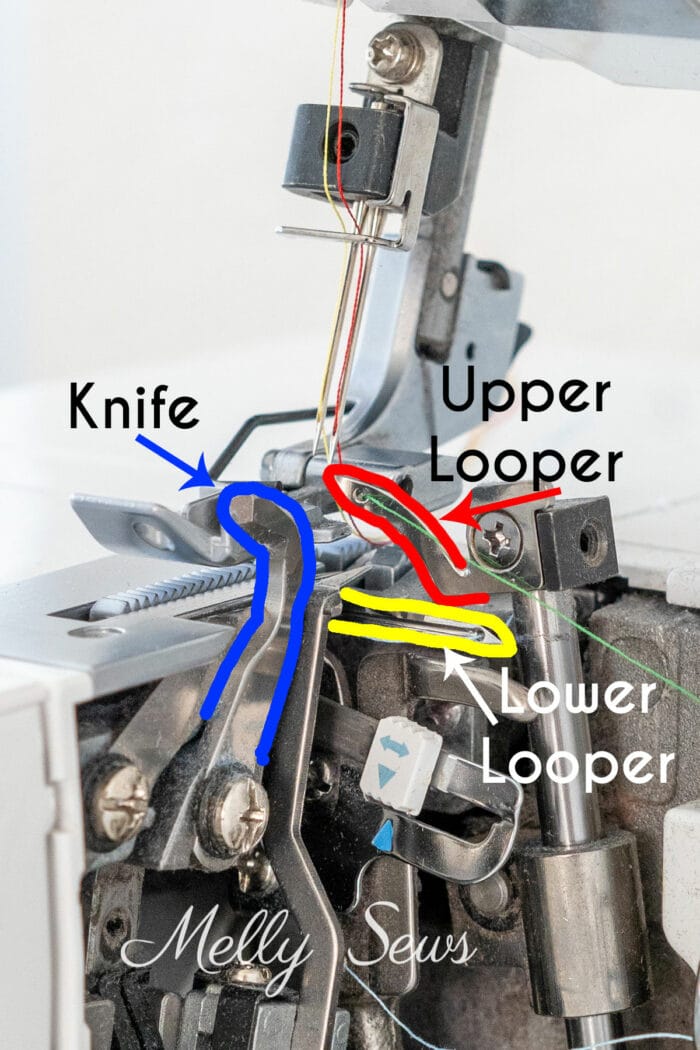
Below I have an image showing the basic parts of a serger. Though some parts, like the needles, presser foot and feed dogs are very similar to a regular sewing machine, the rest of the machine can look very foreign if you’ve never used one before. I remember the knife scared me when I first used a serger. That is to say, the idea of the knife scared me. But you don’t need to be, it’s not a stabbing blade like I had pictured in my head.
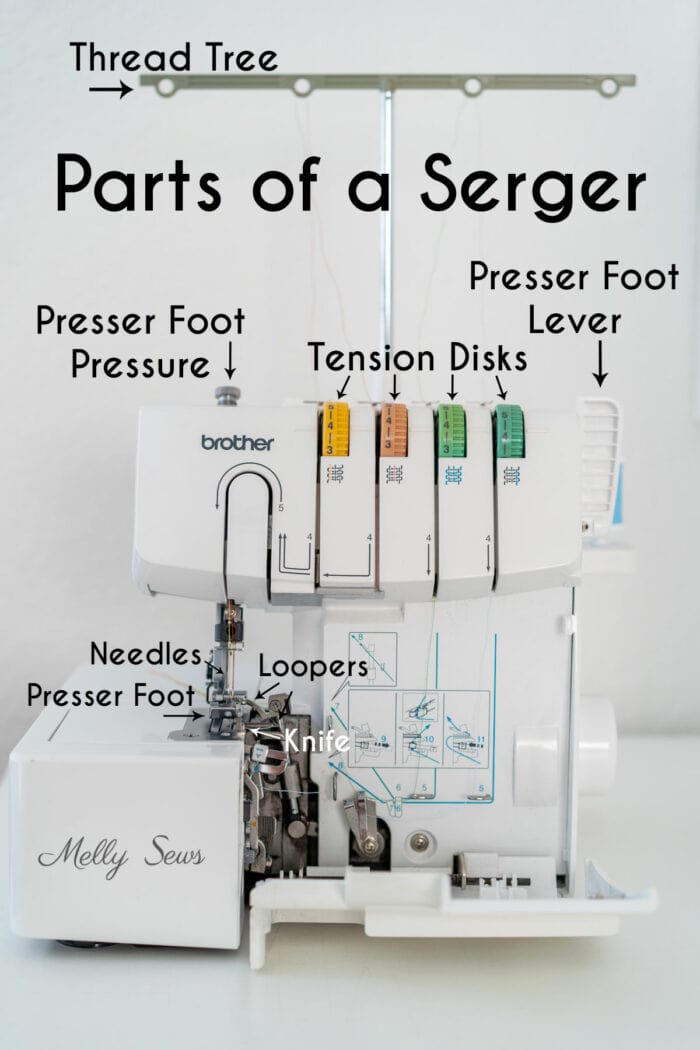
Because a serger has a least 3 and generally 4 threads, it also has that many tension disks. On the machine above, you can see the 4 tension dials so that each thread tension can be set. My Imagine only has one dial because of the automatic tension feature.
Below you can see a close up of the upper knife as well as the loopers. Note that there are actually 2 knives – the lower knife blade is the flat blade right behind the upper blade on the edge of the sewing bed. The looper threads twist with each other then get tacked in place by each straight stitch as the machine sews.
Finally, you can see the side view of my Brother 1034d below showing the differential feed, stitch length, stitch width, and knife position switches. Differential feed changes feeding speed between the front and back ends of the feed dogs. This means that the fabric can be bunched or stretched as it goes under the presser foot. Differential feed can be useful for gathering.
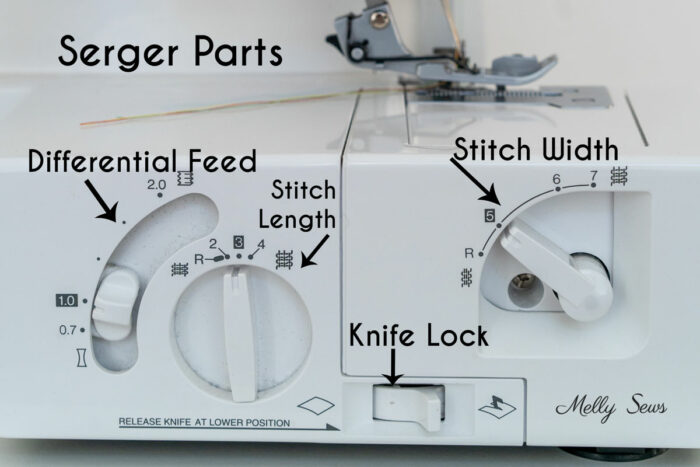
The stitch length sets how far apart your stitches are, just like on a regular sewing machine. The knife lock can engage or disengage the blade. Sometimes you don’t want the fabric trimmed, like when you sew a flatlock seam. Finally the stitch width switch changes how much fabric is trimmed off your seam allowance and how much width the stitches cover on the raw edge. A narrower stitch trims more fabric and leaves less stitching. The opposite is true with a wider switch.
Threading Your Serger
Some machines need to be threaded in a particular order. Your manual should specify this. With my Imagine, it doesn’t matter. With my 1034d, it does. If I go out of order on the 1034d, I get tangles and frustration. That machine needs upper looper, then lower looper, then right needle, then left needle threaded in that order. If a thread breaks, you have to unthread all the threads that come after the broken one, then rethread in the correct order.
To see how to thread the Brother 1034d, watch the video at the top of the post. Though it’s not as easy as the jet air threading, it isn’t difficult.
One tip I also show in the video is how to quickly change threads on the loopers. You can tie the new thread onto the old one and chain stitch until the new thread is pulled through.

Starting and Stopping a Seam
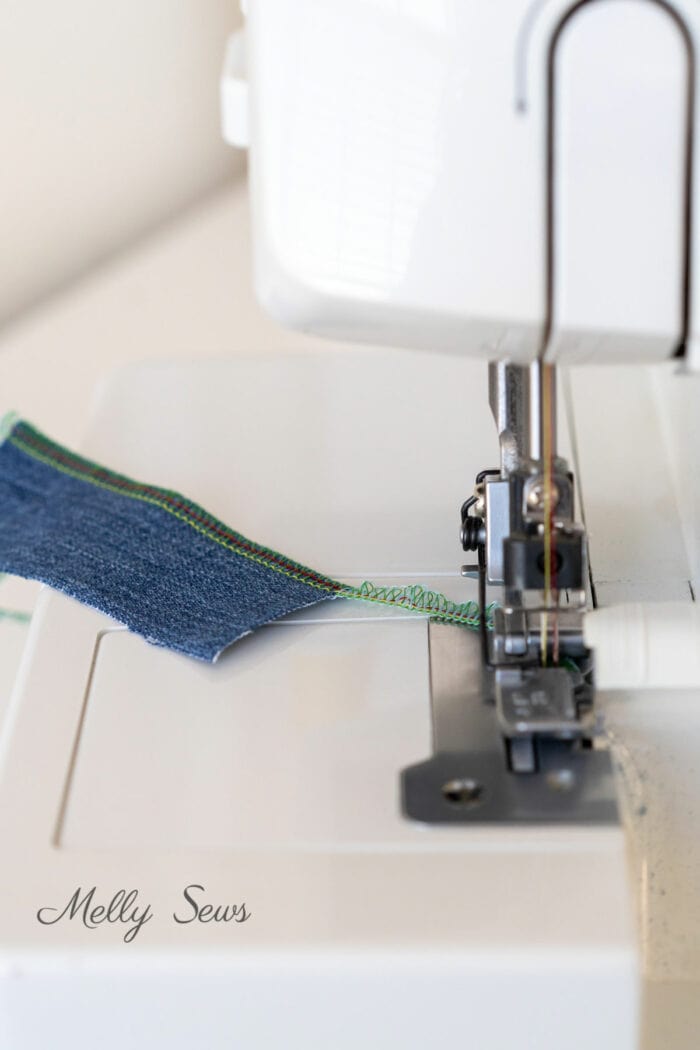
Unlike a regular sewing machine, where it’s not a great idea to stitch without fabric in the machine, it’s perfectly fine to do this on a serger. I often check my threading by chaining off – stitching with nothing in the machine but thread. The serger will form a chain of thread behind the presser foot, and you should be able to see all 4 threads in it.
So when beginning a seam, I often just leave my presser foot down and then line my fabric up at the end of the presser foot and begin to sew. The feed dogs will pull the fabric in and this way you don’t have a weird, untrimmed piece at the beginning of the seam like you would if you lifted the presser foot and put the fabric under it beyond the knife.
Speaking of chaining off, the thing that perplexed me the most when I first starting serging was how to get my fabric out from under the presser foot at the end of a seam. I was used to a regular sewing machine, where you could lift the presser foot and just pull enough thread through the needle and from the bobbin to cut. You can’t do that on a serger, because you’ll break your threads. Instead, you need to continue chaining off beyond the edge of your fabric. When you have enough of a thread chain you can cut the fabric loose.
Tips For Using Your Serger
In addition to the above tip about changing the looper thread on your machine, I have a tip about pinning. If at all possible, don’t use pins! I learned this the hard way when I sewed over a pin and the knife cut it. Not only did the pin end shoot back at me, it broke my knife and I had to replace it. I prefer to use clips instead of pins. However, if you must pin, place your pins parallel to the seam to reduce the chances of hitting one while you stitch.
Shirley Valent
I don’t want to buy a sergerr is it a must,!
Sheila Robson
I’ve never had one. Though I did buy one a couple of years ago, and pretty rapidly gave it back. Instead, I upgraded my sewing machine. So it’s not a must to have one. I sew a mixture of knits and woven, anything from curtains to kids leggings. They are no special advantage for woven fabrics in my view. Fans of sergers say they are a lot faster for knits, but if that isn’t your main priority, you probably don’t need one. Just look at all the tips and tricks for sewing knits on a sewing machine. Melly Sews has many tips, but you can also look up ideas on the internet.. Most people would say they could manage without a serger but couldn’t manage without their sewing machine.
Marie
This was very helpful! Thanks, I was gifted a serger that was not being used and look forward to learning all these new techniques!
Jane Barnett
Thank you so much for spending a whole month on sergers! I got a Brother 1034d for Christmas so these posts will be incredibly useful. I have threaded it a couple of times, but haven’t ventured much beyond sewing on scraps. I’m going to cut out a T-shirt this weekend and we’ll see how that goes. Thanks again!!
JanK
This brings me closer to being brave enough to try and thread the serger I’ve had for over a year and not touched. It’s the Brother 1034D that you’re demonstrating. Maybe I’ll get it done before your next video. Thank you!
Lesley
I wish I had read this when I first got my overlocker from a friend of my daughter who didn’t love it. Every time it needs to be re-threaded I put it off for ages, then when I do it, it is just like my sewing machine x 4.
I have a problem that my stitches overhang the edge of the fabric. It is the same whether I use the knife or not. I don’t have a stitch width adjustment, just tension and stitch length I think. I’m a bit scared to play with it, but I think I must to learn more about it.
Jean
Thank you for publishing this note in addition to the video. They are each helpful and together very useful! The best beginners video I have seen so far — for example, the names of each part, the meaning of stitch width, differences from sewing machine, etc. Look forward to more in the series.
Suzi Cohen-Pessah
Thank you, Melly. This is quite useful. I was gifted a serger but am hesitant to actually use it. I think your post and video will definitely Help me.