
Check out this step-by-step guide to shorten a metal zipper, shorten a plastic separating zipper, or a nylon zipper
Hey y’all, today we’re going to talk about how to shorten zippers. This is one of your sewing questions answered and it’s going to be helpful in a project I’m sharing next week. Based on my decades of sewing experience, I’m going to share several techniques to make a long zipper shorter. The technique you should use changes depending on what type of zipper you’re working with and how it will be used.
Key Takeaways
If you want to shorten a zipper, you’ll learn the following techniques in this post.
- how to shorten a metal zipper
- how to shorten a separating zipper
- shortening a zipper from the bottom
- making a zipper shorter from the top
- how to remove metal zipper teeth
- how to remove plastic zipper teeth
- 3 ways to make a zipper stop
But I won’t be covering how to install zippers in this post. To see how to sew a zipper check this post. For invisible zipper installations check this post. Now let’s dive in to the specifics of how to shorten a zipper!
Parts of a Zipper
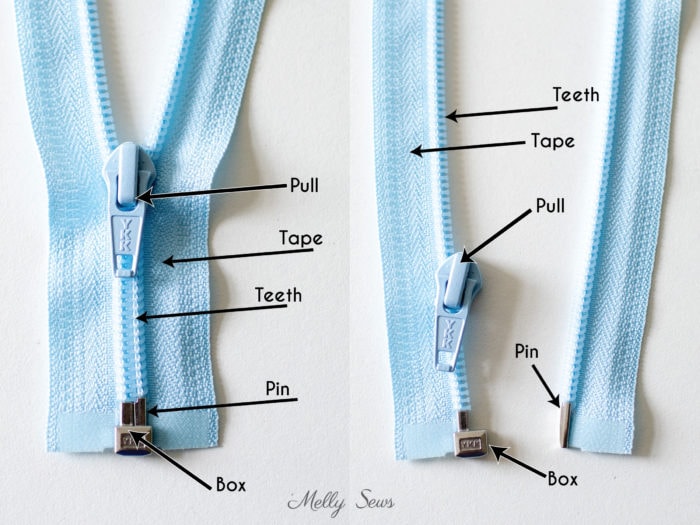
Let’s talk about the anatomy of a zipper. Zippers have two main parts – tape and teeth. These parts make up the majority of the zipper. Zipper tape is the fabric at the side of the zipper, generally polyester or nylon or a blend, though sometimes you can find cotton tape zippers. They also have at least one pull or slider, and stoppers at the top and bottom so that you can’t slide the zipper pull right off accidentally.
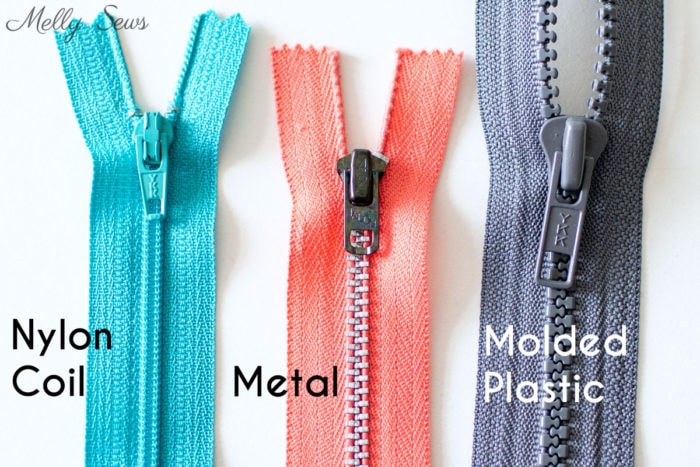
The first thing you need to know is what type of zipper teeth your zipper has. The main types are metal teeth (brass, aluminum, etc), nylon coil teeth, and molded plastic teeth. These are pictured below. This determines whether you need to cut your zipper tape between the teeth or whether you can just cut through the teeth. With a metal zipper you need to cut between teeth. However, you can cut through nylon coil zippers. And a molded plastic zipper might be cut either way depending on the size of the teeth.
Next you need to know whether you are using a separating zipper or a close ended zipper. Separating zippers are the type used on jackets. Close ended zippers are the more common ones, used on everything from zipper pouches to skirts. This determines whether you need to shorten from the zipper bottom or from the zipper top. Close ended zippers can be shortened from the bottom, and separating zippers should be shortened from the top.
I’ve made a video that you can also watch on YouTube here showing all these zipper shortening techniques. You can also keep reading below the video for more details.
How to Shorten Zippers from the Bottom
If you are sewing a close ended zipper, you can shorten from the bottom of the zipper tape. This method is easier than shortening from the top because you can generally leave the zipper teeth below your new stopper. You’ll need scissors, thread, a needle or sewing machine, and possibly a match or other source of flame or fray check.
Measure from the top zipper stop and determine the final zipper length you want. Mark your zipper tape at this point. Cut the extra length off at least a half inch below this mark. If the zipper is a nylon coil, like an invisible zipper, or has small plastic teeth you can cut right through the teeth. If the teeth are larger or metal you need to cut in between them. You can use a flame held close to the cut end of the zipper tape is polyester (most are), seal the end of the tape and keep it from fraying. If the zipper tape is cotton or another fiber you will need to use the fray check instead.
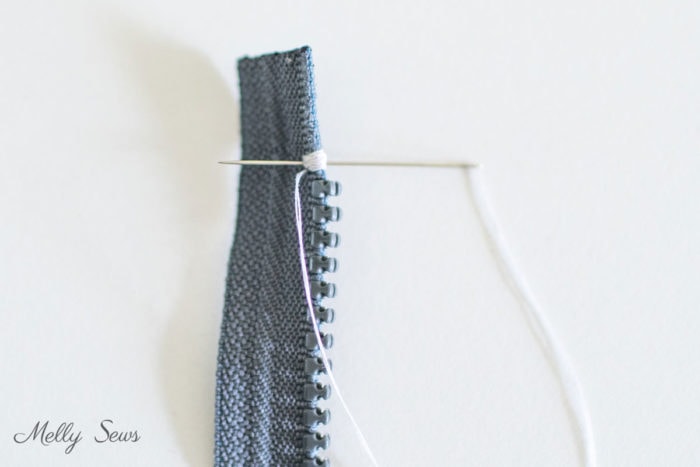
Sew a new bottom zipper stop at the marked point by either hand stitching a whip stitch around the teeth or using a wide, very short stitch length zig-zag stitch on the sewing machine. Hand crank your machine for the first two stitches to make sure you’ve set your zig zag wide enough not to hit a tooth and break the needle.

You don’t need to remove the zipper teeth below the stop unless they are so large that they will affect the stitching that will go over the bottom end of the zipper or make the fabric poke out. Keep reading for methods to remove zipper teeth.
How to Shorten a Metal Zipper from the Top
If you are sewing with a separating zipper, you need to shorten it from the top. This applies no matter what the zipper teeth are made of, because you need to keep the box and pin at the bottom. These are the parts you hook together beneath the pull tab to start joining the zipper when you zip it up. You also want to keep the heat seal patches at the bottom that modern separating zippers have. Those are the stiff parts of the zipper tape beside the box and pin that make it easier to manipulate that part of the zipper.
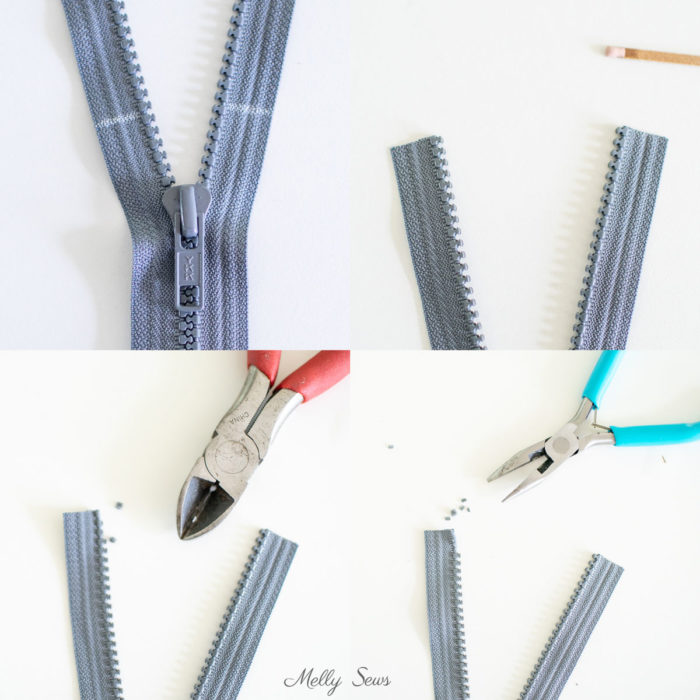
To make a metal zipper shorter you’ll need the same tools as mentioned above, plus pliers (needle nose type work best) and wire cutters. Measure your zipper from the bottom stop and mark your desired final length. You will cut off the excess zipper tape in between the teeth at least half an inch above this mark. BEFORE YOU CUT remove the zipper stops. I think it’s easier to remove these stops while the whole zipper is still intact.
To remove the zipper stops, use the wire cutters. Place the narrow part of the cutter on the inside of the stop on the tape. Squeeze gently to pry the edges of the stop up from the tape. Then switch to the needle nose pliers to pull the stop off the end of the tape. Set aside. Repeat with other top stop.
Now you can cut your zipper and use a flame held close to the tape or fray check to seal the zipper tape ends and keep them from fraying.
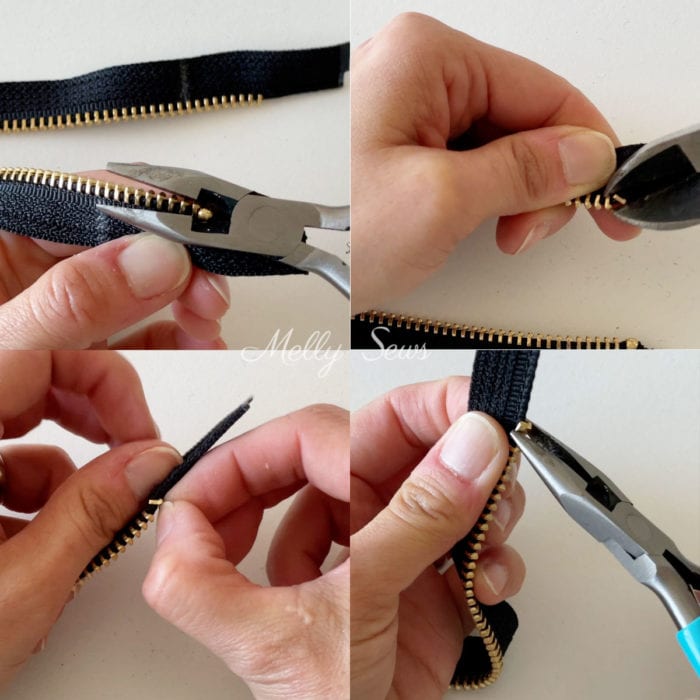
How to Remove Metal Zipper Teeth
Next you need to remove the teeth between your mark and the top of the tape. I do this by cutting the ends of the teeth off with my wire cutters (when I can; this doesn’t always work) and then using the pliers to pull the remaining piece of metal of each tooth off.
Finally, reinstall the top stops above the last teeth you left on each side of the zipper tape. Slide the stopper onto the tape, then pinch it shut with the pliers. Test by pulling on it with your fingers and the pliers to make sure it is securely affixed. If you can’t pinch it closed you can also use a mallet and a nail set to hammer it closed onto the tape.
How to Shorten a Plastic Separating Zipper
The process to shorten a plastic separating zipper is basically the same as shortening a metal zipper, except you can’t reuse the top stops. Here are the steps:
- Measure from the bottom of the zipper and mark your desired finished length.
- Cut the zipper tape at least a half inch above your mark
- Seal the end of the zipper tape
- Use wire cutters and pliers to cut off and remove the zipper teeth above your mark
- Make new top stoppers (see below)
Check out the video above or the details on the metal zipper section to see more on removing plastic zipper teeth.
3 Ways to Make a Zipper Top Stopper
This post contains affiliate links. As an Amazon Associate I earn from qualifying purchases. All affiliate links are identified with (affiliate link) after the link or a commissions earned statement above the link(s).
There are a few different ways to make a new top stop. You can
- Whip stitch a thread bump
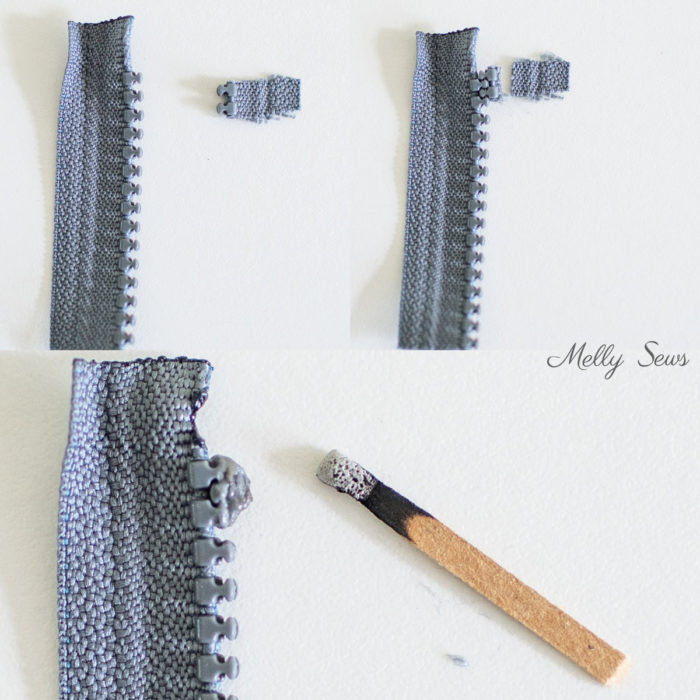
- Melt plastic zipper teeth to make a new plastic piece
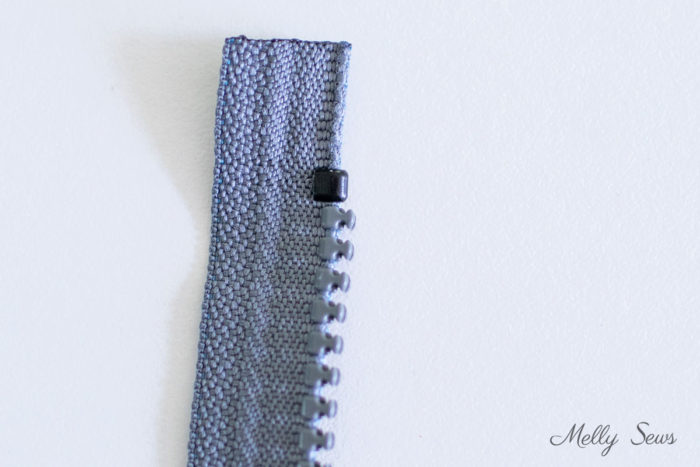
- Buy zipper stops (affiliate link) to install
Whip stitching a new stop works well, but can look a little homemade. You can see an example below, but to make it look better use matching thread, not the contrasting thread I used to make it visible in photos.
Melting molded plastic zipper teeth into a new stop is the easiest of these methods, but has a risk of burns if you touch the hot plastic and can look messy. If you have a hard to match zipper color though, this matches.
My favorite method is to install new metal zipper stops. This requires a purchase but gives the most professional results. The downside is that it can be hard to match colors and you may have to settle for coordinating instead of matching. You can buy these and see the metal zipper section for tips to install them.
Peg
Excellent tutorial. I have done plastic zippers before but the tip about reusing stop on metal zipper great!
I have always just sewn (with matching thread) to be the stop. Now I can do with stop.Thanks.
Love your site.
Cynthia Moore
I made a zipper top stop by sewing a bead to the top. Not my idea. Saw it somewhere.
Amy
Thanks for this. I forget these things because I don’t do them often enough. It’s usually hours on you tube on reading to learn it again. Glad to have it all in one place.
Barb
Thanks! Your tutorials have been incredibly helpful to me! Always interesting and I always learn something from you.