
Today I’m going to show you how I made this top and how to make a bow sleeve detail. Have you ever fallen in love with a print you find on quilting fabric? There are so many great ones I find this happening to me often. The problem is that quilting fabric, while lovely, is not apparel fabric. Oh, it can be used for apparel, of course, and I have, but you have to be careful with your pattern selection because the fabric is only suitable for certain items of clothing. It doesn’t quite drape or move the way you need clothing fabric to a lot of the time.
So I have been thrilled to see quilting fabric manufacturers venturing into other types and weights of fabric, some of which are much more suitable for apparel due to their drape. It’s the best of both worlds – the amazing prints of quilting fabrics available on fabrics that have more range for apparel. Win!

Last month I got the opportunity through Sew Mama Sew to participate in the Palo Verdes Blouse Challenge. Each challenge participant had to create a tops from the new Cloud 9 Fabrics organic voile Palo Verdes collection. As I was already a fan of their voile, having purchased some from the Koi collection (and I still haven’t really shown you that dress – though I’ve been wearing the heck out of it – it’s coming, I promise!), I jumped at the chance to work with more. Disclaimer: Cloud 9 sent me the fabric I used in this post, but all opinions are my own. Obviously. Because I have too many opinions of my own for someone to try to go loaning me some.
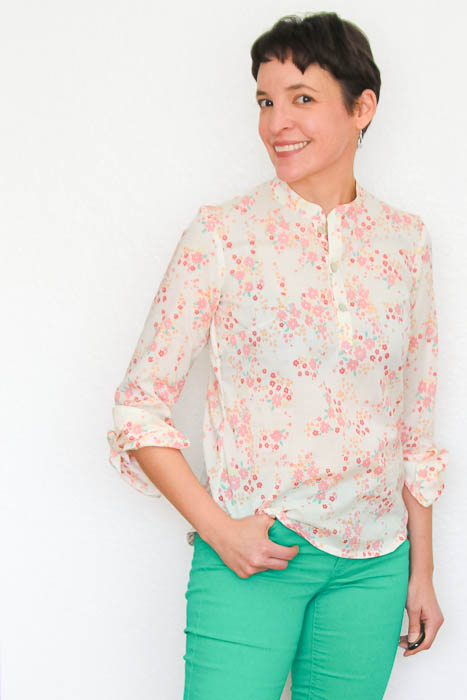
So I dillied and dallied trying to choose what kind of top to make with this lovely Lunada Bay print. Seriously, this fabric is pretty dreamy. It’s thin and drapey and super soft. It is also slightly see through (as I would expect from a nice voile) so keep that in mind – plan for nicely finished seams and nude colored undergarments or lining if you’re using this for apparel. In fact there’s a plain white voile available as part of the collection that I bet would be perfect as lining.
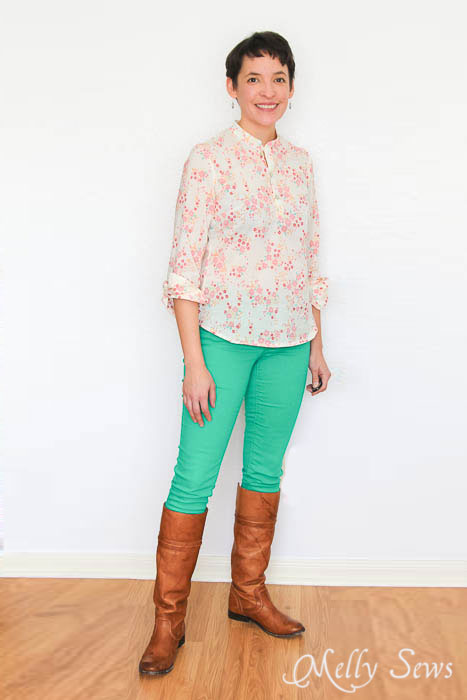
Finally I decided to do something I’d been thinking about for a while – an adult women’s version of my Prepster Pullover pattern. And I really love it, especially in the thin voile fabric that drapes without clinging. In fact, I love it so much I’m thinking of grading and testing this top as a women’s pattern for sale. But today I’ll also show you how to take one of my existing free patterns and modify it to make something very close to this top without having to wait for the pattern for sale.
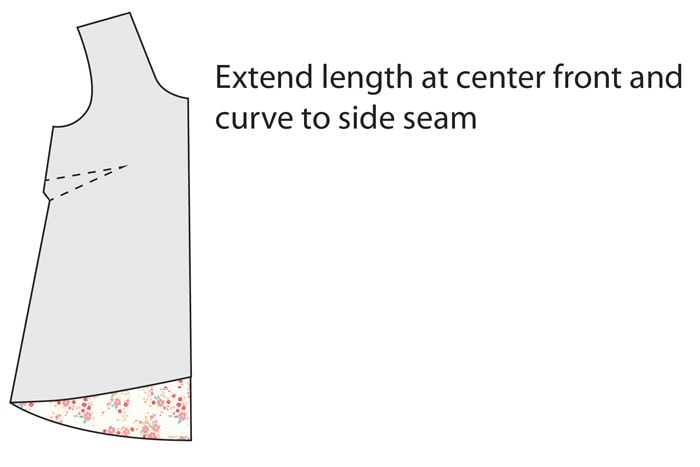
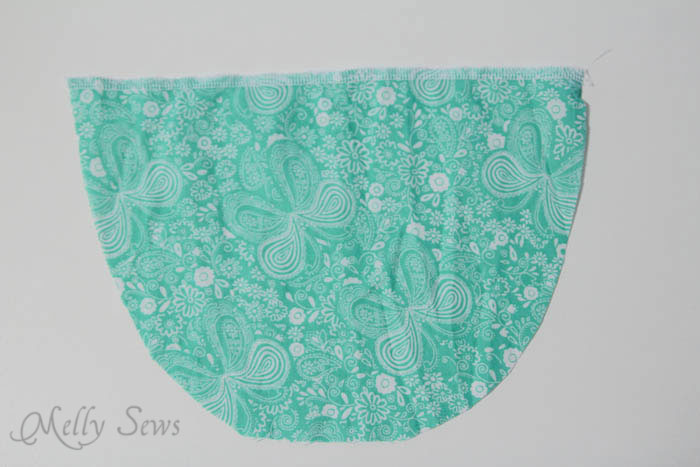
Start with the High-Low top pattern. Since I didn’t want the high part in the front, I extended and curved that side to basically match the curve of the back of the shirt, though a little shorter.
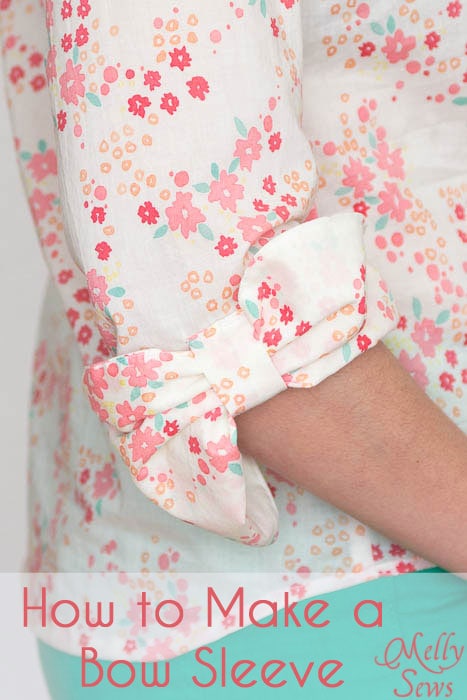
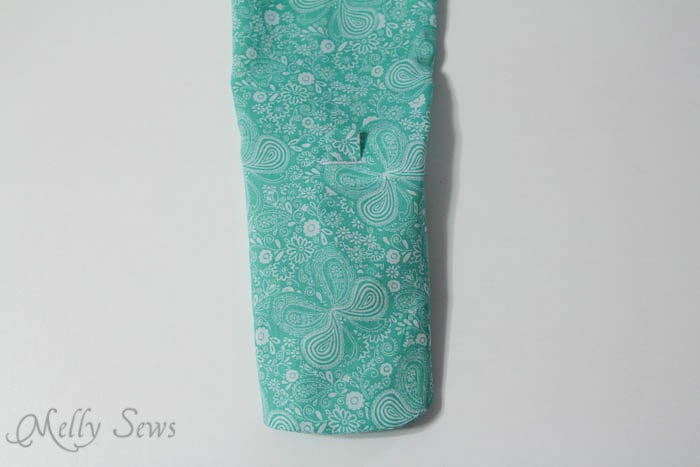
To make the bow sleeves I made these modifications. Your buttonhole should be 3/4″ long.
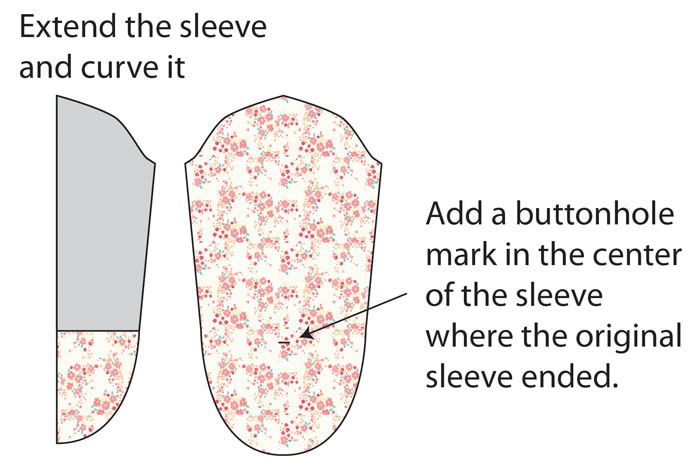
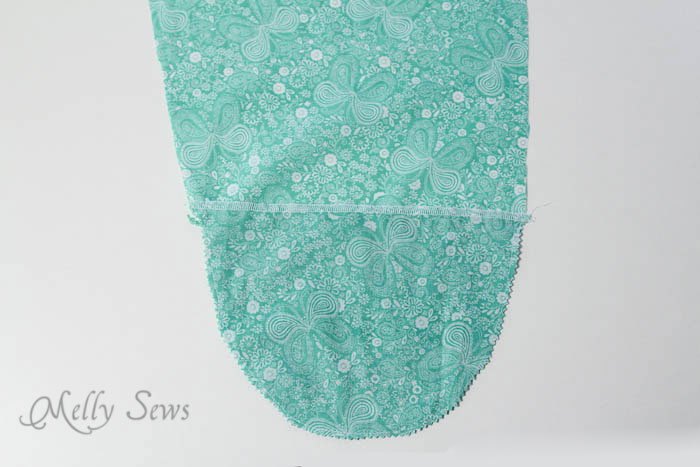
I then used the extended bottom of the sleeve to make a sleeve facing – this is necessary because both sides of the sleeve show in the bow. Cut the sleeve facing so that there will be a 1/2″ overlap over where the original sleeve pattern ends. I supposed I could have lined the entire sleeve as well, and if that’s easier for you go for it.
I also cut the back pattern into two pieces to make a yoke and lower back piece. I cut the lower back piece about 1 inch away from the fold so that I could add a pleat in the center back when sewing it to the yoke.
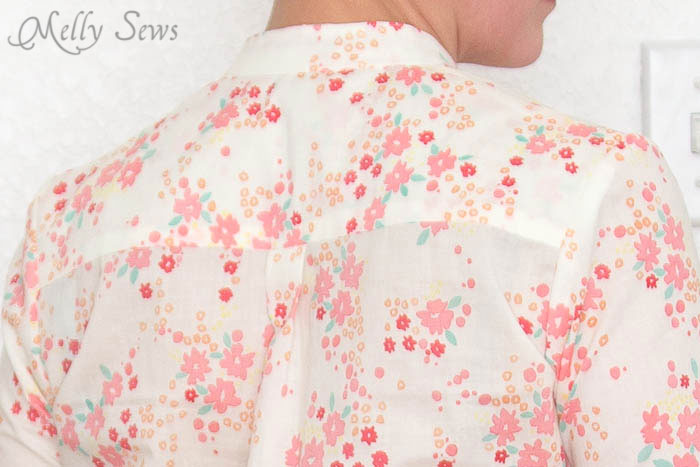
Finally, I did two other things that I’m not really going to cover here. First, I added a continuous placket. I’ll be covering that technique on Thursday, and it’s an easy thing to add to any shirt, including this one.
Secondly I raised the neckline and added a mandarin collar. You could finish the existing neckline with bias tape as I did in the High Low Top, even if you add a placket. But if you’re really set on the collar, you’ll need to raise the neckline and draft your own for the time being – I didn’t take any pictures of that part and it’s really beyond the scope of this tutorial anyway. My friend Shannon covers drafting collars here, and if you just draft the collar stand part you’d have a mandarin collar.
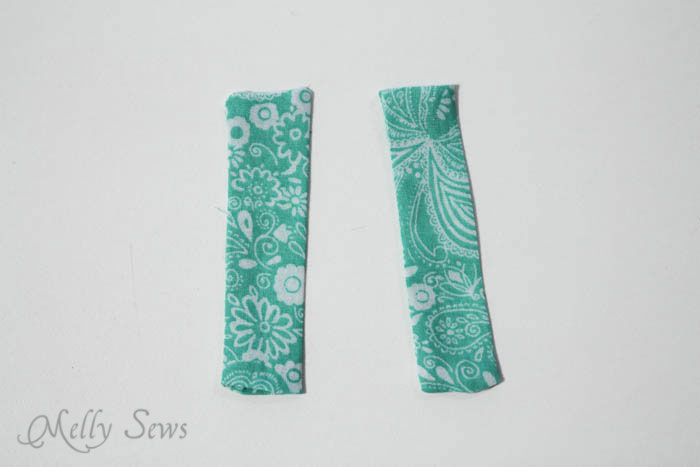
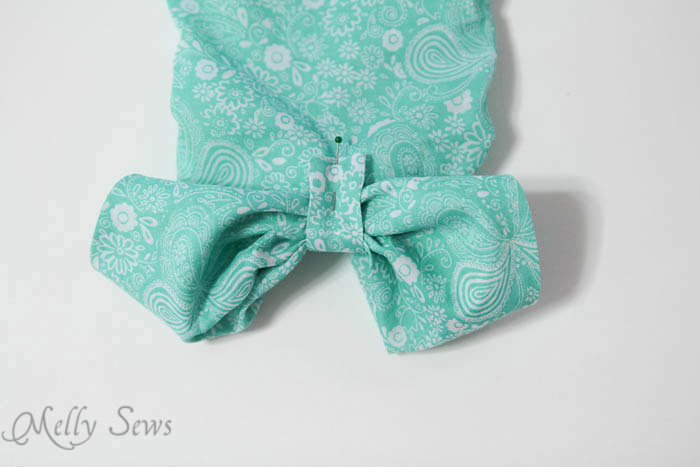
- Cut out two rectangles that measure 3″ long by 2.5″ wide. Fold these in half, right sides together, matching long edges. Sew one short and one long edge, using a 1/4″ seam allowance. Clip corner and turn tube right side out. Fold the raw edges 1/4″ into the tube.
- Reinforce the back of the sleeve buttonhole with interfacing – since voile is so thin I used two layers of lightweight interfacing fused on top of each other.
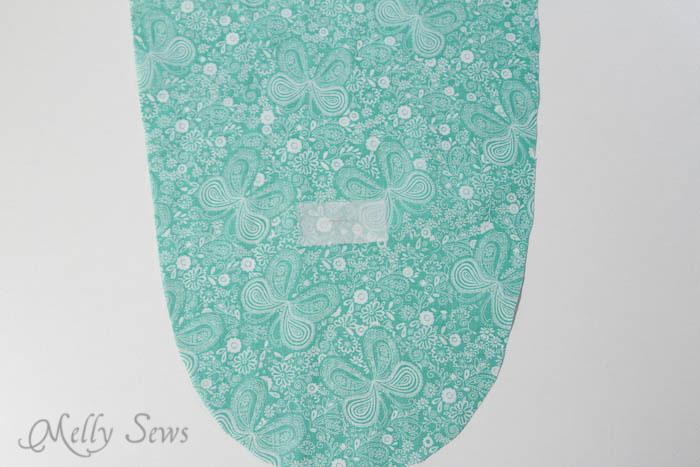
- Sew a 3/4″ buttonhole as you marked (see image of sleeve alterations above for more detail)
- Finish the straight edge of the sleeve facing using a serger or a faux overlock stitch.
- Sew your sleeve facing to the bottom of your sleeve, right sides together. Make sure the facing is aligned correctly, so that both sides hit the sleeve at the same place. Trim the seam allowance down. Turn the facing to the inside of the sleeve – it should just cover the buttonhole. Press and topstitch edges if desired.
- Attach your sleeves to the shirt. When you sew the underarm seam, sew just a few stitches past the edge of the facing and make sure to backstitch.
- Pull your sleeve tab through the buttonhole.
- Fold the sleeve edge up into a bow shape, adjust gathers, and pin tab in place to secure the bow. Stitch tab in place, making sure to backstitch at each end. You may also want to tack down edges of the bow so it doesn’t stand so far away from your arm. This will depend a lot on the fabric you use and your individual preference as to whether you need to do this.
Several other bloggers also worked on the Palo Verdes Blouse challenge, and will be posting their creations this week. Each blogger used a different fabric from the collection. You can check out the others here:
Teresa Behr
http://www.dandeliondrift.com/
Nienke de Jong
http://pienkel.blogspot.nl/
Charise Randell
http://www.charisecreates.
Michael Ann Shreeve
http://www.michaelannmade.com/
Carolina Martinez
http://lovelola.com/
And don’t forget to come back Thursday to see how to add that placket to your shirt!
Tone
I love youre blouse! And the bow is SO cute! Would definatly trye this! thanks! 😀
Kate
I can’t even begin to tell you how much I love this top! It’s gorgeous! Love the rest of the outfit too 🙂
Monica
Oh, thank you, I love this look! Love the entire look here, actually!
Kerry Green
Great top- it suits the relaxed floaty pattern perfectly. The more apparel fabric that is produced like this, the better!
Jess M
I vote to definitely grade this in bigger sizes, this is a great top that could even be extended to tunic length-I love it!!
Anne
Please, PLEASE make a pattern for your grown-up Prepster Pullover! I could wear one every day. I’ve linked to your bow sleeve tutorial here:
http://sewing.craftgossip.com/tutorial-bow-sleeve-detail/2014/01/07/
–Anne
Tara
I love it! The fabric is really pretty and that bow is a cute soft feminine touch without being over the top.
Jess
Oh this is lovely Melissa! I would definitely wear this 🙂
suzanne winter
LOVE THIS!!!! If you grade it up, please let me know – I’ll test for you… we curvy L/XL girls need some awesome things in our closets!!!
Mel
Absolutely, totally LOVE this top. Personally, I think it’s the best one you’ve ever had on the blog. Wow. Would love to see a pattern. Please!
Tanya
I love the shirt, it’s beautiful and good timing as I sewed up my first beachy boatneck yesterday (better late than never) as our eldest just turned 9 a couple of weeks ago but is thankfully in size 7, I upcycled a Green Lantern t-shirt my husband had given me years ago and it looked so good that I whipped up semi matching t-shirts for my 5 year old twins. I love your pattern, I was worried about whether the boys would wear higher necked tops but after what seemed like the 5th time in 2 weeks that I’d told them that they were wearing their t-shirts back to front I knew they’d be fine with the neck heigh
Tiffany
Wow! What an adorable shirt! That pattern is great too… I’ll have to go check out that collection. I love the bow detailing too. Thanks for the helpful tutorial.
Leslie
Oh my, love this blouse!!! So exciting for me to see this!! Thank you!!!
Lola
Everything about this shirt is phenomenal including the fabric choice. I must learn how to adapt a children’s pattern into an adult (unless you already have one for purchase 🙂 )
Ally & Woozle
What a lovely blouse Melissa! The choice of the fabric is perfect ( nice opinion indeed ). Thank you for sharing this tutorial.
Good night ( yes where I live now, it’s 11 PM )
Ally
Nancy
Very cute blouse. I like it a lot. I have two questions:
Where is the tab sewed to before it is poked out the buttonhole?
If the tab is permanently sewed around the bow part, how does one iron it after laundering?
I have looked at your web site and I find the pattern drafting with pins from ready to wear fascinating. I might have to do that some day. N
Janette
That blouse is adorable! I would love to see a version in other sizes. It’s incredible how difficult it is to find a pattern for a casual yet stylish blouse to wear with skinny jeans that isn’t a button- down, a fitted style or the opposite -a huge tent. Just yesterday I made the decision to set aside a blouse I’d been working on (vogue 1323) out of frustration. I just can’t figure out the placket instructions! You would be filling a definite need!
Grace
Adore the sleeve! Would you consider the prepster pattern upsize in a 0 as well? Most adult patterns start at a 2 but I am a 0 or a 00. So smaller sizes would be muchly appreciated too!
stacy
Ahhh! This is the cutest thing I have ever seen, well done sweet friend.
Joni Watson
The bow sleeve is the most original detail I’ve seen in a long time! Please tell me how much you extended the bottom of the original sleeve for the curved part. I’m drafting one now; thanks.
Rina
O! Perfekt! Das hat mir sehr gefallen! Danke sehr! Bis bald! 🙂
Julie R.
Please, ohplease make this a pattern! It’s so very lovely and I would love to make one. In just not confident about drafting my own pieces. You did a gorgeous job!