
Hey y’all – welcome back to fitting month on the blog! Today I’m going to show you how to make a bodice pattern. Now you may wonder what drafting a pattern has to do with fitting ready made patterns, so let me tell you – if you know what your 2 dimensional shape is, it becomes easier to evaluate other two dimensional patterns to see what you’re going to need to adjust.
Note the drafting in this post isn’t meant to be a wearable bodice but an exact flat pattern copy of your body that you can then use to see how much design ease a pattern has and where you might need alterations. Slopers or blocks are then traced and ease and style lines are added. Take the neckline for example – you need to know exactly where the base of your neck is before you can lower it or add a collar, because if you just draft a random neckline you won’t know how much to lower it without the base of the neck reference point – it would all just be a shot in the dark.
So let’s get started. Start by measuring yourself. Last week’s post has the video on how to measure yourself as well as the printable measurement card. You’re going to need a few more measurements besides those on the card – read below to see how to get them.

To take the across shoulder measurement, measure from the point of one shoulder straight across to the other.
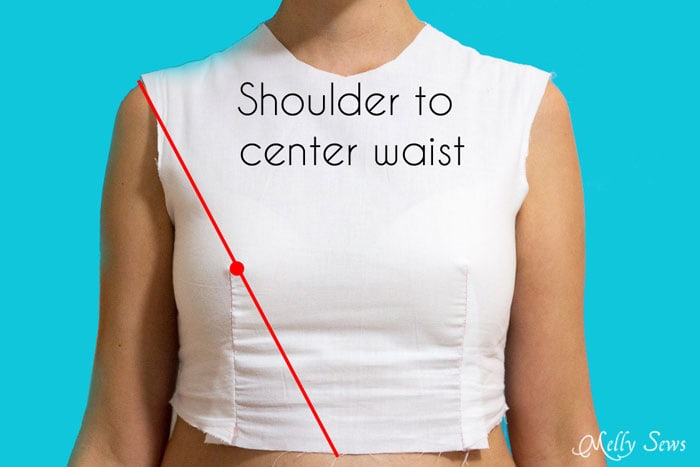
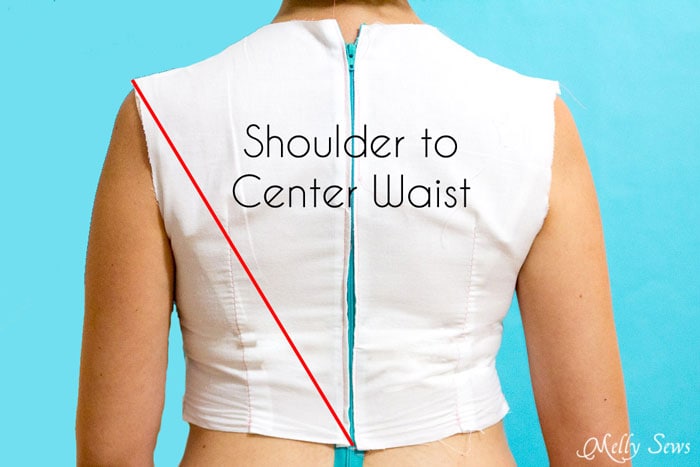
To take the shoulder to center waist measurement, measure from the same point of the shoulder across to the center front of the waist (approximately in line with your belly button) and at the center back (in line with your spine). On the front measurement, mark the tape where the point of your bust hits – you’ll need to know both the front shoulder to center waist and the shoulder to bust point measurements. Note that your front and back measurements probably won’t match if you have boobs – the front will be longer. As it should be – you need more fabric to go out and over breasts.
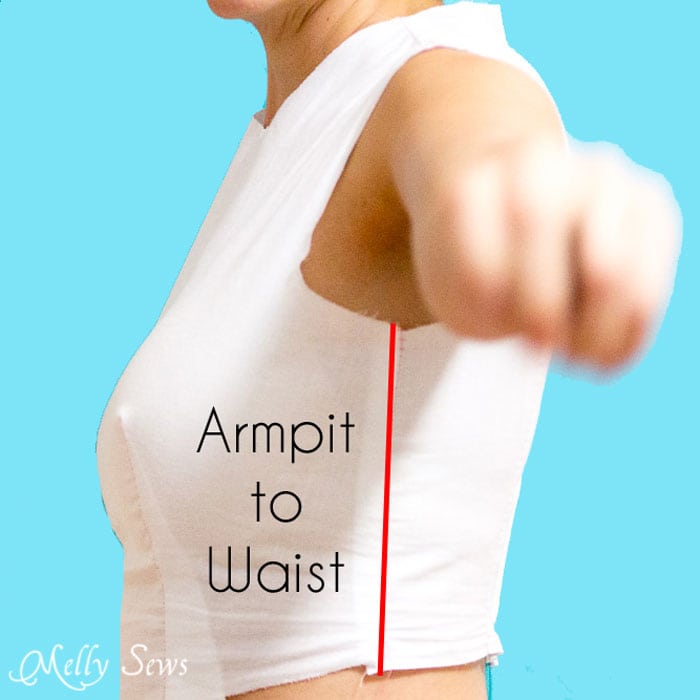
For the armpit to waist measurement, go back to that part where you had the string tied around your waist and the ruler under your arm. Measure from the top of the ruler down your side seam to the waist string.
Got those? Good, let’s draft. You’re going to need a long ruler (at least 18 inches), a pencil, and a large piece of paper (pattern tracing paper, exam table paper, kraft paper, newsprint, butcher paper, baking parchment paper and gift wrapping paper all work well). A flexible ruler like this one or French curve ruler (affiliate links) is also helpful.
*Important note before you begin: your bodice may not look like mine. In fact, you may be shocked at how different it looks. That’s OK, and that’s the point! The first time I drafted a bodice based on my measurements instead of standard measurements for my size, I really, truly though I had done something wrong. I had never sewn anything that had an armscye shaped like what I had drafted. I discovered I was going around thinking clothes fit when they didn’t, and the bodice that didn’t look like it was “supposed” showed me that when I sewed it up and it fit better on the first try than anything I’d ever made before.
Important Note 2 – PERSONAL HELP: If you’re looking for more help or my methods just aren’t making sense for you, these books are excellent and can provide you with much more information than my post does. And many of them are available in local libraries. I am not able to provide personal bodice drafting guidance, so if your question is not answered in this post please look to the books in the post linked above.
Important Note 3 – What we are creating here is a sloper, which is meant to fit like a second skin. That way you have a flat pattern representation of your body, and any other modifications come AFTER. So you would use your well fitting sloper and then retrace and modify to a V neck or a dropped waist or a side dart or a looser fit or whatever design details you want.
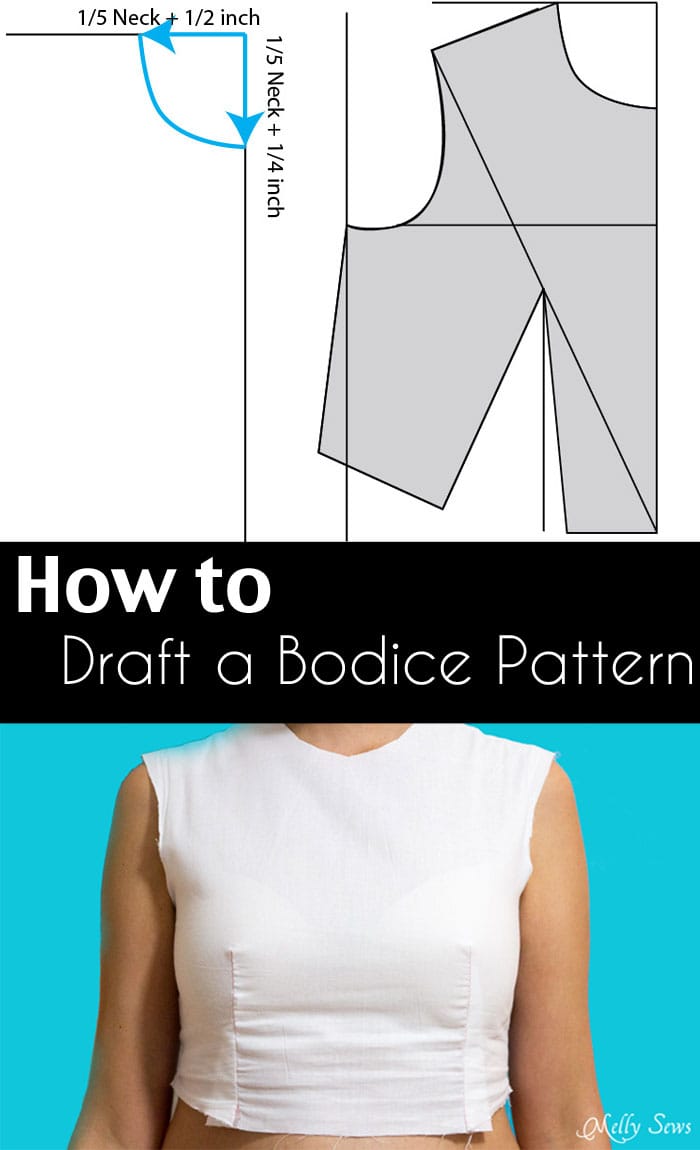
We’re going to start with the front bodice. Use your ruler to draw a long vertical line.
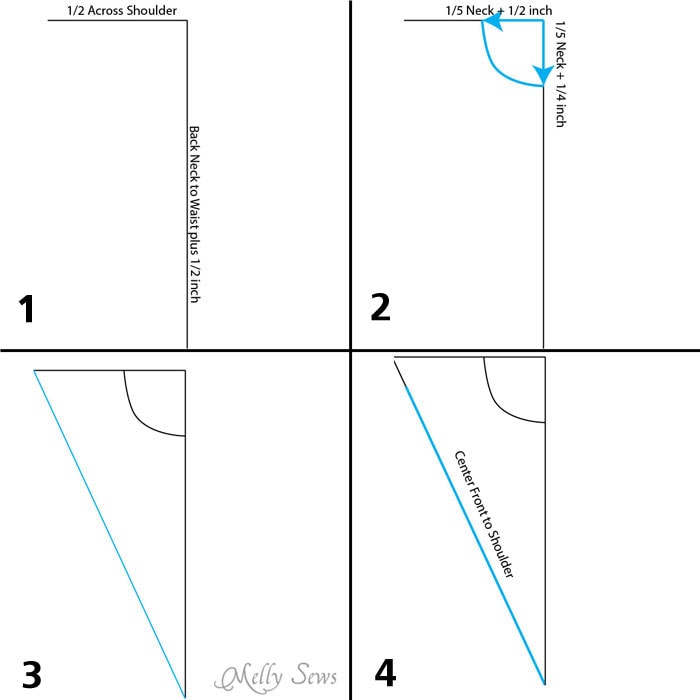
- On the vertical line, mark off the center back length. At the top of the line, measure out 1/2 the across shoulder width. Make sure this is measured out at a 90 degree angle.
- From the corner, measure horizontally 1/5 of the neck measurement plus 1/2 inch. Measure down 1/5 the neck measurement plus 1/4 inch. Draw a curved line to connect the two.
- Draw a line from the center front bottom to the point of the across shoulder line.
- On that diagonal line, measure up the amount of the shoulder to center waist and make a mark.
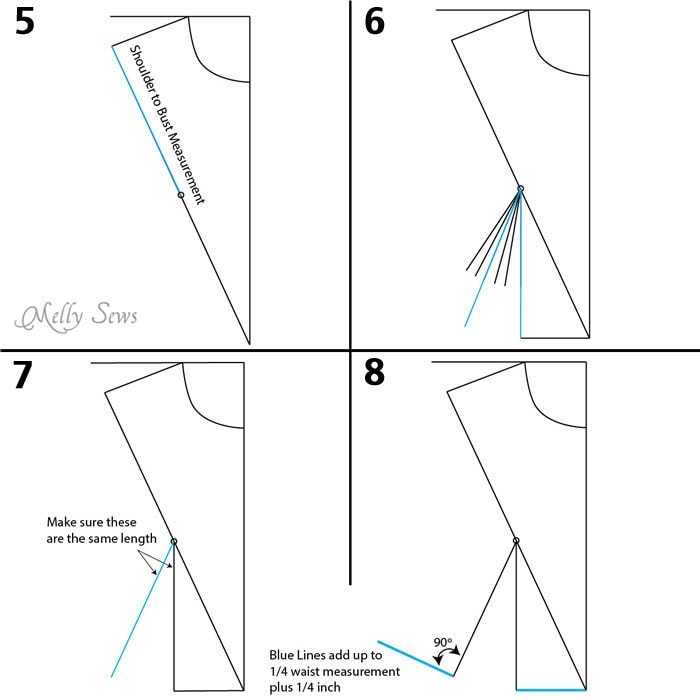
5. Connect your two marks to create the shoulder line of your front bodice. Then measure down from your new shoulder point to the bust point.
6. From the bust point, you’re going to need to mark your dart. To determine your dart, subtract your high bust from your full bust measurement. The amount of difference is the dart you’ll trace from this download (The dart paper size doesn’t matter, just make sure you are printing through Adobe and choosing “actual size” or “100%” or similar instead of anything like “scaling” or “fit to page”. You can check by measuring one of the lines – it should be 4.5 inches or 11.4 cm long). Line the point of the dart up with the bust point and trace the dart for your size. If your difference has a 1/2 inch, you can trace between two lines.
7. Extend the vertical dart line down to meet the waist line, then measure it, then measure the other dart leg to make sure it’s the same length.
8. Draw a 90 degree line from the second dart leg extending out toward the side seam. Measure the two blue lines at the bottom of the bodice – together they should add up to 1/4 of the waist measurement plus 1/4 inch (for ease).
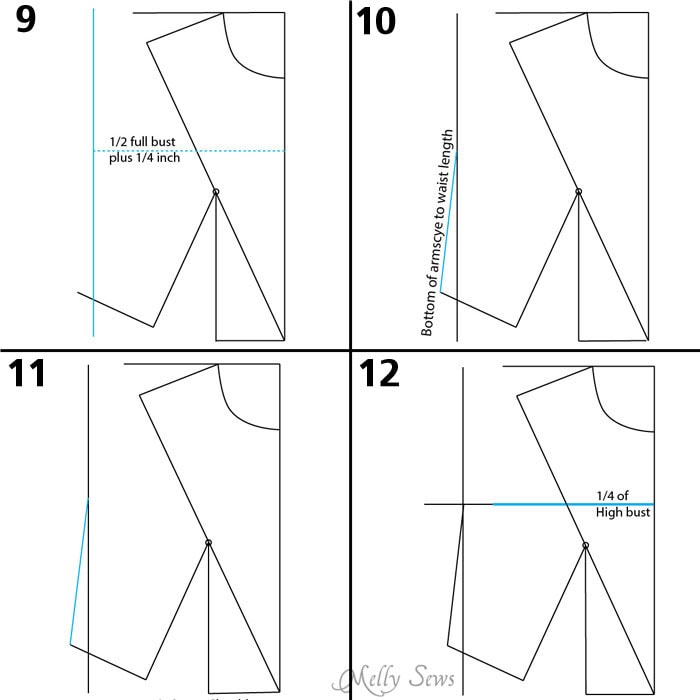
9. Measure out from the center front 1/2 of the front bust measurement (not full bust – this diagram has the wrong wording – sorry!) plus 1/4 inch (this is for ease). Draw a vertical line at this point – this is a guideline.
10. Draw a line that is the length of the armpit to waist measurement that touches the corner of the bottom of the bodice and and the vertical guideline from step 9.
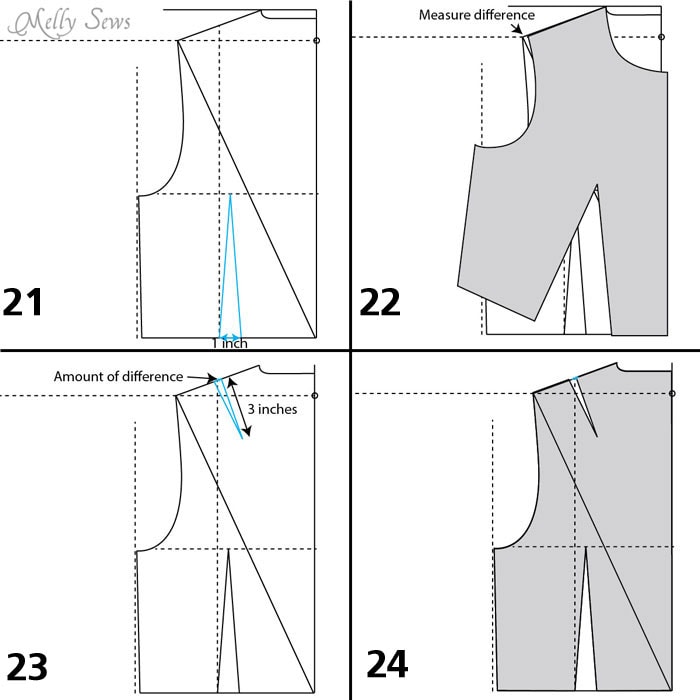
11. This is what the side seam looks like without the words in the way.
12. Where the side seam touches the vertical guide, draw another horizontal guideline. Measure along this guideline from the center front 1/4 of the high bust measurement and make a mark.
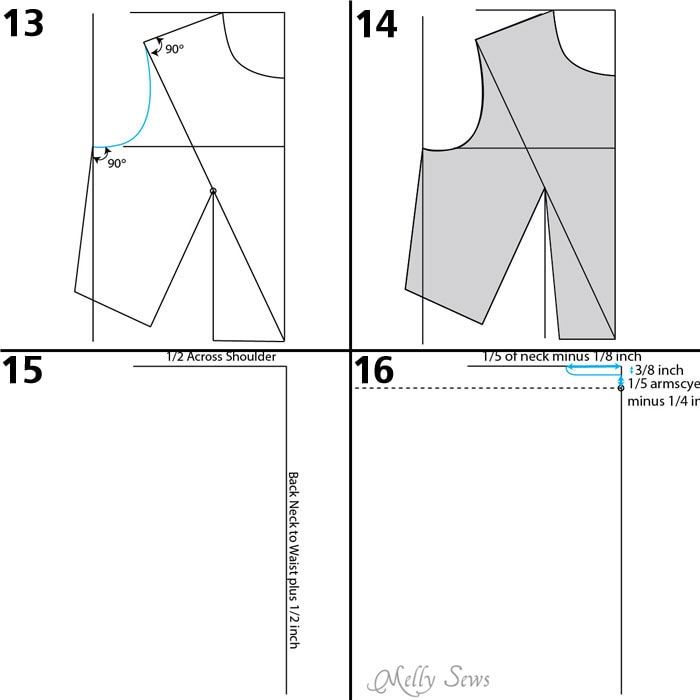
13. Draw in the armscye curve. The fuller your bust is, the deeper this curve will be. The curve should come in to touch the guideline from step 12 before curving up toward the shoulder. Make sure the curve starts and ends at a 90 degree angle to the side and shoulder lines.
14. You’re done with the front bodice!
15. To start to back bodice, draw a vertical line. On the vertical line, mark off the center back length plus 1/2 inch. At the top of the line, measure out 1/2 the across shoulder width. Make sure this is measured out at a 90 degree angle.
16. From the corner, measure horizontally 1/5 of the neck measurement minus 1/8 inch. Measure down 3/8 inch. Draw a curved line to connect the two in the neckline. Then, from the bottom of the neckline, measure down 1/5 of the armscye depth plus 1/4 inch (Not minus 1/4 inch as the diagram says – my mistake – I was drawing these late at night) and make a mark. Draw a horizontal guideline at this level.

17. Measure up from the bottom of the center back up toward the guideline the amount of the center back to shoulder measurement. Then draw in a shoulder line from the end of the neckline to this point.
18. From the center back, measure horizontally 1/2 of the back bust plus 1/4 inch (for ease) and draw a vertical guideline. At the bottom of the center back line, draw a horizontal line at 90 degrees that is 1/4 of the waist measurement plus 1 inch (for the dart) and 1/4 for ease. (So 1/4 waist plus 1 1/4 inches).
19. Mark a line that is the length of the armpit to waist measurement that touches the waistline and the guideline from step 18. Depending on your back bust measurement, this line may be very angled, almost vertical, or even angled out.
20. Draw in the back armscye. This curve will likely be shallower than the front bodice, unless you have a very broad upper back and narrow back waist.
21. Measure the shoulder seam. Make a mark at the halfway point, then draw a vertical guideline straight down from that point to touch the waistline. Draw in a 1 inch dart that starts at this line and goes up to touch the guideline that is even with the armscye.
22. Compare the front bodice and back bodice at the shoulder. You may find that the back shoulder is longer than the front. If so, you’ll need to add a small dart to the back shoulder. Measure the difference between the two.
23. If the shoulder dart is needed, make a 3 inch long dart at the center point of the shoulder that is the width of the difference.
24. You’re done with the back bodice!
To sew up a bodice to test, add seam allowances to the side seams, shoulder seams, and center back. Baste in a zipper and sew the darts, shoulder and side seams.
Now in a real bodice, you’d move the points of the darts down depending on the cup size, but for fitting purposes and comparing to ready made patterns to get an idea of needed adjustments, we’re not going to get into that discussion. So this bodice should fit with the points of the darts ending on the bust points.
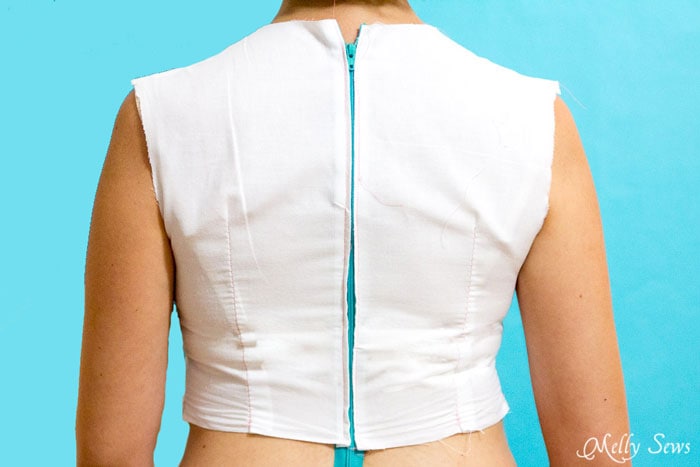
You can see the bodice on my dress form below. Now, while our measurements are close, they are not exactly the same. You can see this because my bodice is above the waist of the dress form and stretched across the back – I have a narrower back and higher waistline that the dress form. Your bodice will likely not fit a form either- most people’s don’t!
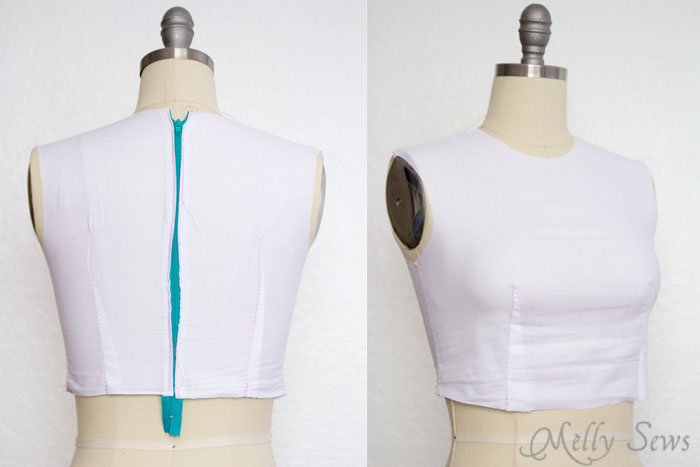
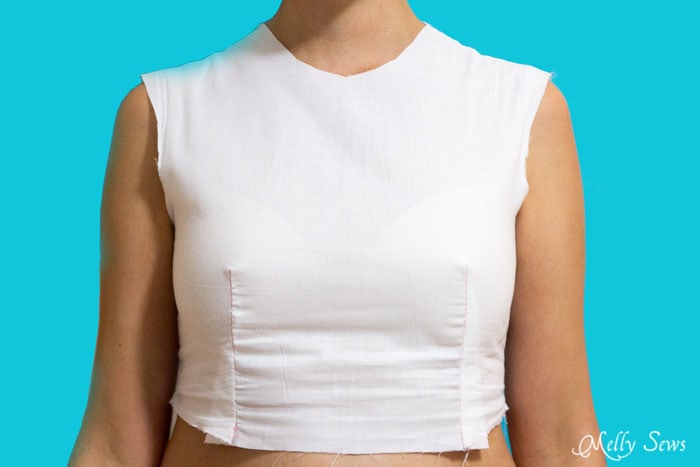
Here’s the bodice on me. You can see it ends at my waist, the edges reach the points of my shoulders, and the dart points end on my bust at the points. The armscyes unfortunately got a little stretched out at the edges and the waist wrinkled from forcing this onto my dress form first, but they’re close.
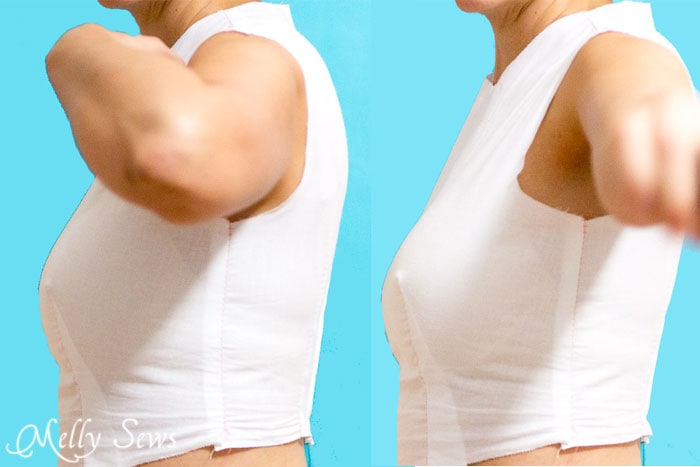
This is the side view – the important thing here is the make sure the shoulder seam is centered and that the side seam hangs straight down your side. If it pulls to the front or back, you need to adjust by subtracting from one side seam and adding that same amount to the other. You also want to check that your front waist is even with the back – which is easier to do when you aren’t trying to move your arm around for pictures and causing the bodice to tilt because of that.
And in the back (wrinkled both from the dress form and moving to take pictures of myself) you can see that I have appropriate room at the shoulders tapering down to my waist thanks to the back darts.
Phew – that was a long post, but I hope you can now draft a bodice that fits your own special shape. In the next post we’ll cover how to take that draft and compare to patterns to figure out where to start making fit adjustments.
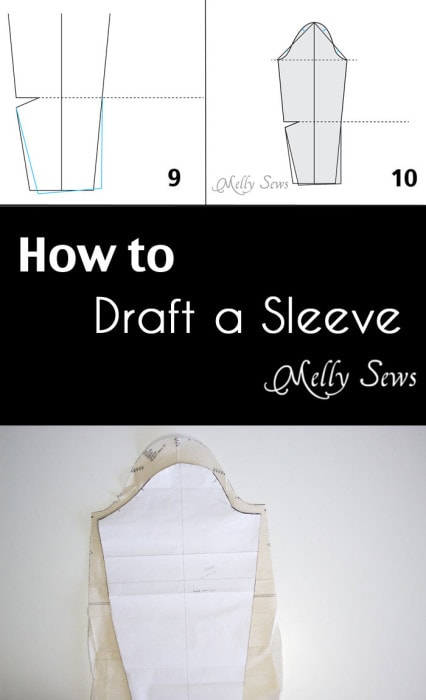
To see how to make a sleeve, check out this post.
Lisa
A fascinating post! Thank you so much for all the information!
Barbara
What about wearing ease and fashion ease? I know there are some basic numbers for adding it, but I don’t recall them.
Melissa Mora
I’ve added 1 inch wearing ease in the drafting instructions. This tutorial is not intended to add fashion ease or style lines – the purpose is to determine fit, so the minimum amount of ease was added.
Dara
Thank You!!
Kristie
Wow. I bet this took some time to put together. Thanks for sharing such great information. I have a feeling that this month will be so informative for me. Lots of stuff to pin and refer back to!
HW
I am really looking forward to the posts this month. I can’t wait to try this! I have forward tilting shoulders; will I need to modify these directions to get a good fit?
Melissa Mora
Nope. The center waist to shoulder measurements will account for that because your measurement will be shorter in the front than in the back.
Maria
Very helpful for a beginner like me
Anne
Thanks for sharing this! I’ve got a Craft Gossip post scheduled for later this morning that links to your tutorial:
http://sewing.craftgossip.com/?p=84369
–Anne
M
Thank you! Such valuable information and you present it so well!!
cat
I am soooo excited about this. Do we tape copy paper together to make the pattern? I do not have any large butcher paper or tissue-type paper.. OR do I draw right on the muslin. By the way is it OK to use cotton fabric for linings rather than muslin? Thanks!
Dianne
i CAN’T BELIEVE i’M THIS CLOSE TO BEING ABLE TO ADJUST ALL THOSE DRESS PATTERNS THAT I BOUGHT THAT DON’T FIT ME ONLY IN THE BUST!!!!!!! I HOPE I CAN UNDERSTAND THE INSTRUCTIONS AND DON’T FEEL OVERWHELMED OR DISCOURAGED. i;M TELLING MYSELF TO READ SLOWLY AND TAKE IT A STEPAT A TIME BUT I AM SO EXCITED!!!! THANK YOU!!!!!!!!!!!!!!
Fran McGee
Thank you so much for taking the time to write and share this tutorial with us. FINALLY, someone has written a tutorial on drafting and fitting a bodice, that I can understand!! I am sure there are other good ones out there, but YOU got through the BIG capital F Fear factor! I think I can do this. With a sloping shoulders, and a DD, I really do need to learn how to do this, if I ever want to be able to make truly well fitting clothing, instead of always just going for sewing stuff that I can hide in.
cat
Hello again and sorry to bother you. I do not see where it tells you how to lay out the pattern pieces on your fabric. I assume the front piece is on the fold and back piece is not. But can you rell me which way to fold? I think it is selvage to selvage??
Thank you!
Cat
Allieboo
Wow, just wow! I’m attempting to make a circle skirt dress for the first time ever, but hadn’t been able to find anyone who explained the bodice like that – thank you so much!
Elaine Perth Australia
Thank you so much, this is so helpful as I have thought of buying a dress form for a while and I quite agree I dont think it will make me a better sewing. These drafting instructions will – thanks again and I promise to be patient with this and pratice. PS Mel, will you be doing drafting for other items? i.e. dress, skirt or pants?
Val
Hi! I’ve been trying to draft the bodice, now on my third try and finally getting what was wrong, I think this one will be just right, but I have a question!
On step 14, the picture- I see you’ve shaded the finished front bodice, but I’m not sure why the right dart line was moved slightly to the right when earlier you said to make sure the dart line is the same length as the vertical line next to it. This is what I’ve drafted and made, but I’m still confused as that line seems to have appeared out of nowhere and the angle makes no sense. So what’s up with that, am I doing something wrong or is it just a mistake in the image?
Regardless, thank you very much for this comprehensive tutorial, I’ve learned a lot about patterns just by paying attention to these numbers!
Melissa Mora
Yes – that looks like a stray line! Not sure what happened except I was illustrating late at night. The gray part should be all the way to that vertical line.
christy
Thanks a million for this easy to follow tutorials.
April
Finally! A basic block tutorial that doesn’t use magic numbers for the dart size. Most sites just tell you what the “standard” dart width is, and expect you to be happy with that – even though the whole point is that you’re making a customized garment. Thanks for giving a real solution!
Tyshieha S Keitt
Thank you for making this post. I am glad that you did this. for people like me who are learning how to create a pattern from scratch. I am still learning so I will be following you everywhere to find out more information that you have to share.
Again thanks for this information.
Dust Bunny
Going to try this soon. I’m not sure how it will go as my bust point doesn’t line up on the shoulder-CF diagonal (long torso, low bust), but maybe it will at least be closer than constant fiddling with pre-drafted patterns.
Pam
Great tutorial. I’ve tried lots of other ways, and I need to tweak a bit , but this is a much better fit on the shoulders. Thanks so much!
Dicie
Very good information. This puts me another step forward. Thanks.
Tavia
This is fascinating! This project is teaching me so much about my body shape. I too suffer from not having patterns fit properly around the bust and I’m quite short waisted as well so everything doesn’t sit where it should but this draft takes all of that into account. I’m not sure why but i found that i needed to move the bust darts 3cm laterally and when i adjusted everything from that step onwards everything fits! Still have some issues with the neckline being vastly different from yours but that’s academic. So excited to start applying this to my large, previously spurned collection of patterns.
Robyn Vaughan
I’d just like to let you know that this is my most saved Pin out of all of my boards. I’m not a huge pinner but this is saved roughly once a week.
Marnie Johnk
Melanie, you are teaching me so much more about every aspect of sewing! My mom was a great teacher, but she is no longer with us, so I’m unable to ask her the questions I have now. Thank you, from the depths of my heart!
Anna
Thank you so much for taking the time to put this tutorial together! Having a perfectly fitted sloper has been a total game changer for me – you’ve saved me both time making muslins and money for sewing patterns now that I can just customise this to whatever style I want.
Cida Luna
Hi, My name is Cida. I’m from Brazil. I love this website and your free patterns. Thank you!
Marta Fernandes
This has been the most simple and useful way I have ever seen to learn how to draft a simple bodice! Thank you so much for doing this, you are amazing!
Katie
Thank you so much for this!! I was looking into dress forms and came across your post explaining why dress forms might not be the answer, and then came to this!! And it is so helpful!! Can’t wait to get started and have some clothes fitted exactly to me 🙂
Cassandra
I’m having a few issues with drawing this up for my measurements, for some reason my shoulder to center front waist measurement is an inch or so longer than that diagonal connecting line and my shoulders are obviously not slanted upwards, and these instructions put the apex of the bust an inch or more too close to center. I’ve double and triple checked all my measurements and retraced my steps through the post and the best reason I can think of is that my shoulder to waist measurement isn’t a straight line but the steps don’t seem to show how to draw it except as a straight line. My neckline also came out much lower than I would’ve expected for a sloper. However this has given me a good starting point and I think I can make adjustments to make it fit me much better by working off of your instructions. Personally I love puzzles and geometry and I’m having fun working it out loosely following this guide and my own logic