
A guide to pants fitting problems – sew pants that fit you

If you’re like me, nothing can kill your sewjo (sewing mojo) faster than a garment that doesn’t fit. And pants are often the worst culprit, as far as I’m concerned (like that time I bought alllllll the jeans and pretty much none of them fit). So today we’re tackling pants fitting!
This post was born from the video below (and on YouTube here) which was originally a Facebook live video. Because of that, it’s a little long and more conversational than my videos tend to be, and I debated about whether to share it. But in the end, there’s a lot of good information in the video, so I do think it might be worth a watch. And then read this post for more examples and clarification.
Note: this post has spawned many, many emails and comments asking me for personal fitting help. While I would love to personally help everyone that asks, there is not enough time in my day to do so. If you comment or email with a personal fitting question a response will not follow. My best suggestion for further help is to get some cheap fabric and experiment with changes, making sure to CHANGE ONLY ONE THING AT A TIME to see how it affects the fit.
Because bodies and pants patterns are all different, I ALWAYS recommend making a muslin or toile of your pants first. The ones in the video and the ones below are made of actual muslin fabric, but yours doesn’t have to be. It just needs to be any inexpensive fabric with similar properties to the fabric you intend to use for your final pants. In other words, don’t use a stretch fabric if your final pants will be non-stretch, and vice versa.
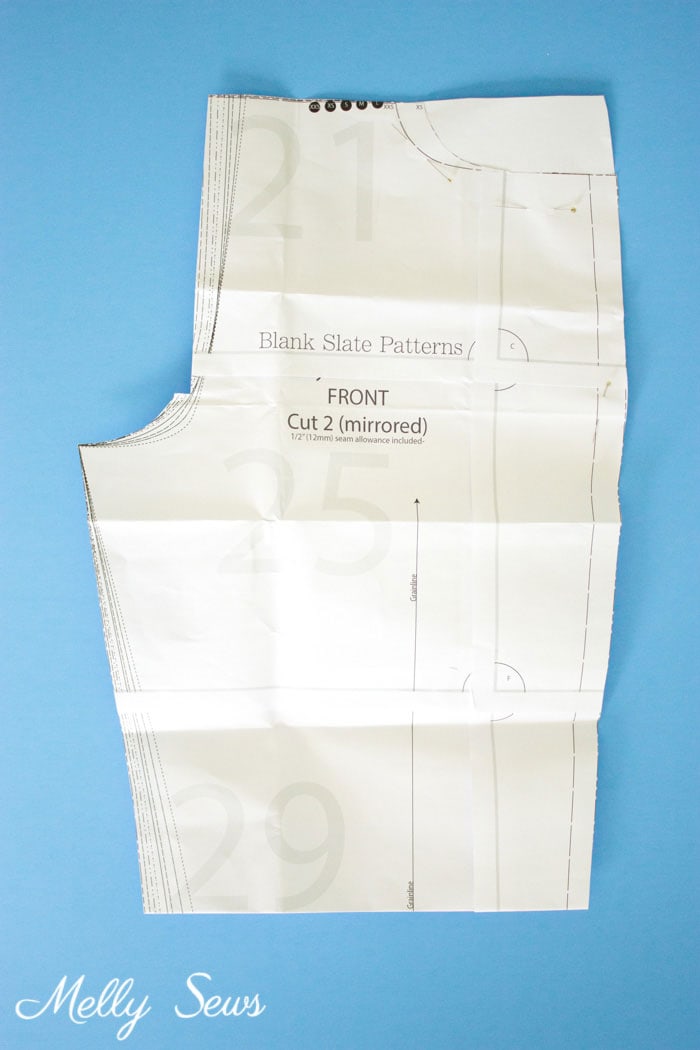
When I make a muslin, I usually only cut the front and back pieces and make them about knee length. This saves fabric. Below, I’m using my Forsythe Trousers pattern. On the front, I pinned the pocket in place on the side seam, and folded the fly under, so all I had to worry about was the front and back.
To make the muslins for this video and for the post, I started with a pair of pants that fit me well and then altered them to make them not fit me. Hopefully the video above and images below help you figure out your own pants fitting issues so that you can successfully resolve them.
And before we get into pants fitting problems, it’s good to note how pants should fit. They should be flat in front when standing, and fall from the buttocks down in back, with perhaps some wrinkles in the back (depending on how tight the thighs are).
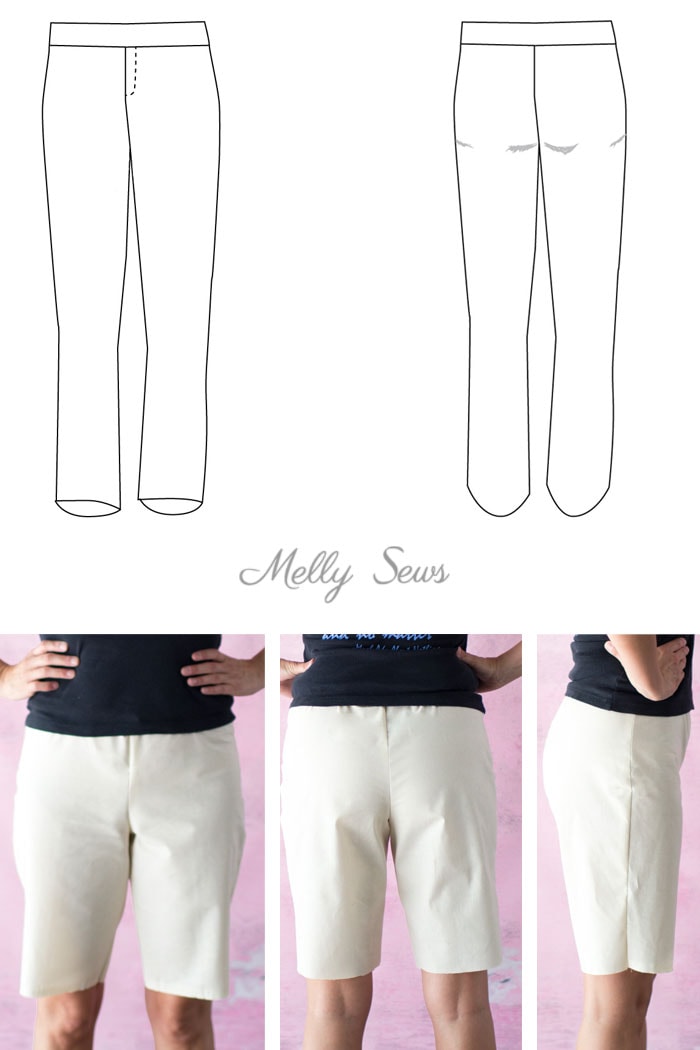
As you can see in the well fitting pair above, not every wrinkle will be eliminated and you should not try to eliminate every single one! You need some room in the thighs or you won’t be able to walk or sit, and that room can translate into wrinkles. In addition, you may have wrinkles around the waistline if you are fitting a pair of elastic waist pants (as these are). When making a muslin you can tie elastic around your waist to hold the pants up – this makes the muslin a very quick sew.
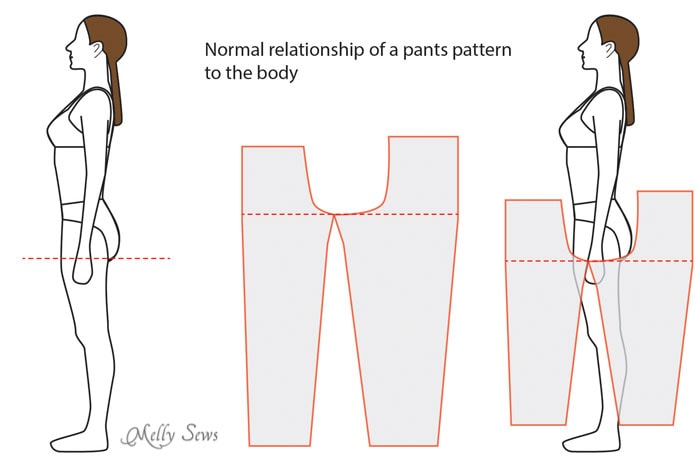
A well fitting pair of pants has both enough room to go around the hips and enough room to go between the legs. If either of these proportions goes off, fit issues happen. For the purposes of this post we’re going to assume you’ve got pants that you can pull up over your hips – if not, size up. But just because you can pull the pants on, doesn’t mean they fit properly.
So, let’s talk about the front fitting problems you might encounter – starting with smile lines around your crotch in the front.
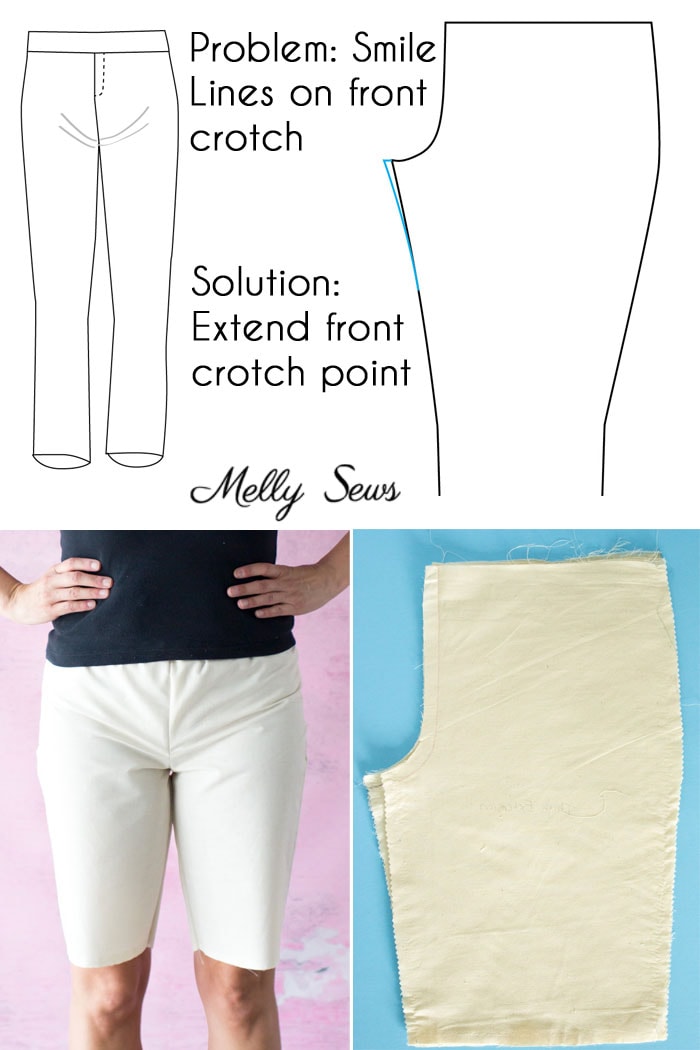
Smile lines are caused by not having enough depth in the crotch/room in the front thigh. In the picture of my muslin above, you can see the wrong muslin on top and the correctly fitting one on bottom – see how a change of 1/2 inch gives me a diaper crotch?
Another common problem is not having enough curve to the crotch, as shown below.
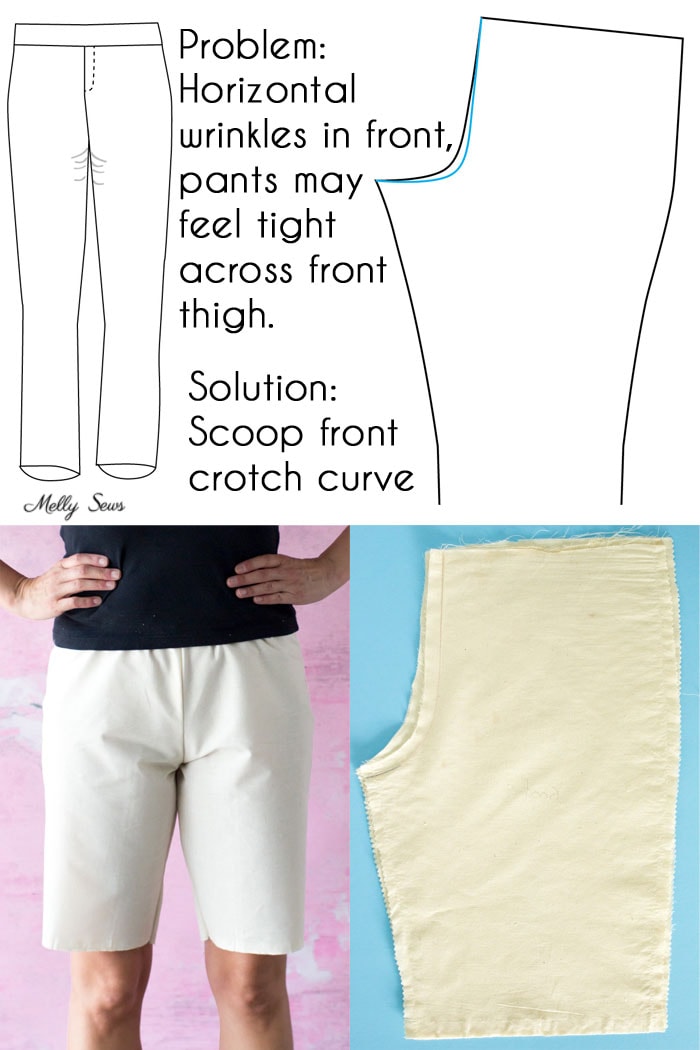
This problem can look like a camel toe, or manifests in horizontal wrinkles at the upper thigh. Now, sometimes very fitted pants can have this look (think jeans) intentionally, but in a pair of pants with a looser thigh such as these the crotch needs more of a curve to have a flatter, more flattering front fit. In the muslin image above you can see the too shallow curved pair on the bottom, and the correctly curved pair on top.
It can get confusing to determine whether you need to scoop the curve or extend the crotch point, so I have a comparison below.
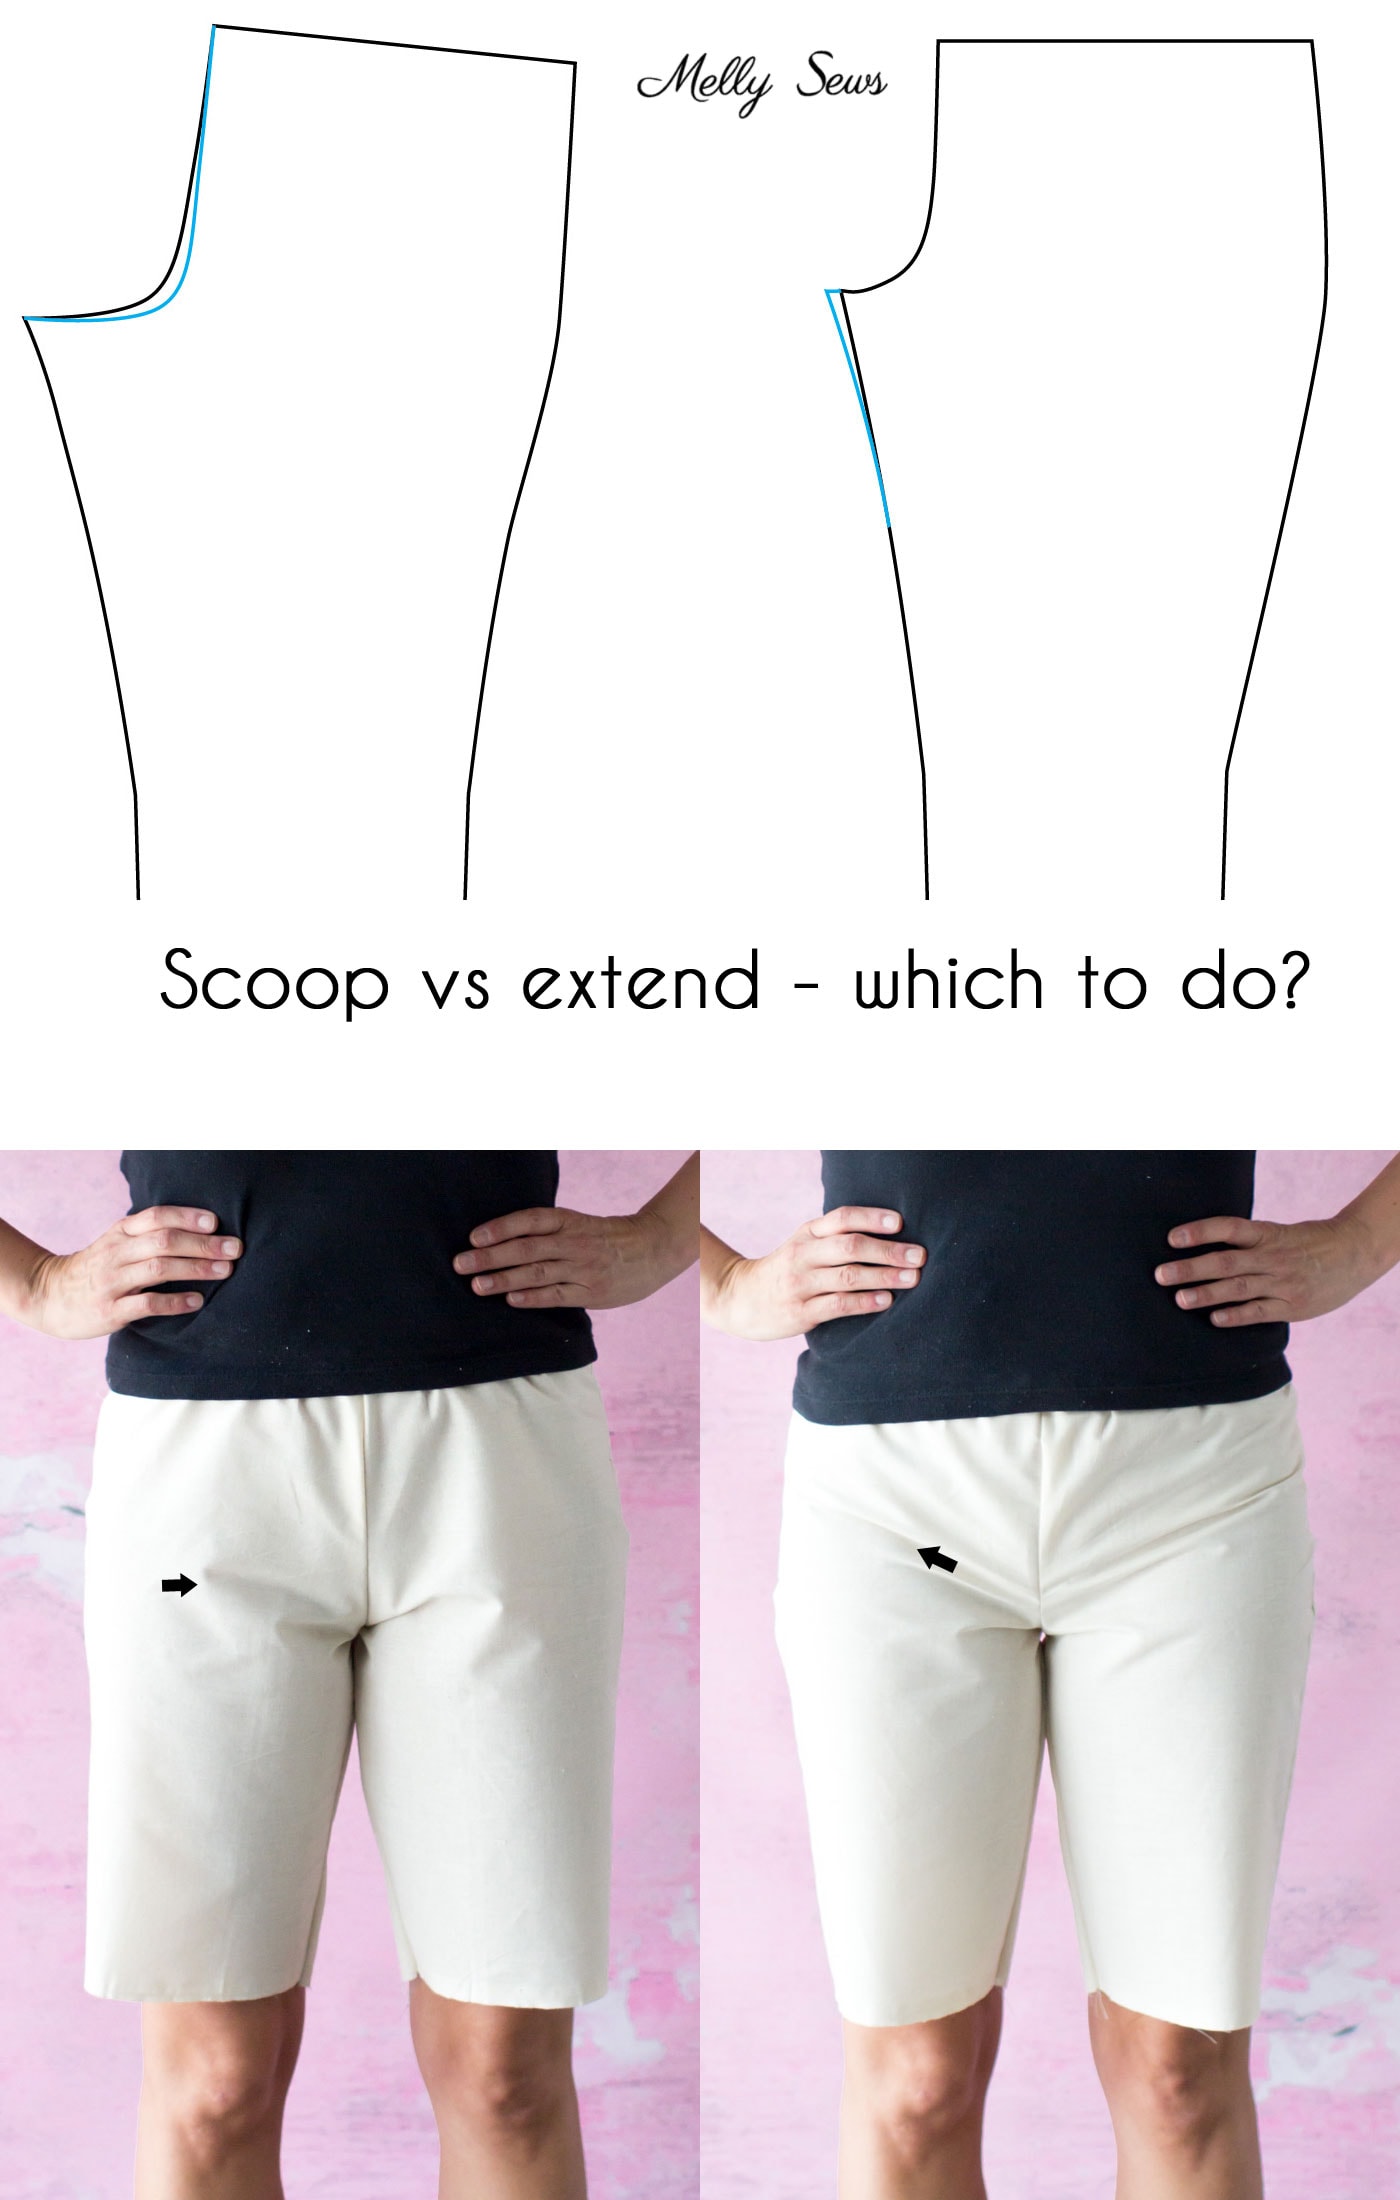
As you can see above, the wrinkles are different for the different fit issues. The pair that needs scooping has horizontal wrinkles, the pair that needs the crotch point moved out has wrinkles radiating from the inner thigh toward the upper outer hip.
These problems with the crotch curve are even more common to encounter in the back of pants, because booties vary so much in size and shape. So if you’ve got a wedgie, here’s what to do.
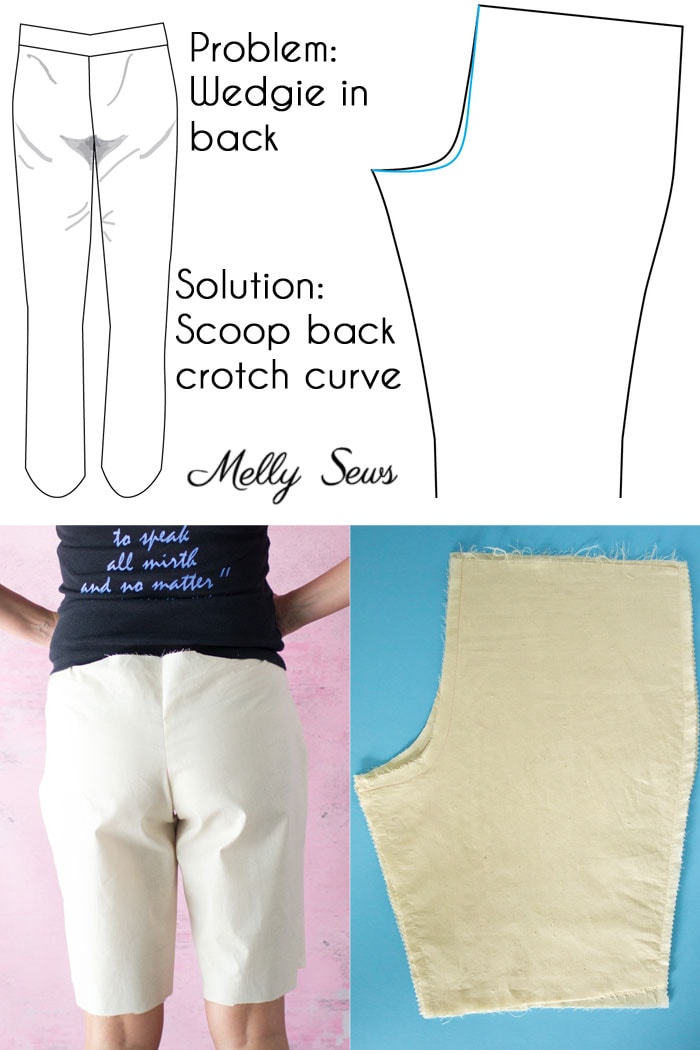
See how I can’t even get the back waist of the muslin above to tuck into the elastic I’m using to hold the pants up? That’s because the back rise isn’t long enough for me, which can be fixed by a deeper crotch scoop. The muslin image above shows the too shallow curved pair on the bottom, and the correctly curved pair on top.
On the other hand, you can also have a wedgie from needing to extend the crotch point, and the two look different.
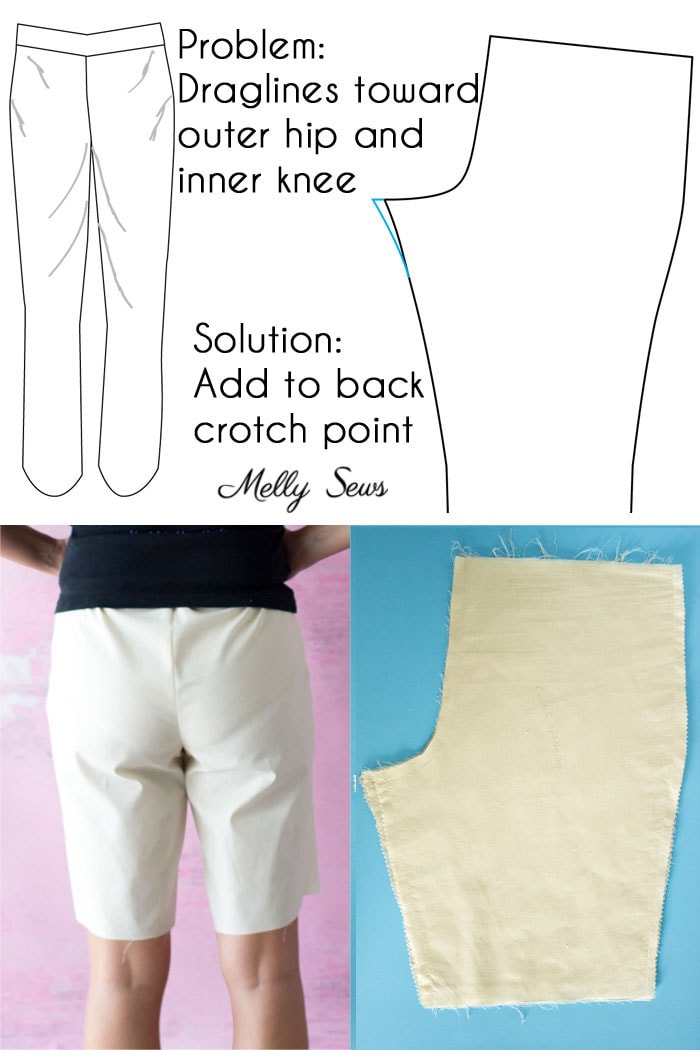
When the crotch point needs to be extended, the pants will be tight around the fullest part of the buttocks and possible seem loose below. In the picture of my muslin above, you can see the wrong muslin on top and the correctly fitting one on bottom. Note that this kind of wedgie is the type often seem in mom jeans – and it can sometimes be intentional.
How do you know whether to scoop the crotch or extend the crotch point?
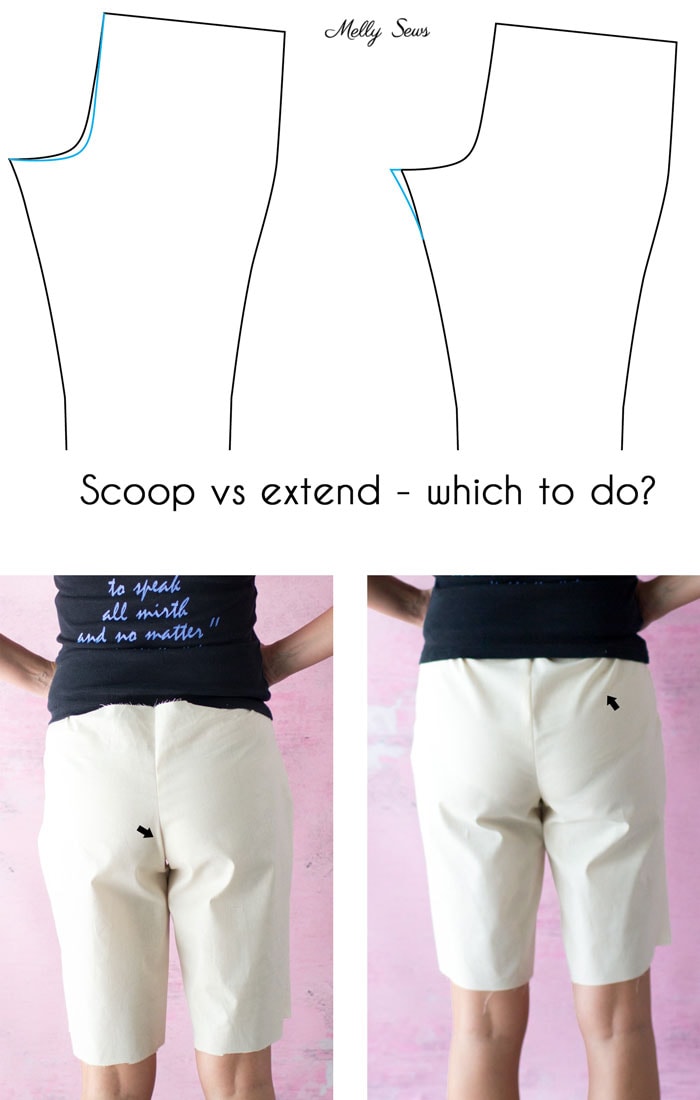
As you can see above, on the left, there is a wrinkle of fabric at the fullest part of my buttocks. That is the big clue that a scoop is needed here – there is extra fabric being pulled into the wedgie. Compare that to the picture at right, where the excess fabric is above and below the fullest part of my buttocks.
This post isn’t an exhaustive list of all the pants fit problems you can have, but it does cover the most common problems I have seen in pattern testing. I do plan to add to it in the future, so pin or bookmark this post for reference.
Liz
Melly, this is the best explanation of pants fitting I have seen. The photos and drawings for all the different issues are a wonderful help and I know they will help me. Thank you for the time you put into a great tutorial.
Barb
This is the easiest, best, fitting tutorial I have seen. Thank you!
Elaine Kidwill
Very good explanation of adjusting pants front and bottoms. BUT…… some of us have pregnant looking tummies and flat rears. What to do, what to do, and Melissa (one of my daughter’s is named Melissa) you are the correct person to advise us, please. I have such a pretty stash of cotton but do not know how to adjust to make decent long and short pants. I know to start with muslin but do you just go out, up, oh help, please??
Thanks Elaine
Melissa Mora
If your curves are in the front instead of the back, the front of your pattern would look more similar to the back pattern piece on mine. And a smaller rear would need less curve, making the pattern for your pants look more similar to the front of mine. You might even make a muslin from an existing pattern and just try it on backwards (like I did in the video) to see how close that gets to the fit you need. Pants patterns should curve where the individual’s body needs them to curve.
Susan Ramsay
Your advice about front to back and vice versa is just what “Stretch and Sew” told us at a class. No one but you knows how you got that perfect fit, and don’t tell. If someone compliments you, just say, “Thank you” never point out your mistakes. You can use two fronts or two backs. Being thin is a problem for some people. (Not I) But as a teenager, even when I weighed 95 pounds, I always had a little tummy. Now I have a BIG tummy!
Glenda
What a fantastic article , the time and effort you gave are priceless , thank you so very much ,,,!
Sharron
This post is BRILLIANT!
Anna Forsaeus
Great post, will definitely keep coming back to it! Thank you so much!
Toni Leggate
Thank you – so timely as I am trying to make my first pair for over 40 years! It used to be so easy too; but not now! This visual guide will be such a great help when I ask my OH what the muslin looks like from behind and directly in front (without a tummy in the way of the view!)
Looking forward to future ‘pants fitting’ help….
Anne
Such a clear explanation. I really appreciate all the time and effort you have put in to this. Thank you !
cd
What do you do when the pants feel like a “mono-butt”?
Nancy Tebbe
It sounds like you may need to add , say a half inch or 1.5 cm, to the side seams from just below the high hip to just underneath the low hip. Of course, that depends on how much your cheeks are being clenched ; ) If you normally have a flatter back side you may want to try the front of the pants pattern also. That was a totally brilliant observation!
Melissa Mora
It would depend on why the pants are doing that. If you want separation between cheeks, you’d want a shorter back rise and probably also some extra room at the side seams.
Jane
Thank you very much for this article. The pictures you use make it very clear and understandable.
Jen
Thank you so much for such a clear explanation. I have just purchased your Oceanside Pants pattern and will definitely re-read this article when I make the muslin.
Jeni Green
Bless Your Bones! This is the Best & Easiest to follow troubleshoot for pants problems ever!
karen s
Melissa, I’ve been sewing for more than 60 (what??) years, and pants are the one item I’ve avoided like the plague. I’ve NEVER seen a better explanation of how to diagnose and correct the challenges of ill fitting pants. They say that learning new things keeps your brain young. Thanks so much for a good 20 years of time travel 🙂 Can’t wait to get some muslin out–and use the scraps for paper towels, too!
Joanne
I have a medical problem with the right side of my stomach, your explanation is the best I’ve seen. Now I can be comfortable in pants. Thanks a million.
Anna
Thank you, this is super helpful! My first muslin had sooo many wrinkles and I really had no idea what to do about them. Thanks to your clear explanation and side-by-side comparison photos, the second muslin is already much better.
Lyndlenz
Like everyone else, this is the best explanation I’ve seen. A picture beats 1000 idealised diagrams. I have resisted adding “so much” to the crotch point but now I can see that is still my issue and the seemingly outrageous amount I measured, is probably what I need. This post has made all sorts of things click fir me. Thank you!
E Baker
Thanks for the best tutorial I’ve seen on this.
Those side by side comparison photos are great. I’m off now to try to fix a fitting issue I’ve had with a pair of trousers for months, because of a couple of things I’ve just seen.
Åsa Hemlin
A big thank you for the absolute best explanation on internet. Finally I can finish my pants. Now i understand the problem and have a solution to it.
Brenda
Thank you for this tutorial! I also have the big tummy and flat bottom issue so I normally have to alter pants to fit me right. I usually take in the sides at the lower hip area. Otherwise I sometimes have saddle bags with ready to wear pants. I guess that is why I find yoga pants and leggings to be so wonderful! I might brave up and try a pair of pants now!
Grethe
Thank you SO mutch 🥰 hugs from Norway ❤️
Gail L
This tutorial is brilliant, thank you! I’m finding it hard to find a decent explanation of my pants fitting problem which is often that there is a bunch of fabric at the front crotch, perhaps my crotch seam is too long but I am 5’11” so do usually need to lengthen.
Kate
Just drafting my own pattern for pants & came across your brilliant article. I already subscribe to your newsletter so chose your article for advice before others. All I can say is wow! And thank you.
Fran Topping
What a clear and concise guide! This was tremendously helpful. Thank you!
Donna
Love this article! When I was a teenager, my mother sewed all of my clothes. I always had a bigger rear end compared to the rest of my body. My mother solved the problem by using a size 10 pattern for the front of my pants and a size 12 for the back. It worked well and my pants always fit perfectly. I did not appreciate it until I was older and could not find store pants that fit like the ones she made me. I can’t wait to try your tutorial and make a pair of pants that fit.
Sandra
I can’t tell you how much I appreciate the time and effort you put into this tutorial. I think I finally understand now. Wow!
SANDRA CUNNINGHAM
Is there a pdf that I can save?
Lori
Thank you Melly! This is an awesome tutorial. I recently discovered your posts and YouTube videos. I’m so glad I have.
Sarah-Jane
Thank you so much. I have never had pants that fit correctly and have been working on a pattern for a while now. This has the best explanation of problems (with visuals) I have ever seen. Thank you so much for sharing!
mac
I thought I would never learn what was wrong and yet your clear, simple explanations and pictures rocked my world. I get it! I will now re-examine store bought pants with a new eye and make shorts that don’t look quite so … unprofessional. Thank you for this.
Francoise Lambert
Thank you for your article, I am French. I can’t have jeans that fit me well. I’m slim, tall, but my butt is flat and I’m still uncomfortable in my jeans. too much fabric under the buttocks, crotch not adapted. I’m trying to make a moussline to correct this,to correct this, but I have a lot of difficulty to be successful.
Thank you for your blog.
Maria
Melly this is so helpful! Thank you so much!
Liv
Thank-you!! Your photos clarified things so much!
Cherry Hunsaker-Clark
Excellent post! Thank you so much.
Abigail J Carless
Thank you so much. I struggle with trouser fitting and I even had a workshop and they didn’t fit! Blame the fabric she said. This is great, I’ve bookmarked it for future use.