
Follow this step by step guide to sewing a hem on a skirt or dress.
Hey y’all, today we’re going to talk about how to hem a skirt. Have you ever watched Project Runway and seen the judges criticize a crooked hemline? Hems are the quickest way to take your garment from handmade to homemade, and not in a good way. But you’re not doomed to an uneven hem, even if you’re a beginner sewist. In this tutorial I’m going to share why uneven hems happen and tips and tricks to avoid them.
Steps to Hem a Dress or Skirt
Time needed: 30 minutes
How to Sew a Hem on a Skirt or Dress
- Cut the hem evenly
Depending on your skirt silhouette and fabric used, you might need to use scissors to even out the bottom before hemming your skirt. Read below for more details and tips on how to do that.
- Fold up the raw edge
All hems start with turning the bottom edge to the wrong side, usually turning the fabric twice to enclose the raw edge. You can also pin, clip or press the hem to hold it in place until it’s stitched.
- Stitch the hem
You can use a straight stitch on your sewing machine, a blind hem stitch, or even hand sew the hem. The right choice depends on your fabric and pattern. Unless you want contrast stitching, be sure to use thread that matches your fabric in both the needle and the bobbin.
- Press the hem
Even if you pressed the hem after you folded it to the inside, another press of the folded edge after stitching will help it look professional.
What causes an uneven hem?
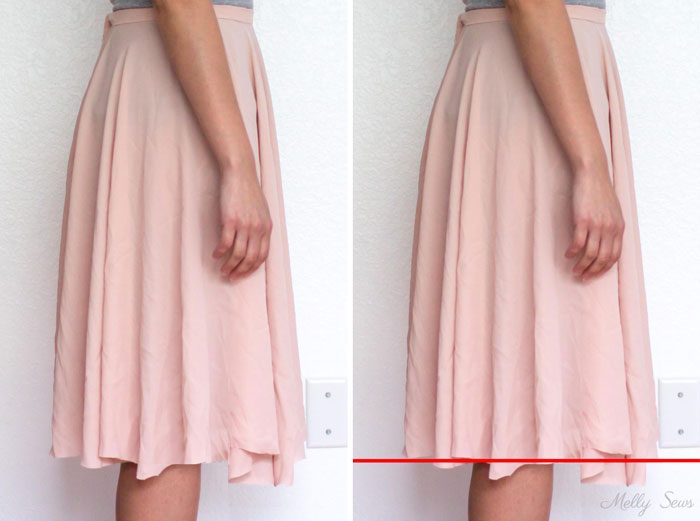
With only 4 steps in the process to sew skirt hems, the concept is pretty straightforward. An even hem starts with precise cutting and sewing, and I’m going to assume you did those steps. So how come even when you’re super careful, you can end up with a bottom edge that looks like the one below?
Well, the skirt hanging above is a circle skirt. And the illustration below shows what happens with the grain in a circle skirt. The black arrows at 12 and 6 o’clock show the straight grain, which runs parallel to the selvedges. The blue arrows at 9 and 3 o’clock show the cross grain, perpendicular to the selvages. And the red arrows show the bias grain, which is at a 45 degree angle from both the straight and cross grains. Those areas are the ones you can see hanging lower in the image above.
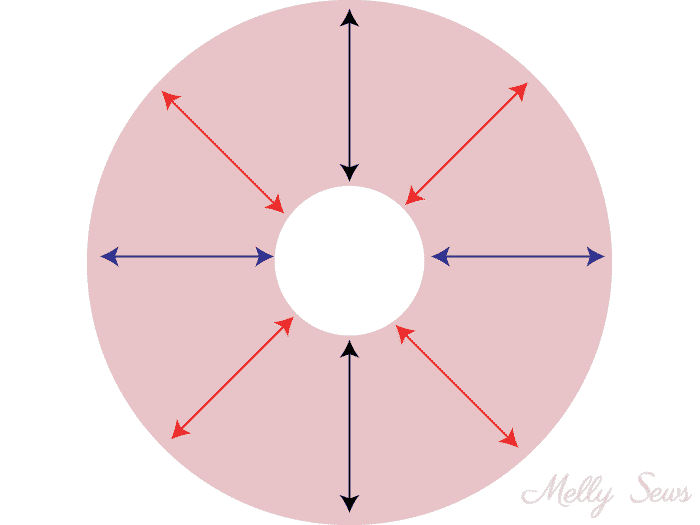
Why is grainline important? Well, the grainlines drape and stretch at different rates. Think about how bias tape can stretch slightly, even though it’s typically made of woven fabric. Add gravity and you can see how the hem that was even when laying flat becomes uneven when hanging. Which is also why it’s a good idea to let a skirt with any parts on the bias grain hang overnight before hemming.
This happens to a greater or lesser extent based on the drape of the fabric, the weight, the weave, and the silhouette of the skirt. All other things being equal, a line skirts will have less of an issue, circle skirts will have a bigger issue. And pencil skirts generally don’t have this issue at all.
So how do you deal with the unevenness? Well, first, if you are using a fabric with a lot of drape to make a very full skirt, allow extra fabric at the hem. You can always cut it shorter, but you can’t add fabric at the hem easily.
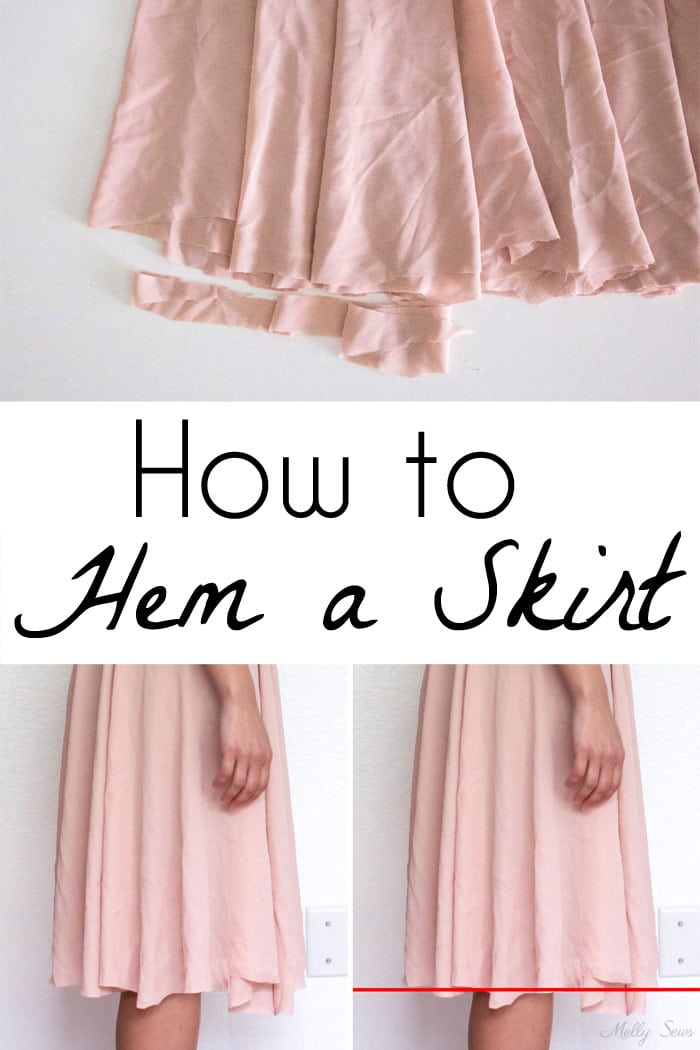
Next, I lay the skirt flat and do a quick hack of the parts that are very obviously longer, as shown below. You can use a measuring tape or a ruler and measure from the waistline to help you in this step.
At this point, it’s important to try on the skirt. This goes for any shape skirt – try it on before hemming to make sure the front and back are even. Make sure the skirt is sitting evenly all around the waist, then check the bottom. Skirts that are cut straight can might hang higher in the back because of a full rear end. They might hang higher in the front due to a full stomach. Side seams might be higher if you have a pronounced curve between your waist and hips. Everyone’s lower body shape is unique, so it’s important to actually have the skirt on if you want a level hem. So try your skirt on, let it flow over your lower half, and then mark the hem.
Marking the Hem
This is one of those times that it helps to have another person or even a dress form so that you can mark the hem. You can try sewing pins to pin the hem on yourself, but that can get tricky. Another person who can use a hem gauge is better. But when you’re working alone without a form, here’s another trick. It works better with a washable marker than with a chalk pen because less pressure is needed to get a mark.
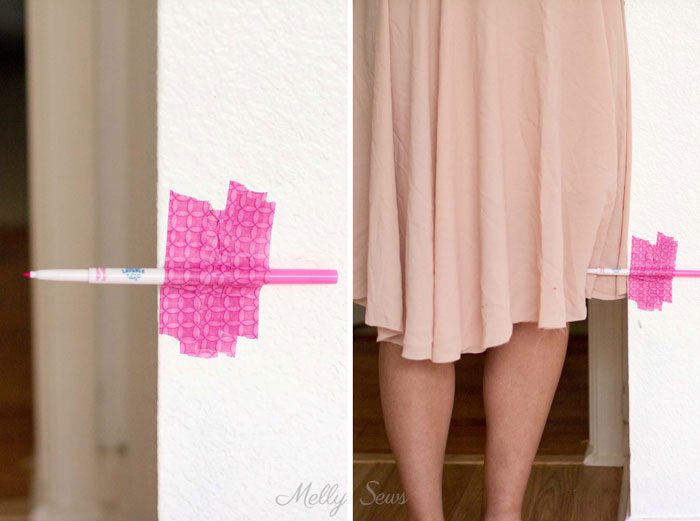
Using the trick above will mark the hem at the same level from your waistband all the way around. It accounts for your body curves while you’re doing in, since it is a measurement from floor level while wearing the skirt and not a measurement from the waistband while the skirt is laying flat.
Before You Cut Your Hem
Once you have your new hemline all marked out, then you can lay your garment flat and evenly cut the hem. When the edge of the fabric is evenly cut, then it’s easier to hem up. Use sharp fabric scissors or a rotary cutter to make a clean edge.
If your skirt has more than one layer, make sure to trim the excess fabric from each layer. For example, if your skirt has a lining you would need to trim both the outer skirt and the lining. Also keep your desired final hem width in mind before cutting. If you want a wide hem with a double fold, you’ll need more hem allowance than if you just want a narrow width rolled hem.
Tips for Stitching the Hem
This post has already gotten quite long on how to get your hemline level. So for specific hem stitching techniques, check out this post. That post has explanations and examples of double folded hems, blind hem stitches, rolled hems, twin needle hems, decorative hems, and bias tape hem techniques. It also talks about the pros and cons of each type of hem and when you would use it.

Alice
Did you line this skirt? Love the marker taped to the wall. Very clever!
Angela cremona
What a great idea 👍
Shannyn
I have no words….BRILLIANT! STUPENDOUS!!! GENIUS!!!!!
Who’da thunk it…. TAPE a frickin MARKER to the WALL to self hem!!!!!
Ahh. I feel like I’ve come across the most amazing discovery since sliced bread.
Anne
Your marker trick is so smart! I’m going to file that away for the next time I have to hem a skirt. I’ve got a Craft Gossip post scheduled for tomorrow afternoon that features your tutorial: http://sewing.craftgossip.com/?p=92337 –Anne
Catherine
Thank you!! I thought it was too late since I’d already sewn all the other seams, and I’m working on some circle skirt-eque culottes that have SO MUCH fabric I can’t really lay it flat on the floor to cut. A good way to shorten when it turns out too long too!
Karen
Whaaaaat?? I’ve sewn for over 65 years and NEVER seen this marker on the wall trick. Makes me want to go right out and make a skirt so I can try it. Love ‘ya!!
Jacque
What a great idea! Thanks for sharing it.
Lani
I agree! My husband and I are both laughing. I too have been sewing for almost 60 yrs. I have to hem every skirt because I am only 5 feet tall. This is just the most clever idea I have seen in a long time thank you for sharing!!