
Easy to follow instructions for sewing a Christmas stocking with video and a free PDF sewing pattern
Hey y’all – today I’m sharing our new Christmas stockings. Every few years I get a craving for a change in our Christmas decor style, and this year I also needed to add a 5th stocking as we’ve added a 5th family member. Luckily it’s easy to sew Christmas stockings and I’ve got a tutorial including video to show you.
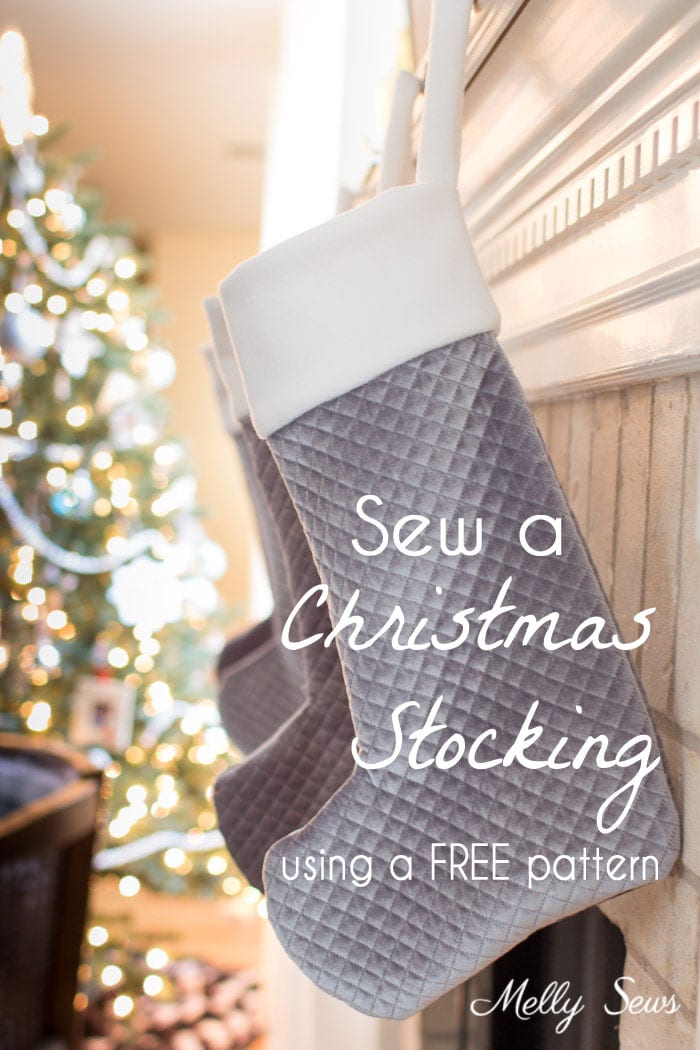
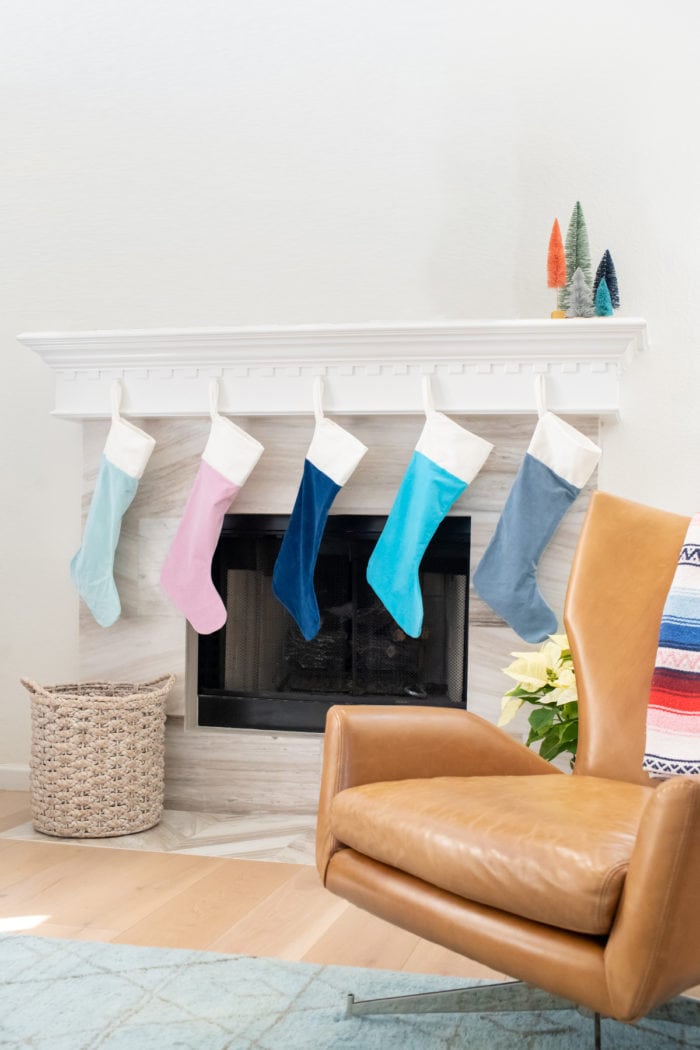
To sew the stockings shown below, which are our current ones, I started with natural ivory cotton velveteen from Dharma Trading Co, which is also where I got the dye I used to personalize the fabric. You can see more about how I dyed the fabric here. The colors I used were Seafoam, Bubble Gum Pink, Indigo, Turquoise and a combination of Stormageddon (a discontinued color) and Glacier Blue diluted with extra water for the gray one.
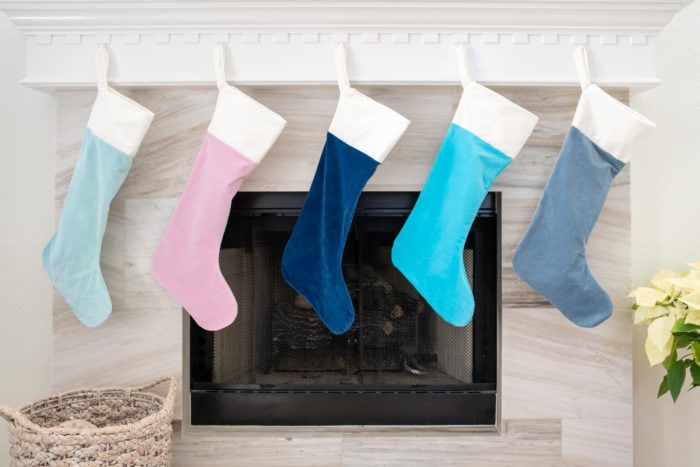
I let each family member choose a color from the bright and cheery non-traditional Christmas decor colors I used on the tree. I went with modern and colorful Christmas decor when we moved into this house three years ago. The gray stockings at the top of this post and below were made for the last Christmas at our old house and they transitioned well into the decor here since they were neutral. But I didn’t have fabric to sew another gray stocking, so we went with new ones for everyone.
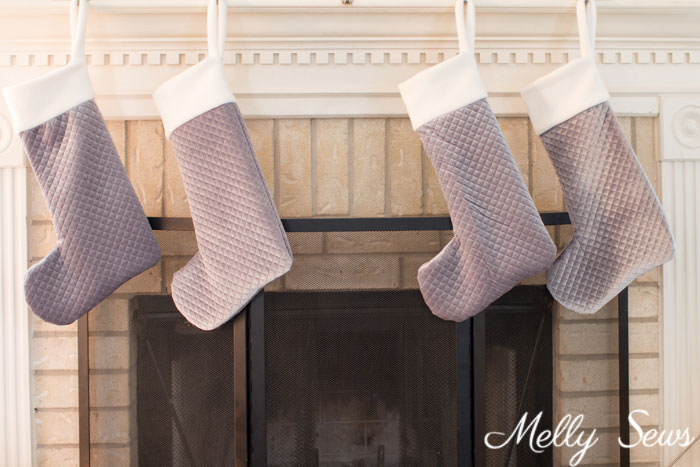
Three years ago I sewed up matching gray quilted velvet stockings. Those were more minimal than the hand knit stockings I switched from.

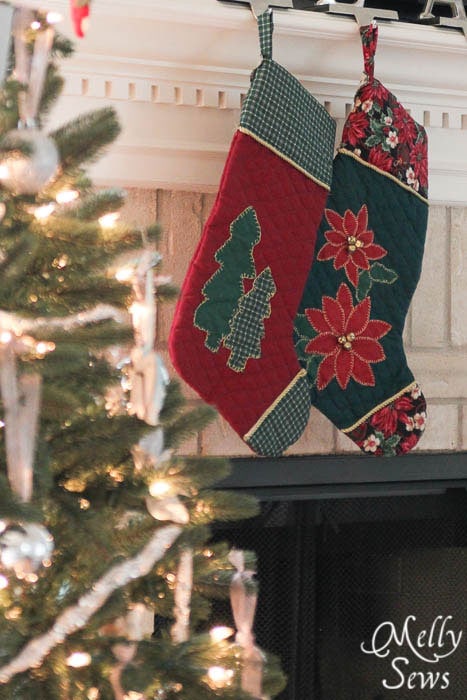
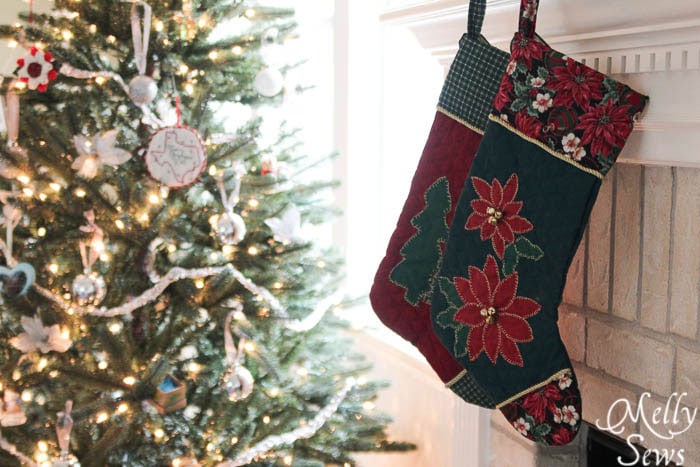
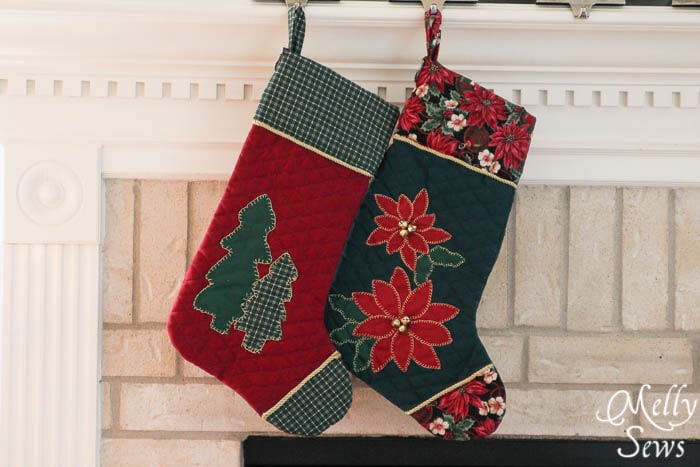
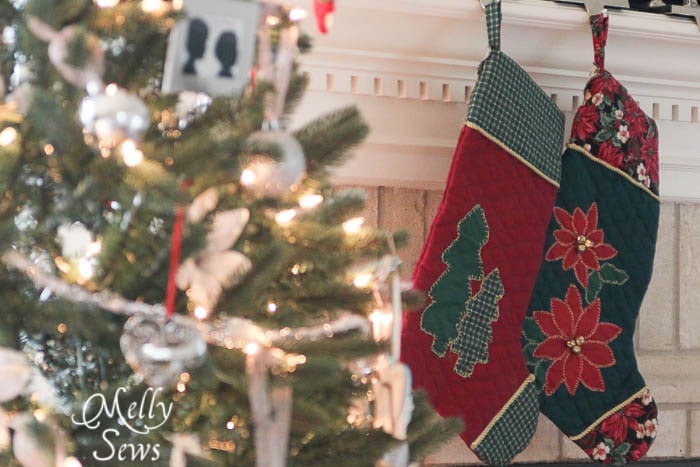
Before the hand knit stockings we had appliquéd stockings, which you can see below. The appliqué stockings now reside at my mom’s house. Between my parents, my brothers, their partners and all our children, we have 15 of these hanging at my parents’ house every Christmas, and I’ve sewn all of them.
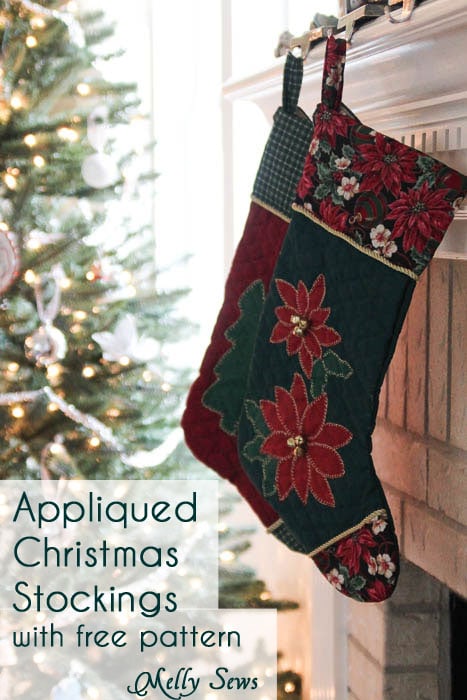
All of the stockings – our current velveteen ones, the previous gray quilted ones, and the older appliquéd ones were sewn from the same free pattern I have in my pattern gallery. Read on to find out how to get access to the pattern gallery.
Fabric Selection
The shift toward more modern Christmas decor coincided with a shift towards less busy design in our home overall, so I love how these turned out. That quilted velvet and creamy fleece fabric below were both exactly what I didn’t even know I wanted until I saw them in the fabric store.

I will say, that though the velvet (from Joann) is perfect for these stockings, it has a yucky polyester backing inside and zero drape, so I wouldn’t want to sew a garment out of it. On the other hand, I would totally sew clothing from the cotton velveteen, but as you can see below, I didn’t line or interface this fabric and the stockings are floppier.
And as shown by some of my more rustic stockings below (these actually go well with my mom’s Christmas decor, which is perfect because they both hang at her house) you can make these out of any kind of fabric you want. For the appliquéd stockings I used pre-quilted cotton for the body and quilting cotton for the cuffs, toes and appliqué pieces. You can even use faux fur for a luxurious look.
So choose your fabric accordingly. If you want your stockings to have a lot of body and weight, choose something like pre-quilted fabric. For floppier, more casual stockings that look more like actual socks, choose thinner fabric. If you want body but you’re in love with a drapey-er fabric, then you’ll need to add lining and/or interfacing to get that look.
Materials Needed to Sew Christmas Stockings
This post contains affiliate links. As an Amazon Associate I earn from qualifying purchases. All affiliate links are identified with (affiliate link) after the link or a commissions earned statement above the link(s).
To make your own stockings, you’ll need:
- Fabric – 1/2 yard for the main stocking and 1/4 yard of the contrast fabric. If you use quilting cotton or another lightweight fabric for the main stocking, I suggest adding heavyweight fusible interfacing or quilt batting and lining to the entire stocking if you don’t want it to flop like my velveteen ones do.
- The pattern
- For the appliquéd stockings only – Heat n’ Bond Lite (affiliate link)
- For the appliquéd stockings only, embroidery thread (affiliate link)
- For the poinsettia appliqués – jingle bells
- Optional for contrast toes – piping
How to Get the PDF Pattern
To get this pattern, you must either be a free newsletter subscriber or have purchased a gallery access pass. Then click your preferred option from the buttons below. Existing newsletter subscribers should look at the bottom of the most recent Friday newsletter for the current free pattern gallery password. If you purchased the all access pass you’ll log in to your shop account to download the pattern. Note that the free version of the pattern does not have printable instructions so you’ll need to refer to this post for instructions.
 |  |  |
Please note that all my free patterns are licensed for personal use only (no selling items made from this unless you purchase it) and by downloading you are agreeing to this license.
How to Sew a Christmas Stocking – Video Tutorial
To sew this up, watch the video below. You can also watch on YouTube here if you prefer. Note that the pattern includes 1/2 inch seam allowances.
Instructions to Sew Christmas Stockings
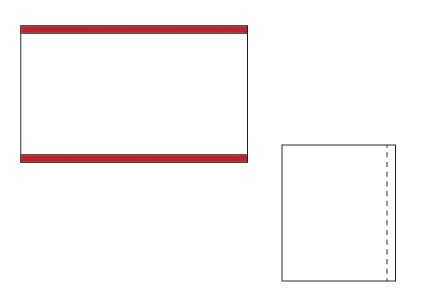
Start by cutting out your stocking pieces. You’ll need two mirrored body pieces, a cuff and a loop. The cuff and the loop are rectangles and dimensions are written on the pattern. If you are sewing a fuzzy fabric, you’ll want to consider the nap and maybe cut the fabric in a single layer instead of folding it. For more about fabric nap and fuzzy fabrics, see this post.
Note that for these stockings and the written instructions I sewed the cuffs in a different way that I do in the video. I think the video method is better, but both work.
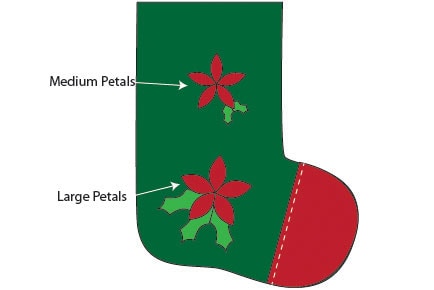
For the poinsettia stocking, cut 10 large petals, 5 medium petals, 5 small petals, 3 large leaves and 2 small leaves. For the tree stocking cut one of each tree. Cut one of each applique item from Heat ‘n Bond light as well.
Fold the straight raw edge of the toe 1/2″ toward the wrong side and press. Position toe on stocking and topstitch in place along folded edge. If desired, place piping under the edge. (See this tutorial for more about piping) You may baste around curved edge if desired.

Iron the Heat ‘n Bond to the back of each applique following instructions on the package. Iron appliques onto stocking, starting with the bottom layer. For the tree stocking this is easy; just make sure your trees don’t get too close to the seam allowances.
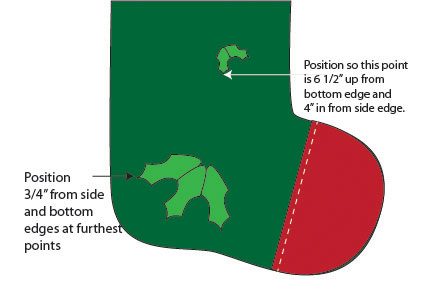
For the poinsettia stocking this is a little harder, so follow this placement guide.

Outline appliqué pieces on each layer with a blanket stitch in contrasting thread before moving on to the next layer.

Once the appliqueing is done, you’re ready to sew the stocking.
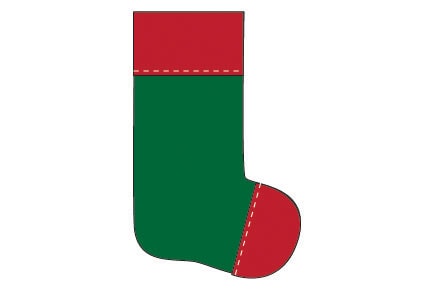
Start by placing the two main stockings right sides together. Stitch around edges, leaving top open. Turn stocking right side out.

Take the cuff and press the two long edges in 1/2″ to the right side. Unfold, then fold right sides together matching the short edges. Stitch across the short edge. Refold raw edges on pressing lines. Take the cuff tube and roll the top part over the bottom part, so that the folded edges are matched and you have a tube with right side of fabric showing on both the inside and outside of tube. (Think of this last part as doing the same thing you would do to cuff your socks – you’re folding the cuff in half but keeping it as a tube.)
With the stocking right side out, cover the top edge with your cuff tube. Stitch around the bottom of the cuff tube to secure the cuff to the stocking and enclose raw edges.
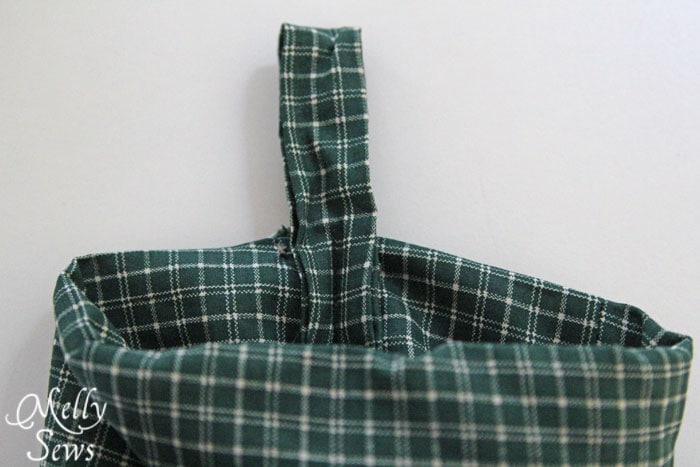
Fold the hanger piece in half, right sides together, matching long edges. Stitch, trim seam to 1/4″, then turn right side out.
Fold the hanger in half. Pin the hanger to the inside of the stocking at the side seam, and stitch vertically through the side seam to secure it in place.
And enjoy your new stocking!
Leave a Reply